Category Archives: @home {recipes to love}

recipe goodness :: baked eggs in spicy tomato sauce

Baked Eggs in Spicy Tomato SauceIf you know me well, you know how much I love to #putaneggonit. Pretty much any dish can be made better with a gooey yolk coating whatever was lucky enough to be blessed with it. So with a container of grandma’s leftover sauce in the freezer and a new carton of eggs in the fridge, I added one additional ingredient to make this one-pan dinner a keeper: spice. You could call this your lazy evening meal, but I bet it would impress any dinner guest too.

Baked Eggs in Spicy Tomato Sauce
Serves 2-3

32 oz Grandma DiLaura’s Tomato Sauce
2 fresh chorizo sausage links {optional — meat version}
1-2 teaspoons red chili flakes {optional — add instead of chorizo for vegetarian}
1 tablespoon olive oil {if using chili flakes}
1 large egg per person

  1. Preheat oven to 450 degrees
  2. If making a meat version: remove chorizo from casings and break up in little pieces. Heat pan to medium heat on stove and cook chorizo until no longer raw, 2-3 minutes. Drain excess oil from pan.
  3. If making vegetarian version: heat a tablespoon of olive oil in pan on medium heat and add chili flakes. Cook 1 minute to release the fragrance of the chili flakes.
  4. Add sauce to a small baking dish with enough volume to fit 40oz+ so sauce doesn’t overflow while cooking. Stir in chorizo {meat version} or chili flakes {vegetarian version} and put dish in preheated oven for 20 minutes.
  5. Once sauce starts to get a deep red with brown, bubbly edges, remove the pan from the oven. Crack eggs into small separate bowls for each one. Gently pour each egg on top of the sauce, spacing each one out. They’ll start to run and look like floating continents — that’s the beauty of it!
  6. Place pan back in the oven and cook for about 5 minutes or until the white is firm when touched with a utensil and no longer raw.
  7. Remove from the oven, allow to cool slightly and serve in a bowl with a spoon and crusty bread to sop up all the goodness. Or over rice!
A Rainy Sunday Meal

A Rainy Sunday Meal

#putaneggonit
Cumin & Dill Dijon Egg Salad with Radish Sprouts
Egg on Egg Salad {Introducing Bottarga}
Secret DiLaura Family Frittata with Sweet Italian Sausage
How To Cook The Perfect Sunny Side-Up Egg
How to Cook the Perfect 8.5 Minute Egg
How to Cook the Perfect Poached Egg {with Ramp Butter!}
Inside-Out Scotch Eggs w/ Ground Lamb, Harissa Yolk & Panko Gremolata
Julia Child’s Rolled French Omelet


Leave a comment

Filed under @home {recipes to love}

recipe goodness :: really crisp roasted sweet potatoes with gochujang

Roasted Sweet Potatoes with Gochujang


It’s been a long time since I’ve put pen to paper, but it’s about time the blog hiatus comes to an end. The other night, with no particularly inspired meal plan in my mind, I made something blog-worthy. The kind of dish that syncs beautifully with one central ingredient and several well-chosen partners.

I had a sweet potato from the farmers’ market that had been sitting on the shelf for several weeks and was starting to stare back at me with a few eyes. I remembered a ridiculously good crispy roasted potato recipe {courtesy of Nigella Lawson} I had made for New Year’s Eve and wondered if I could apply the same technique to a more tender sweet potato with similar results. Granted those were roasted in duck fat, but the secret sauce was really in the technique. It’s good to be back sharing — enjoy!

Sliced and ready to parboil

Crisp Roasted Sweet Potatoes with Gochujang
1 large sweet potato, scrubbed
olive oil for drizzling
1 teaspoon coarse gray salt
1 teaspoon Izak N. 37 (or a blend of sweet chili pepper, cumin, garlic powder)
Gochujang for serving

  1. Scrub the potato and slice it into 1/4-inch thick circles. Because this guy was a fatty, I quartered each round.
  2. Preheat dry baking sheet in 450 degree oven
  3. Parboil the potatoes for about 5 minutes to warm them up and start breaking down the starch — this will help them start crisping as soon as they hit the hot oven.
  4. Once tender enough that a paring knife would easily pierce the potato {about 5 minutes}, drain the goods and throw them back into the empty pot. Add a generous drizzle of olive oil, coarse gray salt and one of my favorite sweet chili spices, Izak N.37 from La Boîte {or mix equal amounts 1/3 tsp each of sweet chili pepper, cumin, garlic powder}.
  5. And now the fun part. Put the lid of the pot on and hold tightly, shaking vigorously to take out all work week frustrations. The process of doing this roughs up the surface, which will allow for more surface area to release the moisture trapped in a potato and also creates more edges that will get good and crisp during roasting. Win, win.
  6. Once everything is nice and beat up, pull the preheated sheet pan out of the oven and drizzle with 1-2 tablespoons of oil and swirl around to coat the pan.
  7. Toss the coated potatoes on the pan {be careful as the oil may splatter} and throw in the oven for 10 minutes.
  8. Rotate the pan 180 degrees after 10 minutes and roast for another 10 minutes.
  9. Remove pan from the oven and use tongs or a spatula to flip each potato over to roast the other side. Toss the pan back in the oven for another 10 minutes {less if getting too dark too or more if desired darkness is taking longer}.
  10. Remove from the oven and sprinkle with a nice flake salt — I love Jacobsen Salt — and serve with a side of Korean Gochujang {a tangy flavor combination of vinegar and fermented chile paste} or your favorite dipping condiment.

Roasted sweet potatoes

Roasted Sweet Potatoes with Gochujang

Some Like it Hot:
Homemade Spicy Pickled Carrots
Homemade Spicy Carrot Kimchi! & Apple Chutney!
Spicy Tomato-Meyer Lemon Stewed Chick Peas
Some Like it HOT Pollo alla Diavola
Lime-Red Chili Grilled Swordfish


1 Comment

Filed under @home {recipes to love}

recipe goodness :: how to make homemade butter

How to Make Homemade Butter

Homemade Butter

Butter is something that is easy to take for granted. Whether to cook with or butter your toast, that lovely yellow cream is something we use almost daily. Yet rarely do we think of it as something we can make ourselves. But man is it easy. And really, really good when you do. Buy the best, local heavy cream you can find, plug in your electric beaters and start schmearing.

Homemade Butter

1 pint heavy cream {I use Grazin’ Angus Acres grass-fed}
Flaky salt to taste {Jacobsen Sea Salt or Maldon}

Optional add-ins: Honey, Thyme, Sage, Rosemary, Orange  or Lemon Zest, Whatever your heart desires

  1. Pour cream in a metal bowl and beat with electric beaters on high until the cream becomes solid and separates from the buttermilk {will become a bright yellow}.
  2. Pour into a cheesecloth-lined strainer with a bowl underneath to catch the liquid and place in the fridge for an hour to allow more of the buttermilk to separate.
  3. On a clean surface or cutting board, press with cold hands or a flexible dough scraper to knead the butter and remove more buttermilk. This is also the time to mix in any flavors if making flavored butter. Sprinkle salt to taste and then form into a ball, roll into a log or press into a container to store if you don’t eat it all right away.
Beat cream until it separates and looks like this

Beat cream until it separates and looks like this

And then strain and knead until it looks like this

And then strain and knead until it looks like this

2 Comments

Filed under @home {recipes to love}

The Way to a Girl’s Heart: Beer-Bartered Trout

Prized Trout

Prized Trout

So this is how the story goes: girl buys new shiny grill, shiny grill needs its maiden voyage, girl craves something that can’t be bought — a friendly barter is made, as is a meal worthy of brag.

I look forward to each Sunday when I roll out of bed, hair disheveled, tote bags hung on the crook of my elbow, and meander a few blocks to the farmers’ market. The only thing on my agenda is to say hi to my friends, the farmers — everyone should  be friends with local farmers, they wake up at 4am to feed you. That’s a good friend.

But this particular day was different. I was hanging out with Keith at Grazin’ Angus Acres — eyeing their grass-fed beef and stocking up on  $10 / dozen golden eggs. Conversation turns to the things that fill empty hours — I was telling him about my new  brewing project {remember: brew beer, make friends} and he was telling me about his day of fishing for stream trout that was planned for Monday. Mmmm, beer. Mmmm, fresh trout. Boom: light bulb. “What would you say to a friendly barter?” he proposes. The genius plan: meet back at the market the following Sunday with two tradable treasures that would be mutually appreciated.

A Fine Finned Friend

A Fine Finned Friend

And so came home a fine finned friend — a beaut, as they say.

Grilled Stream Trout

1 whole trout, gutted and cleaned
2 green garlic stems, chopped
1 lemon sliced
4-5 pats of butter
salt and pepper to taste

With nothing more than a little butter, green garlic and lemon stuffed inside and blanketing the fiddy, I wrapped this guy in a foil pouch, threw him on the grill at a steady 350° {yes, the new grill has a gauge!} and cooked him until his clear-as-day eyes turned white — about 20 minutes.

Poach Pouch

Poach Pouch

Voila — maiden voyage success and a meal to remeber!

Grilled Trout

Grilled Trout

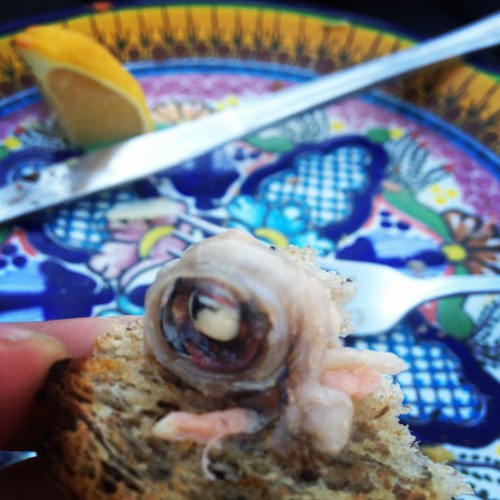
Oh, and the best part? A dare to eat the eye. I rarely turn away from a good challenge. Thank goodness for bread and a cold beer.

Eye see you

Eye see you

3 Comments

Filed under @home {recipes to love}, Do This!

Do This!: Brew Beer, Make Friends


Home brew

Home brew

I’m a girl who likes  projects. But even the idea of brewing my own beer intimidated me. Until I became the proud owner of a Brooklyn Brew Shop beer kit after an auction to raise money for Hurricane Sandy relief. With a Saturday to kill and my cousin Angela and her fiance Ryan here to provide moral support {and expert home-brewer guidance} we got to work.

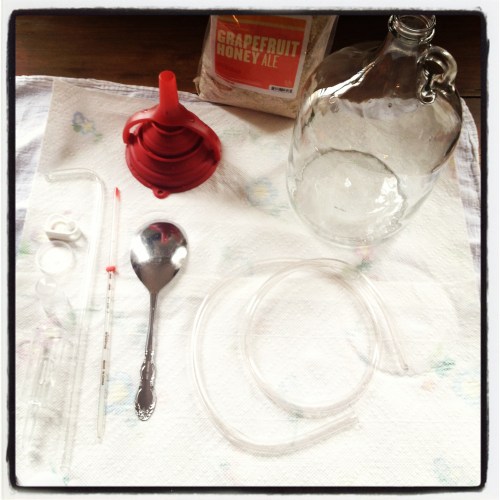
The tools

The tools

The kit comes with almost everything you need to get started, but I did have to have my own funnel and large fine-mesh strainer on hand. Oh, and the grapefruit peel and honey for the grapefruit honey ale. I was a little perplexed that these two key ingredients where not provided in some dried or packaged form, but since I was still in my citruspalooza mode, I happened to have grapefruit on hand so got over the disappointment quickly. Step 1: sanitize all the equipment with the  sanitizer provided in the kit and then get work.

The Mash

The Mash

The Mash 

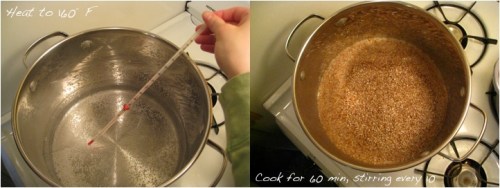
  1. Heat 2 quarts (1.9 liters) of water to 160°F.
  2. Add grain (This is called “mashing in.” Take note of jargon. Or don’t).
  3. Mix gently with spoon or spatula until mash has consistency of oatmeal. Add water if too dry or hot. Temperature will drop to ~150°F (66°C).
  4. Cook for 60 minutes at 144-152°F (63-68°C). Stir every 10 minutes, and use your thermometer to take temperature readings from multiple locations.
  5. You likely don’t need to apply heat constantly. Get it up to temperature, then turn the heat off. Monitor, stir, and adjust accordingly to keep in range.
  6. After 60 minutes, heat to 170°F (77°C) while stirring constantly (“Mashing Out”).
The Sparge

The Sparge

The Sparge 

  1. Heat additional 4 quarts (3.8 liters) of water to 170°F (77°C).
  2. Set up your “lauter tun” (a strainer over a pot).
  3. Carefully add the hot grain mash to the strainer, collecting the liquid that passes through.
  4. This liquid is called “wort” (pronounced “wert”). It will be your beer.
  5. Slowly and evenly pour 170°F (77°C) water over the mash to extract the grain’s sugars.
  6. You want to collect 5 quarts (4.75 liters) of wort. You will lose about 20% to evaporation later on, so you want to start with a bit more than you’ll end with.
  7. Re-circulate wort through grain once.


The Boil

The Boil

The Boil 

  1. In a pot, heat wort until it boils.
  2. Keep boiling until you’ve hit the “hot break” (Wort will foam – you may need to reduce heat slightly so it doesn’t boil over.)
  3. Stir occasionally. All you want is a light boil – too hot and you lose fermentable sugars and volume.
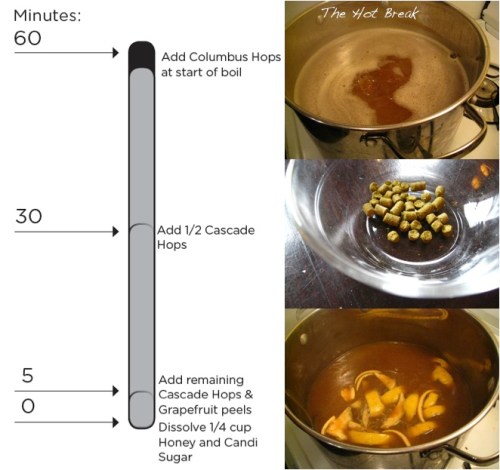
  4. The boil will last 60 minutes. Start your timer and add in the rest of the ingredients at these times: Add Columbus Hops at start of boil.
  5. Add 1/2 Cascade Hops 30 minutes into boil.
  6. Add remaining Cascade Hops and Grapefruit Peels 55 minutes into boil.
  7. At 60 minutes turn off heat. Dissolve 1/4 cup Honey and Candi Sugar.
  8. Twenty percent of the wort will have evaporated in this step leaving you with 1 gallon (3.8 liters) of wort. If your boil was a bit high, the surface area of your pot extra large, or you brewed on a really hot day, you may have less than the full amount. Don’t worry – you just reduced your beer a bit too much, but you can add more water in the next step.
The Fermentation

The Fermentation

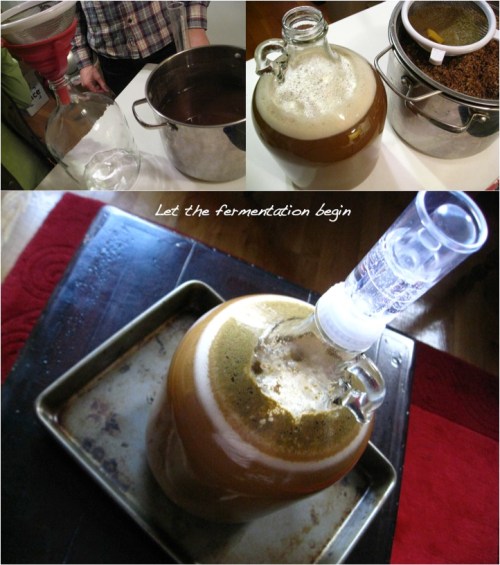
Fermentation 

  1. Place brew pot in an ice bath until it cools to 70°F (21°C).
  2. Once cooled, place strainer over funnel and pour your beer into the glass fermenter. Yeast needs oxygen. The strainer helps aerate your wort and clarify your beer (as well as catch any sediment from going into the fermenter). Add tap water to bring wort up to 1 Gallon mark if level is low.
  3. “Pitch” yeast. (Toss the whole packet in.)
  4. Shake aggressively. You’re basically waking up the yeast and getting more air into the wort.
  5. Attach sanitized screw-top stopper to bottle. Slide rubber tubing no more than 1” (2.5 cm) into the stopper and place the other end in small bowl of sanitizer. You’ve just made a “blow-off tube”. It allows CO2 to escape.
  6. Let sit for two or three days or until vigorous bubbling subsides. This is when fermentation is highest. You may notice bubbles and foam at the top of the beer. After bubbling calms down, clean tubing and ready your airlock.
  7. Sanitize, then re-assemble airlock, filling up to line with sanitizer.
  8. Insert airlock into hole in stopper.
  9. Keep in a dark place for two weeks without disturbing other than to show off to friends. (If beer is still bubbling, leave sitting until it stops.)
  10. In the meantime, drink beer with self-closing swing tops, or ask for empties at a bar that has some. If you have a bottle capper and caps, you can save two six packs of non-twistoff beers instead.
Bottling

Bottling

Two Weeks Later: Bottling 

  1. Thoroughly rinse bottles with water, removing any sediment.
  2. Mix remaining sanitizer with water.
  3. Fill each bottle with a little sanitizer and shake. Empty after two minutes, rinse with cold water and dry upside down.
  4. Dissolve 3 tablespoons honey with 1/2 cup water. Pour into a sanitized pot. You will be siphoning your beer into the same pot in the next steps. Carbonation comes from adding sugar when bottling, so if you filled your jug with less than the full gallon in the last step, use less honey when bottling. Using the full amount can result in your beer being over-carbonated.
  5. Siphoning (It all happens pretty fast. You may want to practice on a pot of water a few times.) To see it in action first, watch the How to Bottle video at brooklynbrewshop.com/instructions.
    1. Attach open tubing clamp to tubing.
    2. Fill tubing with sanitizer.
    3. Attach sanitized tubing to the short curved end of your sanitized racking cane. Attach the black tip to the other end – it will help prevent sediment from getting sucked up. It will probably be a snug fit, but you can get it on there.
    4. Pinch tubing clamp closed.
    5. Remove screw-cap stopper and place racking cane into jug, just above the sediment at the bottom (“trub”).
    6. Lower end of tubing not connected to racking cane into sink. Suction will force beer up and through the racking cane and tubing. Open tubing clamp, let sanitizer flow into sink until beer just starts to flow out of the tubing, then clamp shut. Open clamp on tubing, allowing beer to flow into pot with sugar solution. Tilt jug when beer level is getting low, but be careful in not sucking up the trub.
  6. Siphon beer from pot into bottles, pinching tube clamp to stop flow after each bottle.
  7. Close bottles.
  8. Store in a dark place for 2 weeks.

Two Weeks Later: Enjoying and Making Friends

  1. Put beers in the fridge the night before you drink them.
  2. Drink. Share with friends if you’re the sharing type. Or barter for fresh river trout {more on that later}

MORE SCRATCH PROJECTS {get back to your roots}

CHEESEHomemade Fresh Mozzarella
CHEESEHomemade Ricotta
BREAD101: How to Make Bakery Quality Bread @Home
MUSTARD & PRETZELSHomemade Soft Pretzels and Mustard

PICKLESHomemade Spicy Pickled Carrots
KIMCHIHomemade Spicy Carrot Kimchi! & Apple Chutney!

1 Comment

Filed under @home {recipes to love}, Do This!

Memorial Day Recipe Round-Up

IT WOULDN’T BE A BBQ WITHOUT BOOZE 

Alton Brown’s Bourbon Mint Julep
Bottle of Baron {Refreshing “Island Cocktail” a la Tippling Bros.}

Fresh Lime-Margarita Marinated Watermelon
Kickin’ Ancho Chili Fresh Citrus Margarita
Pink Fizzy Lemonade Cocktails Beat the Heat
Smokey Margarita {a la Tippling Bros.}

Stand-Out Spanish Sangria
Summer Strawberry Chilled Chamomile Tea {non-alcoholic}
Spritzy Sunday Morning Citrus Cocktail {non-alcoholic}

SNACK’EMS {makes happy hour happier}

Avocado & Tropical Fruit Salsa {also good as an entree side}
Creole Roasted Fresh Corn-Tomato Salsa
Fresh Lime-Margarita Marinated Watermelon{double duty bites}
Inside-Out Scotch Eggs w/ Ground Lamb, Harissa Yolk & Panko Gremolata

Peppers Padron at Home
Rosemary, Truffle and Parmesan Chips or Fries
Spiced Sweet Potato Hummus
Union Square Bar Roasted Rosemary Nuts

SALADS 

Orzo, Spinach & Feta Summer Salad
Spinach, Strawberry & Halloumi Salad
Tomato, Basil & Feta Salad
The Ultimate Summer Slaw

PIZZA & BREADS {d’oh! why didn’t i try this yet}

Creative Crowd-Pleasing BBQ’d Pizzas
Red Chili-Lime Cornbread Muffins
Za’atar-Pecorino Toasted Crostini

FOR THE GRILL 

Bison, a Better Burger Worth Biting Into
Sesame Ginger Lime-Poached Cod
Pistachio-Encrusted Spring Lamb w/ Pickled Red Onions & Cumin Yogurt Sauce
Whole-Grain Mustard & Rosemary Pork Chops

DESSERT {life is short, eat it first}

Alton Brown’s Bourbon Banana’s Foster w/ Bourbon Ice Cream
Banana Puddin’ Chocolate Cups
 {bottom of post}
Julia Child’s Chocolate Mousse
Violet’s Lemon Cheesecake with BBQ’d Summer Berries{bottom of post}

Creole Roasted Corn-Tomato Salsa and Chips

Creole Roasted Corn-Tomato Salsa and Chips


Leave a comment

Filed under @home {recipes to love}

recipe goodness :: {gluten-free} grapefruit olive oil pound cake

Grapefruit Olive Oil Cake

Grapefruit Olive Oil Cake

I’ve been on a bit of a bit of a citrus overload lately — not in a “I’ve had too much” overload, but in a “I can’t get enough” overload. So when two things happened at work — 1) I had to test Cup4Cup’s gluten-free flour as a potential product to sell in the Food52 Shop and 2) a co-worker came in raving about Smitten Kitchen’s Grapefruit Olive Oil Cake — I had just one more excuse to zest and lovingly squeeze one of nature’s winter gems. Before you run away after reading the word “gluten-free,” know that this recipe originally called for all-purpose flour, but worked beautifully with Cup4Cup’s gluten-free flour during this ingredient test. Win win for all the celiacs and non-celiacs in the world! Dessert is served.

Cake Time

Cake Time

Grapefruit Olive Oil Pound Cake
Slightly adapted from Smitten Kitchen

Cake
Butter and flour for the pan
2 TBS freshly grated grapefruit zest
1/2 cup (100 grams) granulated sugar
1/2 cup (95 grams) raw or turbinado sugar
1/2 cup (120 ml) olive oil
2 large eggs, at room temp
1 1/2 cups (190 grams) gluten-free Cup4Cup flour {or all-purpose}
1 teaspoon baking powder
1/4 teaspoon baking soda
1/2 teaspoon salt
2 TBS (30 ml) grapefruit juice
1/3 cup (80 ml) buttermilk or plain yogurt

Syrup
2 TBS granulated sugar
1/3 cup (80 ml) grapefruit juice

Glaze
1 cup (120 grams) confectioners’ sugar
2 TBS (30 ml) grapefruit juice
pint of salt

  1. Heat oven to 350°. Butter and flour 9 x 5″ loaf pan.
  2. In a large bowl rub grapefruit zest into the sugars with your fingertips to release the oils. Whisk in the oil until smooth. Add the eggs one at a time, and whisk until combined. Scrape down the bowl.
  3. Combine flour, baking powder, baking soda and salt in a second bowl.
  4. In a liquid measuring cup combine grapefruit juice and buttermilk or yogurt.
  5. Add flour and liquid mixtures, alternating between them, to the oil-sugar mixture, beginning and ending with flour.
  6. Spread the batter in pan, smooth the top and rap on the pan to release any air bubbles. Bake for 45 minutes – 1 hour, until a cake tester comes out clean.
  7. Make grapefruit syrup — combine 2 tablespoons sugar with 1/3 cup grapefruit juice in a small sauce pan, and cook over low heat until sugar dissolves.
  8. When cake is finished, let it cool 10 minutes in the pan before inverting on a cooling rack set over a tray. Poke holes in the cake with a skewer or toothpick, then brush or spoon syrup over the cake. Let the cake cool completely while it absorbs the syrup.
  9. Make glaze — combine confectioners sugar, salt and grapefruit juice in a bowl, whisking until smooth. Pour glaze over the top of the cooled cake, and allow glaze to drizzle decoratively down the sides.
Grapefruit - Oh my God - glazing step by step

Grapefruit – Oh my God – glazing step by step

Dinner’s Done:
Alton Brown’s Bourbon Banana’s Foster w/ Bourbon Ice Cream
Banana Puddin’ Chocolate Cups
 {bottom of post}

Grandma Dilaura’s Lemon Madeleines
Honey-Vanilla Pound Cake with Red Bud Flowers
Julia Child’s Chocolate Mousse
Millionaire’s Shortbread Worth a Billion Bucks
Perfect Pear Cranberry Pie
Violet’s Lemon Cheesecake with BBQ’d Summer Berries {bottom of post}

1 Comment

Filed under @home {recipes to love}

recipe goodness :: spent grain raisin bran beer muffins

Spent Grain Raisin Bran Beer Muffins

Spent Grain Raisin Bran Beer Muffins

With no major plans on the weekend calendar, the kitchen was beckoning to be dirtied. It felt like the right time to break open my Brooklyn Brew Shop beer making kit and start the 4-week project {more on that later}. What I didn’t realize is that I was going to get way more out of this project than 12 bottles of suds. After simmering your “mash” for an hour you strain everything through a sieve, leaving behind a protein and vitamin-rich hearty grain that has completed its job in the brew, but is still ripe for a second life — beer baked goods anyone?

Before figuring out what you’ll do with your newfound pot of grain gold, you can store this spent grain in the fridge “wet” for a few days before it starts to get funky or you can spread it out on a baking sheet and dry it completely in the oven to store in an airtight container for later. Set your temp to warm-200° and bake 4-5 hours or until no moisture remains to the touch, stirring periodically to dry evenly.

My experiment: a spin on Raisin Bran muffins.  The result: better than mom used to make {sorry mom}. The muffins have a great hearty whole grain depth, while maintaining a moistness thanks to the buttermilk. And, of course, every thing’s better with beer.

Filling muffins

Filling muffins

Spent Grain Raisin Bran Beer Muffins

Makes 20-22 | 375° for 15-20 mins

8oz (weight) wet spent grain
1/2 teaspoon salt
2 1/2 cups all-purpose flour
1/4 cup melted butter
1/3 cup brown sugar
2/3 cups granulated sugar
3/4 teaspoon baking soda
1 1/2 cups of raisins
1/2 teaspoon cinnamon
2 large eggs, lightly beaten
2 teaspoons vanilla extract
2 cups buttermilk
demerara sugar for sprinkling on top {optional}

  1. In a large bowl mix together spent grain, flour, salt, sugars, cinnamon, baking soda and raisins.
  2. In a medium sized bowl, whisk together butter, eggs, vanilla extract and buttermilk.
  3. Whisk the wet ingredients into the dry ingredients. If you plan on baking the muffins right away, allow to sit on the counter for 15 minutes before baking to let the grain and flour absorb the buttermilk.
  4. Using an ice cream scoop with a thumb release, fill each cup. Sprinkle tops with a spoonful of demerara sugar {optional}.
  5. Bake at 375 degrees for 15 to 20 minutes, or until a skewer inserted in the center comes out clean.
  6. Let rest in the pan for 5 minutes before removing to cooling rack.
    Enjoy at least one while warm, with melted butter!

Beer, Bread and Buttermilk:
Breadmaking 101: How to Make Bakery Quality Bread @Home
Grandma Dilaura’s Panettone

Herbed Buttermilk Biscuits
Royal British Cranberry-Almond Breakfast Scones
Irish Steak & Guinness Puff Pastry Pie

3 Comments

Filed under @home {recipes to love}

recipe goodness :: the best focaccia i’ve ever had, toppings optional

The Best Focaccia I've Ever Had

Take a bite

I took a breadmaking class with Matthew Tilden of SCRATCHbread a few years ago and learned what is quite possibly the best focaccia recipe I’ve ever had. The inside has a spongy spring that makes focaccia the type of bread you want to sop up whatever needs sopping. But the difference in his recipe is that the lovely springy inside is enrobed in a crackly crust that seems to be missing from too many other oily focaccia phantoms.

I love when focaccia is permeated with other delicious treasures. Inspired by the suitcase of meyer lemons I just toted back from San Fran and a meyer lemon focaccia recipe we just published on Food52, I decided a weekend project was calling my name. This SCRATCHbread recipe was asking for some sweet lemon love.

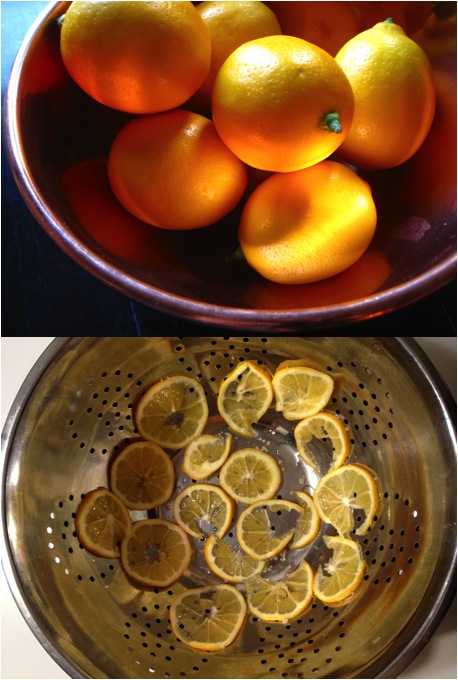
Thinly slice, sprinkle with coarse salt and let drain to remove some moisture.

Thinly slice, sprinkle with coarse salt and let drain to remove some moisture.

SCRATCHbread Focaccia (3-3.5 hours total; 3 cake pans)

2 lbs. – all purpose Unbleached Unbromated Flour (preferably organic)
8 oz – “oo” Fancy Durum Flour
1.5 lbs. Water (warm 90-100 degrees)
1 oz – compressed “brick” yeast
1 oz – Sea Salt (coarse grey)
1 TBS – Honey
Olive Oil (lots!)
Toppings — whatever your heart desires (in this recipe I used one meyer lemon, one red onion, fresh thyme, whole grain mustard, cracked black pepper and coarse salt)

Prepare yeast, honey and ground salt

Prepare yeast, honey and ground salt

  1. 1. Mix and dissolve yeast, honey & salt (crush salt with mortar and pestle if using coarse grains) with warm water. Set Aside. Make sure water is warm, not hot or you will kill the yeast.

Focaccia dough steps

  1. In a large bowl (or mixer, but we used our hands) add flour and then water mixture, incorporate into shaggy mass.
    1. If using a mixer, continue mixing with dough hook until dough comes together and begins pulling away from the sides, about 1.5 minutes. Add about 2T of olive oil to lather and let it mix in for about 20 seconds.
    2. If using your hands, scrape dough onto a clean surface and practice the slam and flip method! Take the dough, slam it down hard, it will spread out, take one end and fold it over the other end, grab the dough at the end closest to you and slam it down again (it will be sticky and that’s ok). Repeat this process for 1-2 minutes until the dough comes together and the gluten has some toughness to it (if you were to pull on the dough it fights back.) Form into a smooth round ball and pour about 2T of olive oil over the dough ball, massaging all over.
  2. Pour ~2T of olive oil in a clean bowl to “grease” sides. Put the olive oil lathered dough in bowl and cover with saran wrap or a clean towel. Let rise until doubled, about 1 hr 30 minutes in an 80-90 degree environment (you can put near a heater of turn your oven on and set bowl on a chair near the oven vent.)
  3. Once dough is doubled in size and super fluffy, pour onto a clean dry surface and fold over itself into a tight mass. Begin beating the living crap out of the dough. Punch it, elbow it, release all frustrations as you are basically giving it life by pulverizing it. So consider this a good deed to the dough. You can repeat the slam and flip method. Once the mass has had its way, let the beaten mass rest for about 15 minutes. Before dividing into desired shapes/pans. (We used a knife to cut this amount into thirds and made 3 pans.)
  4. I recommend a heavy non-stick cake pan (square or round) because you can take advantage of the rising capabilities and add more toppings, which is always nice.
  5. Coat the pan in olive oil and add third of dough to each pan. Massage with your finger tips, using a “piano finger motion” to form crevasses and spread the dough. Pour MORE olive oil over the dough to coat and collect in yummy olive oil pools in the crevasses. This is sort of the secret for super sexy focaccia goodness. Let the dough rest for 30 minutes in the pan.
  6. Piano finger-in the toppings

    Left: Meyer lemon-thyme. Right: Red onion-meyer lemon-coarse mustard

    You will notice after about 30 minutes, the dough has taken a fluffier approach to its existence and at that point you add the toppings you desire – get creative, but here are a few suggestions! His secret was the coarse black pepper (gave it a really good bite!) And very coarse salt (for that salty goodness) If you use onion, cut them up earlier and toss with coarse salt to remove some of the moisture – toppings with moisture can prevent the focaccia from crisping nicely. I also like to do different combinations in different pans to have lots of options.

    1. Rosemary, grey salt (coarse), more olive oil!
    2. Thinly sliced meyer lemon, red onion quarters, fresh thyme, coarse grey salt, more olive oil!
    3. Crushed garlic, rosemary, thyme, coarsely ground black pepper & salt, more OO
    4. Whole grain mustard, speck, coarsely ground black pepper and salt, more OO
  7. Add your toppings and MORE OLIVE OIL!! Massage into the dough, again using the piano finger method. This will get the flavors and ingredients mixed in and attached nice and good to the dough. Anything that might burn or turn bitter should be added after you take out of the oven (fresh basil, lemon zest, etc.)
  8. Really make a point to pool the olive oil, as this will provide a very moist rich dough once cooked as well as give you the desired crust considering you don’t have a seriously hot wood burning oven.
  9. Bake 425 degrees for about 35-50 minutes (mine took 35), rotating half way. Make sure to take it to a really nice dark golden brown. It’s ok if the toppings start to slightly char – adds to the flavor! When done, immediately and CAREFULLY remove the hot sexy bread mass onto a cooling rack from the pan (pull it out with a knife or fork on one of the sides) so that the crust will become crusty! Let it cool to room temperature so you don’t burn your mouth and let the moisture set. Fight back the crowds.
Crispy Focaccia Goodness

Crispy Focaccia Goodness

2 Comments

Filed under @home {recipes to love}

recipe goodness :: ardith mae fennel & goat ragout

Ardith Mae Goat Ragout

Ardith Mae Goat Ragout

Like goat cheese? Then you should keep reading. For some reason goat meat is not a commonly consumed fork and knife option on American dinner plates — but we sure do love goat cheese. But you can’t enjoy the goat cheese without the goat, and in order to have a thriving goat dairy you need both females and males. And since males can’t produce milk, they are virtually useless after they’ve done their job creating a family — so where does all that goat meat go? Never really thought about it much did you? I’m pretty sure it’s not at your local grocery store.

You may be surprised to learn that goat is the most widely consumed meat in the world. The flavor of goat is delicate and grassy, and in my option, almost sweet. So when Shereen, the fabulous farmer behind Ardith Mae Goat Cheeseoffered to send me home with a few packages of sweet and spicy ground goat, I jumped at the chance to try something that had previously never entered my freezer.

Armed with fresh fennel, carrots, onion and celery from the farmer’s market, I decided to chuck it all in a pot, simmer it with some diced tomatoes and create a goat ragout. The result was outstanding. OUTSTANDING. Scooped on top of some fresh pasta and topped off with a dollop of — what else — fresh goat chevre, this dish was made with no prior knowledge of what in the world to do with goat and is now a crowd favorite with the few lucky ducks who joined the table. I challenge you to explore the world of goat meat — it is truly an underappreciated wonder in our American diet. If you want to read more about the No Goat Left Behind initiative watch a great video HERE.

Chop, Saute, Simmer

Chop, Saute, Simmer, Scoop

Ardith Mae Fennel & Goat Ragout

1lb ground goat meat
1 yellow onion, chopped
1 large carrot, chopped
1 celery stalk chopped
1 bulb fennel, chopped — frawns reserved
6 cremini mushrooms, chopped
2-3 TBS olive oil
2 28oz cans diced San Marzano Tomatoes
1 TBS tomato paste.
1 can water
Salt and pepper to taste

1-2 lbs pasta of choice to serve 6-12
1 package fresh goat’s milk chevre {I love Ardith Mae in NY}

  1. Wash and chop all vegetables. Set aside. Chop 1-2 Tablespoons of fennel frawns and save for serving.
  2. Crumble and lightly brown goat meat in a large le creuset or sauce pan. Remove meat from pot and set aside.
  3. Add 2-3 tablespoons of olive oil to the pan and all the chopped vegetables — cook until tender and caramelized. Add tomato paste and stir pot thoroughly. Season with salt and pepper.
  4. Add both cans of tomatoes and one can of water. Bring to a simmer and add meat back to the pot.
  5. Simmer 1-2 hours until sauce has thickened. Taste and add additional salt and pepper, as desired.
  6. Scoop on top of pasta with several dollops of fresh chevre and fennel frawns sprinkled across top. Extra sauce freezes really well for a midweek meal.

Other Meaty Goodness:
Bison, a Better Burger Worth Biting Into
Braised Grass-Fed Beef Brisket and Polenta
Irish Steak & Guinness Puff Pastry Pie

Leave a comment

Filed under @home {recipes to love}

recipe goodness :: grandma dilaura’s veal scaloppine

Grandma DiLaura's Veal Scallopine

Grandma DiLaura’s Veal Scaloppine

I always loved when my grandma made this dish for dinner, but I didn’t realize it left a big impression on people who weren’t part of our immediate family. A few weeks ago I got a request from my dad’s childhood friend, Skip, to publish this recipe. I’ve never met Skip, but I imagine him tagging along behind the younger version of my dad after a few hours of neighborhood baseball. Of course my grandma would have made enough food to feed 17 people, so it was no big deal that Skip would have been asked to pull up a chair and join for dinner — after removing his baseball cap, washing his hands and calling his mother to ask permission, of course.  So this one’s for you Skip!

Vito my Veal Butcher

Vito my Veal Butcher

Step one: find the best butcher in the neighborhood. Preferably one with an old school butcher block, guys in white coats with metal mallets and a man named Vito. For this adventure, we headed up to the best kept Italian secret, Arthur Avenue, and did just that. Ask Vito to get to work hand-slicing each cutlet and pounding it until it’s paper thin and doubled in size. Note to you veal haters out there, you can use chicken but grandma might yell at you.

Veal Assembly

Grandma DiLaura’s Veal Scaloppine

1-2 veal {or chicken} cutlets per person depending on the size
1 plate of flour, seasoned with salt & pepper
2-3 eggs, beaten and seasoned with s&p
1 dish of panko {or regular} breadcrumbs, seasoned with salt & pepper
Vegetable Oil for frying
Salt to season
Lemon wedges
Fresh parsley, chopped

  1. Have your butcher pound each cutlet {or do it yourself if you want to work harder} until 1/4 inch thick and even.
  2. Line up three dishes — one with enough flour to coat both sides of each cutlet, one with beaten eggs and one with enough breadcrumbs to coat both sides of each cutlet. Season each dish with salt and pepper. Note, you can always add more, so start with what looks like just enough.
  3. Work with one cutlet at a time. Designate one hand the dry hand and one hand the wet hand to keep from getting gooey hands. Using the dry hand, add to flour and coat both sides. Shake off excess flour and then add to the egg dish. Picking up with the wet hand, let excess egg drip off and add to the breadcrumbs. Coat both sides using the dry hand and then place on a baking sheet. Repeat to coat each of the cutlets, placing a layer of plastic wrap or waxed paper between each layer of cutlets on the baking sheet.
  4. Using a large, deep skillet pour ~1/2 inch of oil in the pan and bring to medium-high heat. Test when the oil is ready by dropping a bread crumb into the oil at which point you should see bubbles form around the edges as they start sizzling.
  5. Being careful not to over crowd the pan, add 2-3 cutlets at a time and cook until golden brown on one side, ~2-3 minutes. Flip and cook the other side until golden brown, ~2-3 more minutes depending on how high your heat is and how thick each piece is.
  6. Remove from oil and place on a plate or baking sheet lined with paper towel to absorb excess oil. Sprinkle with flaky maldon salt to taste.
  7. Cook remaining cutlets, adding additional oil to the pan and adjusting the temperature as needed.
  8. Serve on a platter with lemon wedges and chopped fresh parsley sprinkled over the top…and a big jug of red wine.
Mangia!

Mangia!

Grandma is the Best Cook in the World:
Secret DiLaura Family Frittata with Sweet Italian Sausage
Grandma’s Italian Wedding Chicken Soup
Homemade Gnocchi and Sauce: Channeling My Italian Grandmother
Violet’s Lemon Cheesecake 

8 Comments

Filed under @home {recipes to love}

recipe goodness :: grandma dilaura’s panettone

Grandma DiLaura's Panettone

Grandma DiLaura’s Panettone (Photo by James Ransom for Food52)

We don’t deviate much from the past when it comes to the DiLaura Christmas morning menu. Since my earliest memories of Santa Claus and pink bikes with baskets, Christmas morning always starts with a buttered slice of my Grandma DiLaura’s toasted panettone. The smell of sweet anise wafting from downstairs is a sign that ‘ole St. Nick has done his job.

Our recipe dates back to the late 1800s Florence, where my grandmother’s sister’s mother-in-law was an award-winning baker. Of course the story goes that she never used a recipe and no one has ever been able to make it as good since.

While my grandma was smart enough to write down the measurements for this edible heirloom, there were some parts of her recipe that did not get recorded. My grandma had a special heavy wooden chair that lived in the basement 364 days of the year. On panettone-making day, the chair was ceremoniously brought up to the kitchen where she placed a huge stockpot atop the seat and got to work mixing all of the ingredients with her special oversized wooden spoon.

A Cut Above the Rest

A Cut Above the Rest

After my parents married, my mom began helping on the big day and made the mistake of suggesting it might be easier to mix the large batch, of what is quite sticky dough, with her hands. To which my grandma promptly replied, “Oh no, honey you can’t do that, you have to use the spoon.” Deviate she did not.

My grandmother has since passed on, but my mom has heroically carried on the tradition of making our annual panettone. Our recipe is different from many you’ll find in stores, which often include candied fruit. We prefer a mix of dark and golden raisins with pine nuts, but of course you could make it however you prefer. After all, my mom ditched the wooden spoon and has been hand-mixing since taking over the panettone helm.

This recipe makes about 16 pounds of bread, which my mom breaks up into four large 2 1/4 pound loaves and four smaller 1 3/4 pound loaves. She gives everyone in the family a loaf and also freezes a few. You could easily cut the recipe in half, but your friends and neighbors will thank you if you don’t!

Grandma DiLaura’s Panettone

Makes 16 pounds of bread (about 8 loaves)

5 cups whole milk
4 cups sugar, plus 1/4 cup for yeast
1 pound unsalted butter
1/4 cup shortening (or use all butter)
1 teaspoon anise oil (if you can’t find oil, substitute 4 teaspoons anise extract)
9 packets non-instant yeast
5 pounds all-purpose flour, plus 5 cups (plus 4-5 more cups for kneading)
6 teaspoons salt
8 large eggs
15 ounces golden raisins (soaked in hot water to plump if dry)
30 ounces dark raisins (soaked in hot water to plump if dry)
1/2 pound pine nuts
1 egg yolk, plus 1 tablespoon water for brushing tops

  1. In a medium saucepan, scald milk with 4 cups sugar, stirring often. Then add butter and shortening (or all butter), and melt, stirring often.
  2. Remove from the stove and add anise oil or extract to milk/butter/sugar mixture. Let cool slightly.
  3. Dissolve yeast and 1/4 cup sugar in enough warm water to cover (1 1/2 to 2 cups) and let double in volume.
  4. In a large bowl, mix 5lbs plus 5 cups flour and salt. Add raisins and pine nuts.
  5. Add slightly cooled milk to flour mixture. Add eggs and mix together with large wooden spoon. Add yeast mixture and mix well. Grease your hands and mix and knead for about 5 to 10 minutes in the bowl (adding 4 to 5 cups flour as needed). Dough will be very sticky.
  6. Grease sides of bowl, cover with greased plastic wrap and several towels, and let dough rise in a warm place for 1 1/2 to 2 hours, until doubled.
  7. Grease loaf pans — we use four large (9 5/8 x 5 1/4 x 2 3/4) and four small (8 1/2 x 4 1/2 x 2 5/8). Lightly squeeze to release any air bubbles and shape dough and put in pans. Cover with greased plastic wrap and towels and let rise for 1 1/2 hours.
  8. Bake at 350 F for about 20 minutes.
  9. If using multiple oven racks, rotate loaves, then lower oven to 325 F and bake for 20-25 minutes, or until top is a medium golden color.
  10. After bread is baked, brush tops with egg yolk and water mixture and return to oven for about 5 minutes.

What Else Did Grandma Whip Up?
Grandma DiLaura’s Lemon Madeleines
Secret DiLaura Family Frittata with Sweet Italian Sausage

Grandma’s Italian Wedding Chicken Soup
Homemade Gnocchi and Sauce: Channeling My Italian Grandmother
Violet’s Lemon Cheesecake

2 Comments

Filed under @home {recipes to love}

‘Tis the Season Party Recipe Roundup

'Tis the season!

‘Tis the season!

Everyone can use a little help when it comes to holiday entertaining. Easy, but memorable recipes that deserve a place at any party we may be throwing with our nearest and dearest friends and family. Here are a few ideas to help get you through the nibbles and dribbles.

GREAT HOST GIFTS {with the most!}

Cinnamon Sugar & Dark Cocoa Almonds
Homemade Spicy Carrot Kimchi! & Apple Chutney!
Homemade Spicy Pickled Carrots
Union Square Bar Roasted Rosemary Nuts

DRINKS {cheers!}

Autumn Manhattan {Herby Garnished Classic a la Tippling Bros.}
Fireside Sparks {Champagne Cocktail a la Tippling Bros.}
Smokey Margarita {a la Tippling Bros.}

Spritzy Sunday Morning Citrus Cocktail {non-alcoholic}

SNACK’EMS {makes happy hour happier}

Cinnamon Sugar & Dark Cocoa Almonds
Flaky Cheese Straws, As Easy As Being Barefoot

Homemade Ricotta and Melted Leeks
Inside-Out Scotch Eggs w/ Ground Lamb, Harissa Yolk & Panko Gremolata
Mini Wild Mushroom Shepherd’s Pie w/ Scotch! {bottom of post}
Spiced Sweet Potato Hummus
Union Square Bar Roasted Rosemary Nuts
Za’atar-Pecorino Toasted Crostini

SEASONAL SIDES

Bursting Brussels Sprouts with Pancetta-Orange Reduction
Crispy Cayenne Roasted Potatoes
Mini Wild Mushroom Shepherd’s Pie w/ Scotch! {bottom of post}

Roasted Cauliflower with Gremolata Breadcrumbs
Community Grains Lazy Sunday Red Flint Polenta Integrale
Farro Salad with Steamed Kale and Roasted Pinenuts

SEASONAL SWEETS {life is short, eat it first}

Honey-Vanilla Pound Cake
Julia Child’s Chocolate Mousse
Millionaire’s Shortbread Worth a Billion Bucks
Perfect Pear Cranberry Pie
Violet’s Lemon Cheesecake 


Leave a comment

Filed under @home {recipes to love}

recipe goodness :: grandma dilaura’s lemon madeleines


Grandma's Lemon Madeleines

Grandma’s Madeleines

Santa called, he wants a new kind of cookie this year. Yes, we all love sugar cutouts and peanut butter cookies with chocolate kisses —  don’t get me wrong, I love the tradition of knowing those festive favorites will be stacked high on the Christmas table too. But this year everything old is new again, so I’m rethinking the cookie plate.

These lemony Madeleines weren’t necessarily a Christmas tradition in our house, but they were ceremoniously revealed after many Sunday dinners at Grandma’s. After a heaping bowl of gnocchi or a big Sunday roast, she’d shuffle over to her cookie tins {which were never empty} and arrange these delicate little shell-shaped cookies {which might as well be referred to as mini cakes for their delicate sponge} on a plate to await the blessing of decorative powdered sugar. They were divine. Pretty, perfect little pillows of lemony goodness. These will always remind me of my grandma and have become a new tradition in my own kitchen — parting gifts for dinner guests or just comforting treats to accompany a steaming cup of weekend coffee. And so for something that evokes those cherished memories, it seems only fitting that they join the joyous Christmas cookie tray. Enjoy!

Madeleine Tray

Madeleine Tray

Grandma DiLaura Lemon Madeleines

Makes 36 Large or 48 Mini | 350°

3/4 Cup Butter, melted and slightly cooled, plus more for brushing pans
3 Large Eggs
2/3 Cup Sugar
1 tsp Vanilla
1.25 Cups Cake or All-Purpose Flour
1/2 tsp Baking Powder
1/4 tsp Salt
Zest of 1 Lemon
1/3 Cup Shredded Coconut (optional)

  1. In a large bowl, mixer on high, beat eggs until light.
  2. Gradually add vanilla and sugar and continue beating until volume has increased about 4x and is pale and fluffy. Add melted butter.
  3. Sift dry ingredients together and fold with spatula into mixture.
  4. Fold lemon zest and/or coconut.
  5. Brush Madeleine molds with melted butter and scoop mixture into each shell filling about halfway —  careful not to overfill as they will rise like a cake.
  6. Bake 8-10 minutes for Large Madeleines and 6-8 minutes for Mini Madeleine trays until cake is firm to the touch and light gold in color.
  7. Remove from trays and let cool on a wire rack. Store in an airtight container.
  8. Right before serving sprinkle with powdered sugar.
Mini Madeleines

Mini Madeleines

Other Grandma Favorites:
Secret DiLaura Family Frittata with Sweet Italian Sausage
Grandma’s Italian Wedding Chicken Soup
Homemade Gnocchi and Sauce: Channeling My Italian Grandmother
Violet’s Lemon Cheesecake

2 Comments

Filed under @home {recipes to love}

Last Minute Thanksgiving Recipe Roundup

Looking for a little last minute Thanksgiving Feast inspiration?

While You Wait for the Bird
Autumn Manhattan {Herby Garnished Classic a la Tippling Bros.}
Fireside Sparks {Champagne Cocktail a la Tippling Bros.}
Homemade Ricotta and Melted Leeks
Spiced Sweet Potato Hummus
Za’atar-Pecorino Toasted Crostini

spiced sweet potato hummus

spiced sweet potato hummus

The Pilgrims Ate Soup
Best Butternut Squash and Green Apple Soup
Wild Child Broccoflower and Celery Root Soup

The Best Butternut Squash Soup

Sides Tom Will Love
Bursting Brussels Sprouts with Pancetta-Orange Reduction
Crispy Cayenne Roasted Potatoes
Roasted Cauliflower with Gremolata Breadcrumbs
Farro Salad with Steamed Kale and Roasted Pinenuts
Italian Sausage & Chard Stuffin’ Muffins
Flaky Cheese Straws, As Easy As Being Barefoot

Pan-Roasted Brussels Sprouts with Pancetta-Orange Reduction

Pan-Roasted Brussels Sprouts with Pancetta-Orange Reduction

The Grand Finale
Perfect Pear Cranberry Pie

1 Comment

Filed under @home {recipes to love}, Do This!

Fall in Love with Sardines, Save Dinner

Bela Sardines. Photo by James Ransom for Food52

Bela Sardines. Photo by James Ransom for Food52

When I was a wee little one, I remember my dad coming in from an afternoon tending to his garden and popping open a can of sardines for lunch. Curious about these little guys, I was not. Usually his offer to share a bite was met with a prompt and firm “ewwwww, no.”

It’s taken me 30 years to question why these cans of conveniently packed, flavorful little fiddies get such a bum rap. I don’t think twice when cranking a can of tuna open to save the day when I have nothing in the fridge for lunch. I recently read an article by Nicholas Day on Food52 speaking the praises of sardines — in his case because it conveniently saves dinner in a pinch for his own children. He feeds his kids sardines? This made me take pause. Well why not.

And then I was contacted by BELA Sardines to see if their cans of fresh-packed {within 8 hours of being caught and never frozen} Portuguese sardines would be something we would be interested in selling in the Food52 shop. We popped a few cans open at the office, broke out the crackers and started snacking. They were good — really, really good. Each is slightly smoked and packed in either Portuguese extra virgin olive oil or tomato sauce {4 flavors to choose from}. Beyond just the flavor, there are other reasons to love these little guys — they’re low-mercury, sustainably caught, and full of healthy fats. They are a pantry staple everyone should pile high.

I’m a convert. To be perfectly honest, I would be happy opening a can of these, pouring a nice glass of wine and calling that alone a mid-week meal. But it doesn’t take much to use them in a slightly more creative way, with still minimal effort, and have a dish to be proud of. Go ahead, give sardines a chance — you may be surprised by a new love.

Need a Little Inspiration?
Linguine with Sardines, Fennel & Tomato
Sardines, Avocado and Radish Salad with Upland Cress
Sardine Butter

Leave a comment

Filed under @home {recipes to love}, Do This!

recipe goodness :: homemade soft pretzels and mustard from scratch

Homemade Soft Pretzels

Homemade Soft Pretzels

Fall is the time for wooly sweaters, weekend projects and Oktoberfest. Instead of a typical apple pie pastime, I had my taste buds set on a rather adventurous experiment of making homemade soft pretzels and from-scratch mustard. After grabbing several generously sized bags of mustard powder and whole mustard seeds at Kalustyans, the idea of making my own mustard swelled into making four different kinds — it is my favorite secret ingredient, after all. It also didn’t hurt that my cousin and her beer-brewing fiance were in for the adventure and came bearing homemade suds and the same amount of experimental exuberance.

The result? After tasting a piping hot pretzel from my own oven, dare I say I’ll never buy a pretzel from the corner cart again. As for the mustard — four may have been excessive, but it revealed a few standout favorites which I’ve included below. Each of these Oktoberfest treats was made with relative ease, but you may want to consider making the mustard ahead of time as it will continue to mellow out each day — and at first taste, you {and your nasal passages} will quickly understand why mustard plaster was a treatment for pleurisy back in the day.

Homemade Mustards

Homemade Mustards (left to right clockwise: coarse rosemary, brown sugar, red wine)

Homemade Soft Pretzels
Recipe From the Fresh Loaf Makes 6 large pretzels — you might as well double it!

1 teaspoon instant yeast {or bread starter}
1 tablespoon brown sugar
2-3 cups all-purpose unbleached or bread flour
1 teaspoon salt
1 cup warm milk (approximately 110 degrees, which is 1 minute in my microwave)

  1. Combine all of the ingredients in a bowl and mix together until it forms a ball. I start with 2 cups of the flour and mix it together until it forms something like a thick batter, then add more flour a handful at a time until it’ll form a nice ball that I can knead by hand.
  2. Either use an electric mixer to mix the dough for 5 minutes or remove it from the bowl and knead it by hand for 5 to 10 minutes until the dough begins to get smooth and satiny.
  3. Return the ball of dough to a clean, greased bowl, cover with plastic wrap, and set it aside to rise until it has doubled in size, approximately an hour.
  4. Before shaping, start preheating the oven to 425 degrees and bring a large, wide pot of water to a boil.
  5. Roll and rest the pretzel dough

    Roll and rest the pretzel dough

  6. Cut the dough into 6 pieces. Roll each one into a short log, cover with a towel, and let the dough relax for 5 to 10 minutes. After it has relaxed you should be able to roll it out and stretch again fairly easily.
  7. Let them relax again and give each a third roll and stretch session until about 15 inches long and about as big around as your index finger. They’ll nearly double in width while baking, so it is ok to roll them out quite thin.
  8. Place a rope of dough on the work surface in front of you. Take each end in a hand, loop the dough away from you, and bring the ends back toward your stomach, crossing them about an inch above the rope. Apply a little bit of pressure to make the loops stick together, but not too much because you don’t want then to flatten out.
  9. Dunk each of the pretzels into the boiling water for 5 seconds, then place them onto a baking sheet and sprinkle with coarse salt immediately while wet (I use the kosher stuff that is easy to find at the grocery store).
  10. Place the baking sheets into the oven. It took around 15 minutes for my pretzels to get golden and brown. Remove from the oven and eat immediately.
Homemade Fig Mustard

Homemade Fig Mustard

Fig and Port Grainy Mustard (slightly sweet)

½ Tablespoons Brown Mustard Seeds
1½ Tablespoons Yellow Mustard Seeds
½ Teaspoon Kosher Salt
1 ¼ Cup Mustard Powder (not Coleman’s)
1½ Tablespoons Cider Vinegar
1/4 Cup Tawny Port
3 Tablespoons Chilled Fig Simple Syrup (recipe below)

4 Fresh Figs
½ Cup Granulated Sugar
½ Cup Water

  1. Add figs, sugar and water to a small saucepan.
  2. Over medium high heat, stir until sugar dissolves. Continue cooking a few minutes longer until figs become very soft.
  3. Mash the figs into the syrup and keep stirring. Once the figs are well mashed and fully incorporated into the mixture, remove from heat. Pour contents of saucepan through a strainer and remove the large bits of fig.
  4. The syrup that’s left is the fig simple syrup. You can use the fig bits in oatmeal, ice cream or just eat them. You will have syrup left over after making the mustard.
  1. Grind the mustard seeds in a spice or coffee grinder for a few seconds, or in a mortar and pestle. You should leave them pretty chunky (near whole) because you want this to be a grainy mustard…but you could grind them to whatever consistency you like.
  2. Pour the ground mustard seeds into a bowl and add the salt and mustard powder.
  3. Add in the vinegar, port and simple syrup and stir well. Once everything is thoroughly mixed, pour everything into a glass jar (with a lid) and refrigerate.
  4. Wait at least 12 hours before using.
  5. Mustard made this way will last several months if refrigerated in a sealed jar. This recipe makes 1/2 – 3/4 cups of mustard.

Brown Sugar Mustard (#1 crowd fav)

1 cup dry mustard
1/2 cup light brown sugar
1/2 tsp dried marjoram
1 tsp salt
dash cayenne
1/2 cup white vinegar
1/2 cup olive oil

Coarse Rosemary Honey Mustard (a standard whole grain)

½ Tablespoons Brown Mustard Seeds
1½ Tablespoons Yellow Mustard Seeds
½ Teaspoon Rosemary Salt
¾ cup mustard powder
¼-1/2 cup champagne vinegar
2 tbsp honey

Coarse-Ground Red Wine Mustard (packs a red vinegar punch)

1/4 cup white or brown mustard seeds
1/4 cup red wine vinegar
1/4-1/2 cup dry red wine
1/2 cup dry mustard
2 tsps salt
1/4 tsp allspice
2 tbsps cold water

  1. For any of the recipes above, place all the ingredients in a blender or food processor.
  2. Process for 30 seconds, scrape down the sides and process for 30 seconds more.
  3. Add additional liquid if to thick as mustard powder & seeds will absorb more of the liquid.
  4. Put in an airtight container and let stand at room temperature overnight or up to 1-2 days more. The mustard will mellow out in heat over time. Once it reaches desired mildness store in the fridge.

Favorite Dishes with Mustard:
Cumin & Dill Dijon Egg Salad with Radish Sprouts
Roasted Dijon Chicken Salad w/ Dried Cranberries & Sunflower Seeds
Whole-Grain Mustard & Rosemary Pork Chops

Leave a comment

Filed under @home {recipes to love}

recipe goodness :: community grains lazy sunday red flint polenta integrale

A Lazy Polenta

A Lazy Polenta

Well, by the sound of that title it sure does sound like I made something super fancy doesn’t it? Truth is Polenta integrale is the traditional Italian term for ‘whole milled’, meaning the whole corn kernel is coarse-milled together with nothing sifted out, offering a beautiful, rustic texture and hearty, full-flavor that lends itself as the perfect accompaniment to traditional ragús & savory braises, or just butter and cheese.

It just so happens that we’re selling this polenta {quite honestly the best I’ve ever had} in the Food52 Shop. Near extinct, this rare variety of corn was re-discovered in 2000 near the town of Trento in northern Italy. Lucky for us, it is currently in very limited production in the United States.  Here’s the kind of thing you can always have in your pantry and make a lazy, but outstanding Sunday supper out of just about anything you can throw in or on top of it. Polenta is your leftovers friend. And with this whole milled rustic version you’ll transport yourself to nonna’s table with a few stirs of a pot.

Rustic Polenta Integrale

Rustic Polenta Integrale

Lazy Sunday Polenta Integrale
Serves 2-3

1 cup polenta integrale
4 cups water
1 tablespoon butter {optional}
Salt to taste

Toppings or flavor inspiration: 

Rosemary, thyme or any fresh herb, chopped
Chopped red chili for a small kick
Sauteed mushrooms or grated truffles
Sauteed scallion
Leftover pasta sauce or ragu
Leftover grilled vegetables
Dollop of ricotta or goat cheese {let’s be honest, this is a must!}
Grilled or pan seared sausage
A poached egg!
Anything your heart desires

  1. Bring water and polenta to a gentle simmer in a heavy bottomed pot.
  2. Simmer on low for an hour, stirring regularly to prevent sticking on bottom of pot. Add herbs or red chili at this time, if desired. Go read a book.
  3. After an hour cover with a lid and turn heat off to allow polenta to absorb water. Go reorganize your closet.
  4. Add a pat of butter and kosher salt to taste. Stir and bring to a slow simmer to reheat. The consistency should be perfect, but if it’s too thick, add a bit of water to make it easy to stir, but still thick and hearty.
  5. Scoop into a bowl, top with cheese and anything you feel like eating.

Nonna-Worthy:
Homemade Gnocchi and Sauce: Channeling My Italian Grandmother
Homemade Ricotta
How to Cook the Perfect Poached Egg 
Braised Grass-Fed Beef Brisket and Polenta

Leave a comment

Filed under @home {recipes to love}

recipe goodness :: heidi swanson’s harissa spinach chop salad

A few good ingredients

A few good ingredients

I know a few people who would rather leave the lettuce eating to the rabbits. But they like cooked greens — spinach, collards, amaranth greens will all be happily stabbed with a fork and consumed. I also know a few vegetarians who roll their eyes when people suggest all they eat are salads. So when I came across Heidi Swanson’s {a well-known vegetarian cookbook author} recipe for a warm spinach chop, with hard-boiled eggs, garlic, almonds and harissa, not only did my mouth begin to water, but I felt like I discovered a solution to a salad that’s not just another salad.

Everything on this ingredient list I usually have on hand, except the spinach — so it’s an easy last minute menu saver if you can get your hands on some fresh cooking greens. And with the spice of the harissa, the crunch of the almonds, the tartness of the lemon and the substance of the egg, you’ll find this chop combines complex flavors and doesn’t leave you feeling like a peckish rabbit.

Heidi Swanson's Spinach Chop

Heidi Swanson’s Spinach Chop

Heidi Swanson’s Spinach Chop

1 lb. spinach {or other good cooking green — kale, collards}
1 tbs. extra-virgin olive oil
3 cloves garlic, minced
1 tbs. harissa
4 large hard-cooked eggs, peeled and chopped
1/2 cup slivered or whole almonds, toasted
Scant 1/2 tsp. fine-grain sea salt
Grated zest of 1/2 lemon

  1. Remove any tough spinach stems. Add ½-inch water to a pot and bring to a boil.
  2. Add spinach and stir constantly until the spinach collapses entirely, about a minute. Drain spinach and run cold water over it until cool. Spin-dry very well in a salad spinner, or press-dry in a clean kitchen towel.
  3. Finely chop the spinach. Heat oil in a large skillet over medium-high heat. Stir in the garlic and cook for about a minute, without letting it brown. Remove pan from heat and stir in harissa and spinach. Add eggs, almonds, salt, and lemon zest and stir again gently to combine well.
  4. Serve warm or at room temperature.

Stab-Worthy Salads:
Julia Child’s Salade Nicoise
Lime-Kissed Peach and Corn Summer Salad
Orzo, Spinach & Feta Summer Salad
Spinach, Strawberry & Halloumi Salad
Tomato, Basil & Feta Salad
The Ultimate Summer Slaw

1 Comment

Filed under @home {recipes to love}

recipe goodness :: lime-red chili grilled swordfish

Lime-Red Chili Swordfish

Lime-Red Chili Swordfish

The beautiful thing about swordfish is the heartiness of the meat. It’s the perfect grilling fish for someone whose worried about their filet falling through the cracks. And it’s just begging to be topped with a heaping spoonful of some lovely fresh salsa you whipped up — like the smooth spicy tomatillo blend or the bright avocado & peach salsa. I like to marinate it with a little olive oil and the juice of a lime with some red chili and fresh cilantro {or parsley for cilantro haters} just to add a little love to the fish itself. And if you don’t have time for a salsa topper, the marinated fish alone will please a crowd.


Grilled Swordfish with Tomatillo Salsa

Grilled Swordfish with Tomatillo Salsa

Lime-Red Chili Grilled Swordfish

6-8oz fillet per person
1 lime, zested and juiced
Drizzle of olive oil
1/2 red chili chopped
2 sprigs cilantro or parsley chopped
Salt and pepper to taste

  1. Lay the swordfish in a small casserole dish with sides.
  2. Juice, zest, drizzle all the marinade ingredients over the top and turn each fillet to coat.
  3. Cover and let it all hang out in the fridge for as little as 15 minutes or 2-3 hours if you have the time.
  4. Heat a grill to medium heat and cook for 3-4 minutes. Flip and cook for an additional 3-4 or until the fish is cooked through.
  5. Serve as is or with a fresh tomatillo or avocado & peach salsa topper.

Swim with the Fiddies:
Introducing grilled blowfish
Julia Child’s Fillet of Sole Meuniere
Sesame Ginger Lime-Poached Cod
Spicy Balsamic and Fennel Fish Stew

Leave a comment

Filed under @home {recipes to love}

recipe goodness :: grilled zucchini & summer squash pesto “pasta”

Grilled Zucchini & Summer Squash Pesto Pasta

Grilled Zucchini & Summer Squash Pesto Pasta

Summer is a time of agricultural abundance. A stroll through the weekend farmers’ markets is like a rainbow connection — ruby tomatoes, sunshine orange nectarines, golden summer squash, enviously green zucchini, deep purple eggplant. It doesn’t take a lot of effort to take your booty home and make a stellar meal. I’m a proponent of grilling just about anything {I’ve even been known to grill berries} — a little olive oil, salt and pepper is all you need and you can focus on the complexities of your wine paring, not your meal planning.

However, after making a large batch of basil-walnut pesto, I fell compelled to use that precious pairing before it went bad. A likely partner: pasta. But with the mercury rising to high 90s for much of July, a heavy meal was the last thing that appealed to my cravings. Enter zucchini & squash “pasta.” A few swipes of across my mandolin created thin, long strips that mimicked a tagliatelle noodle. Grilling only required enough time to make the squash tender and add some flame flavor. Once done, everything was tossed with the bright herby pesto, a handful of pine nuts for texture and we had ourselves a bowlful of fork twisting goodness.

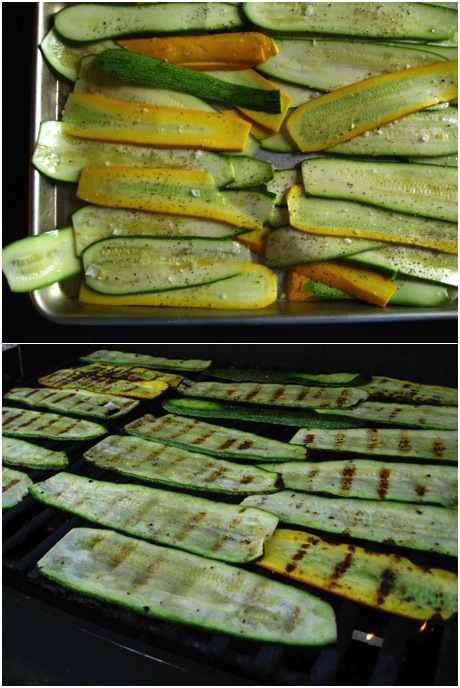
Grilled Zucchini and Summer Squash

Grilled Zucchini and Summer Squash

Grilled Zucchini & Summer Squash Pesto Pasta

1 zucchini per person
1 summer squash per person
olive oil
salt and pepper to taste
~1 tablespoon pesto per person
~1 tablespoon pine nuts per person

Pesto {makes ~1 cup}:
1 large bunch of basil, leaves only, washed and dried
1-2 cloves of garlic
1/4 cup walnuts or pine nuts {pine nuts are expensive, so walnuts are a nice sub}
1 cup freshly grated Parmesan
A few tablespoons of extra-virgin olive oil

  1. In a food processor add all the ingredients for the pesto and whiz until blended. Taste and add more garlic, nuts or olive oil to your liking and desired consistency.
  2. Pour pesto into an air tight container and cover with a thin layer of olive oil to protect from the air. Cover and store in the fridge or freezer if not immediately using.
  3. Remove the stem from the squash and zucchini and slice thinly lengthwise using a mandolin or sharp knife. Lay on a large baking sheet, drizzle with olive oil and season with salt and pepper.
  4. Grill 1-2 minutes on each side until slightly tender and shows grill marks.
  5. Toss in a bowl with pesto and top with pine nuts.

Grilled Goodness:
Gourmet Grilled White Truffle Corn
Grilled Thyme-Cumin Vegetable Kabobs

Lemon Herb Roasted Chicken
Some Like it HOT Pollo alla Diavola
Bison, a Better Burger Worth Biting Into

1 Comment

Filed under @home {recipes to love}

Labor Day Recipe Roundup

IT WOULDN’T BE A BBQ WITHOUT BOOZE 

Alton Brown’s Bourbon Mint Julep
Bottle of Baron {Refreshing “Island Cocktail” a la Tippling Bros.}

Fresh Lime-Margarita Marinated Watermelon
Kickin’ Ancho Chili Fresh Citrus Margarita
Pink Fizzy Lemonade Cocktails Beat the Heat
Smokey Margarita {a la Tippling Bros.}

Stand-Out Spanish Sangria
Summer Strawberry Chilled Chamomile Tea {non-alcoholic}
Spritzy Sunday Morning Citrus Cocktail {non-alcoholic}

SNACK’EMS {makes happy hour happier}

Avocado & Tropical Fruit Salsa {also good as an entree side}
Creole Roasted Fresh Corn-Tomato Salsa
Fresh Lime-Margarita Marinated Watermelon{double duty bites}
Inside-Out Scotch Eggs w/ Ground Lamb, Harissa Yolk & Panko Gremolata

Peppers Padron at Home
Rosemary, Truffle and Parmesan Chips or Fries
Spiced Sweet Potato Hummus
Union Square Bar Roasted Rosemary Nuts

SALADS 

Orzo, Spinach & Feta Summer Salad
Spinach, Strawberry & Halloumi Salad
Tomato, Basil & Feta Salad
The Ultimate Summer Slaw

PIZZA & BREADS {d’oh! why didn’t i try this yet}

Creative Crowd-Pleasing BBQ’d Pizzas
Red Chili-Lime Cornbread Muffins
Za’atar-Pecorino Toasted Crostini

FOR THE GRILL 

Bison, a Better Burger Worth Biting Into
Sesame Ginger Lime-Poached Cod
Pistachio-Encrusted Spring Lamb w/ Pickled Red Onions & Cumin Yogurt Sauce
Whole-Grain Mustard & Rosemary Pork Chops

DESSERT {life is short, eat it first}

Alton Brown’s Bourbon Banana’s Foster w/ Bourbon Ice Cream
Banana Puddin’ Chocolate Cups
 {bottom of post}
Julia Child’s Chocolate Mousse
Violet’s Lemon Cheesecake with BBQ’d Summer Berries{bottom of post}

Creole Roasted Corn-Tomato Salsa and Chips

Creole Roasted Corn-Tomato Salsa and Chips


Leave a comment

Filed under @home {recipes to love}

recipe goodness :: traditional tomatillo tops salsa notions

Traditional Tomatillo Tops Salsa Notions

Traditional Tomatillo Tops Salsa Notions

Each week’s trip the greenmarket feels like a treasure hunt. But despite the many visits I’ve made over the years, I’m still discovering new items that I’ve never cooked with before. This week’s experiment: tomatillos. Luckily my produce stand is manned with friends of Mexican descent, who are more than willing to share their traditional preparation secrets to create a tomatillo salsa that will top any prior notions of what makes salsa good.

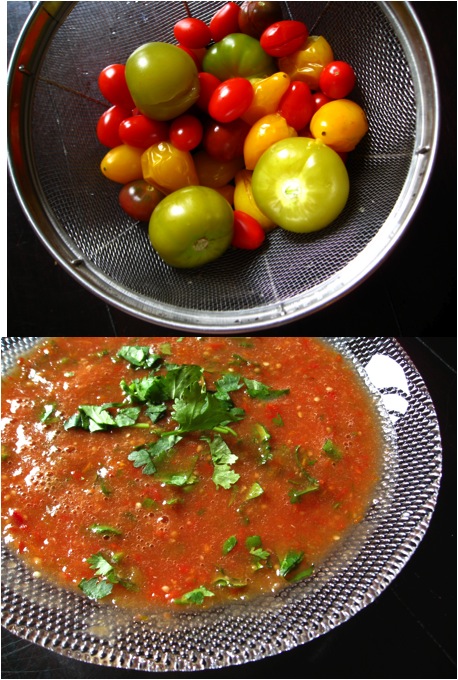
First: peel thin outer skin and cook 3 minutes in boiling water until color changes to a darker green.

Side by Side Tomatillos

Side by Side Fresh and Cooked Tomatillos

Second: Toss in the tomatoes and cook for 2 more minutes. Drain. Whiz. Salsa!

Salsafied

Salsafied

Traditional Tomatillo Salsa

4 tomatillos
~2 cups mixed yellow, red and black grape tomatoes
2 stems of cilantro, washed and finely chopped
1/2-1 red chilli {depending on heat pref}
1 scallion or 1/4 medium red onion
salt to taste

  1. Bring a pot of water to a boil with 4-5 inches of water
  2. Peel tomatillo and add for 2 minutes. Add tomatoes and cook for 2-3 more minutes until tender.
  3. Drain and blend thoroughly with onion, red chili and salt to taste.
  4. Mix in chopped cilantro by hand.
  5. Chill or serve immediately as a salsa or topping to fresh grilled fish.

Salsafied:
Creole Roasted Fresh Corn-Tomato Salsa
Avocado & Tropical Fruit Salsa 
Introducing grilled blowfish

2 Comments

Filed under @home {recipes to love}

recipe goodness :: balsamic-drizzled watermelon steak topped with feta, mint and pistachios

Watermelon-Feta Steak

Watermelon-Feta Steak

Every now and then something brilliant hits you over the head and you wish you discovered that genius trick first, patented it and retired to easy living on the shores of a remote caribbean island. I often struggle with slicing the unwieldy watermelon — do I cut it in half first, then slice it into easy-gripping triangles? Do I chop it into neat little cubes for easy bites that don’t require a fork and knife? Is there a *right* way to slice that big bertha? I don’t know the answer to that, but I do know that thanks to my brother’s brilliant find, I recently discovered the simplest plan of attack that, in my opinion, is the most beautiful as well. Simple circles. The result is like cutting into a juicy steak, only sweeter. Doesn’t that plate just make you swoon for summer?!

Simple Slicing

Simple Slicing

Balsamic-Drizzled Watermelon Steak Topped
with Feta, Mint and Pistachios

Serves a watermelon sized party {all ingredients optional}

1 Seedless Watermelon
1/2-1 lb fresh goat’s milk feta  {NYC: Ardith Mae at the greenmarket is the best!}
1 bunch fresh mint, chopped
1/2-1 cup shelled pistachios, chopped
Good aged balsamic for drizzling
Maldon salt to taste

  1. Place the watermelon on its side — if it is more round in shape, slice a thin edge off the rind to create a flat surface that you can lay on the cutting board to avoid rolling.
  2. With a large chef’s knife slice into 1-inch thick circles and set aside.
  3. Lay each circle flat and take a small paring knife to slice around the circle where the melon meets the rind.
  4. Place each melon circle in the center of a plate, top with crumbled feta, chopped mint, chopped pistachios and a drizzle of balsamic. Add flaky salt to taste, if desired {will bring out the sweetness of the melon}.

More Summer Stars:
Fresh Lime-Margarita Marinated Watermelon
Pink Fizzy Lemonade Cocktails Beat the Heat
Avocado & Tropical Fruit Salsa 
Creole Roasted Fresh Corn-Tomato Salsa
Lime-Kissed Peach and Corn Summer Salad
The Ultimate Summer Slaw

6 Comments

Filed under @home {recipes to love}

Do This:! Fragrance Meets Food with Aftelier’s Chef’s Essences

Aftelier Chef's Essences

Aftelier Chef’s Essences

You may have been to a bar recently where the mixologist sprayed a scent of some mysterious fragrance on the edge of your glass, and wondered if that’s how he got away with charging you $16 dollars for your drink. But you weren’t complaining as you downed that fancy cocktail speaking the praises of unexpected flavors and promptly ordered another. Adding fragrance to food and drinks is nothing new to the culinary elite, but since Mandy Aftel started her own line of essential oils after writing the book Aroma with Michelin-starred chef, Daniel Patterson, you can now add a dash of blood orange to your own vodka on the rocks or a drop of pink peppercorn to your vanilla ice cream. Sound crazy? Perhaps, but Mandy’s process of extracting the natural oils from these ingredients creates a softer, almost floral flavor that you can impart without pulling out your pepper mill or pulverizing a celery stalk into your bloody mary.

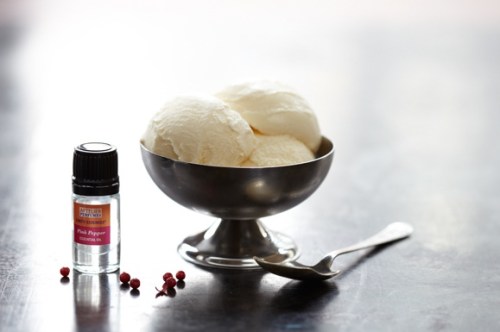
Pink Peppercorn meets Ice Cream

Pink Peppercorn meets Ice Cream (photo courtesy of Food52)

The oils are potent as they are completely extracted from the original ingredient, unlike most synthetic flavorings — Mandy recommends adding a drop or two to a teaspoon before adding to your dish to avoid the blunder of more pouring out and overpowering your creation {with 150 drops per bottle, these will last a long time.} Your first inclination may be to wonder why need a pink pepper oil when you can just grind pink peppercorns — would you do that into a chilled vodka, neat? Or why you would need blood orange when you can just squeeze the bright citrus yourself — would you do that over ice cream? These oils allow you to experiment with flavors and add an unexpected fragrance to a dish or cocktail that will put you on the level of any michelin-starred chef. Finish soups, create cocktails, a dash over fruit and my favorite, ice cream {I was serious when I suggested pink peppercorn — the hands down winner in our ice cream test session.}

Want to start playing with your food fragrance? Save $20 on the Food52 starter set HERE or select from any of her 50 essences. 


1 Comment

Filed under @home {recipes to love}, Do This!