Tag Archives: Snack

Fall in Love with Sardines, Save Dinner

Bela Sardines. Photo by James Ransom for Food52

Bela Sardines. Photo by James Ransom for Food52

When I was a wee little one, I remember my dad coming in from an afternoon tending to his garden and popping open a can of sardines for lunch. Curious about these little guys, I was not. Usually his offer to share a bite was met with a prompt and firm “ewwwww, no.”

It’s taken me 30 years to question why these cans of conveniently packed, flavorful little fiddies get such a bum rap. I don’t think twice when cranking a can of tuna open to save the day when I have nothing in the fridge for lunch. I recently read an article by Nicholas Day on Food52 speaking the praises of sardines — in his case because it conveniently saves dinner in a pinch for his own children. He feeds his kids sardines? This made me take pause. Well why not.

And then I was contacted by BELA Sardines to see if their cans of fresh-packed {within 8 hours of being caught and never frozen} Portuguese sardines would be something we would be interested in selling in the Food52 shop. We popped a few cans open at the office, broke out the crackers and started snacking. They were good — really, really good. Each is slightly smoked and packed in either Portuguese extra virgin olive oil or tomato sauce {4 flavors to choose from}. Beyond just the flavor, there are other reasons to love these little guys — they’re low-mercury, sustainably caught, and full of healthy fats. They are a pantry staple everyone should pile high.

I’m a convert. To be perfectly honest, I would be happy opening a can of these, pouring a nice glass of wine and calling that alone a mid-week meal. But it doesn’t take much to use them in a slightly more creative way, with still minimal effort, and have a dish to be proud of. Go ahead, give sardines a chance — you may be surprised by a new love.

Need a Little Inspiration?
Linguine with Sardines, Fennel & Tomato
Sardines, Avocado and Radish Salad with Upland Cress
Sardine Butter

Leave a comment

Filed under @home {recipes to love}, Do This!

recipe goodness :: how to make mama proud & homemade fresh mozzarella

Let me start by saying this was shockingly easy and a lot of fun. It was perhaps made easier by the Roaring Brook Dairy Mozzarella Cheesemaking Kit that my brother gave me for Christmas. The kit comes with everything you need, including the gloves and thermometer, but most importantly the few specialty items required for cheesemaking {citric acid, rennet}. Now that I have stretched my homemade curd skills, these are things I plan to stock up on so I can continue to make the mozz monday, tuesday, thursday.

Homemade Fresh Mozzarella

Ingredients:
1 gallon pasteurized whole milk {not organic or ultra-pasteurized}
1.5 teaspoon citric acid
1/4 rennet tablet
1 teaspoon salt {or more to taste}
1 1/4 cup chorine-free filtered/spring water, divided

Equipment:
Thermometer
Rubber gloves
Measuring spoons
Strong slotted spoon {this is a great one}
Microwave safe mixing bowl
Colander
1-gallon stainless steal or non-aluminum pot

PREPARATION:

  1. Wash your hands and make sure all equipment is completely sterilized and clean {a run through the dishwasher is a good way to do this to eliminate an dirt or dust that may impact the curd}.
  2. Have a timer near your stove.
  3. Prepare the rennet water solution by dissolving 1/4 tablet of rennet in 1/4 cup of cold chlorine-free water {not tap water and if you buy bottled, be sure to buy spring-sourced}. Set aside. Wrap the remaining pieces of tablet and store in freezer for future use.
  4. Measure 1.5 teaspoons of citric acid into 1 cup of cold chlorine-free water. Stir to dissolve completely and set aside.

HEATING THE MILK:

  1. Pour the milk in the pot.
  2. Heat the milk over a medium-low flame {about 10 minutes}. Using the thermometer, check the temperature. At 85° F, add the citric acid. Stir with a slotted spoon or whisk slowly for 20 seconds.
  3. When milk reaches 100° F {about 5 minutes}, stir in the rennet-water solution and add to the milk. Using a slotted spoon gently stir the milk in an up and down motion for approximately 30 seconds.
Step 1-Heating the Milk

Step 1-Heating the Milk

DEVELOPING THE CURDS:

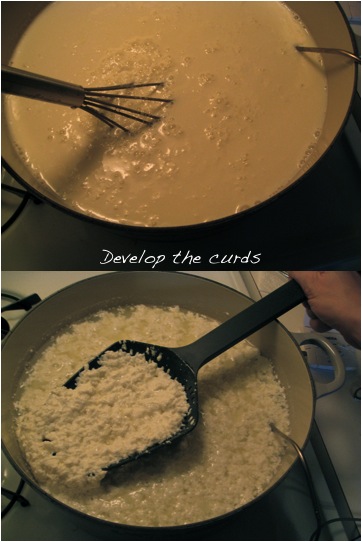
  1. Heat the milk a little more to 105° F and then turn the heat off. Cover the pot and let sit for 10 minutes. You should see signs of coagulation. The curds {the white mass} should look shiny and being to pull away from the side of the pot. The whey {liquid} should look like it has a yellow tint to it.
  2. To check if the curds are ready gently press the back of a spoon into the curds. If it leaves a dent, the curds are ready. If it does not, allow the curds to sit for another 2 minutes.

Step 2-Develop the CurdsDRAINING THE CURDS:

  1. The goal is to drain as much whey as possible from the curds while handling gently.
  2. Place the colander over a large microwaveable bowl.
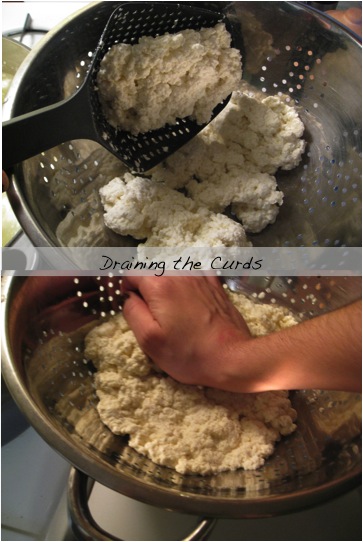
  3. Using a slotted spoon, gently lift up the curds and let the whey drip back into the pot. Then place the curds in the colander.
  4. When all the curds are in the colander, gently press the curds with the palm of your hand to push out as much whey as possible. When there is almost no whey coming out of the curds place the curds in an empty microwaveable bowl.
  5. Again, using the palms of your hands, press down gently on curds and remove as much whey as possible.
  6. You can save the whey for Homemade Spicy Carrot Kimchi! & Apple Chutney!.

Step 3-Draining the CurdsCOOKING AND KNEADING THE CURDS:

  1. Microwave the curds for 1 minute.
  2. Put on a pair of rubber gloves to protect your hands from the heat. Remove the bowl of curds. Drain any whey and then gently fold the curds over to distribute the heat. Continue to drain out any whey.
  3. Microwave the curds for an additional 30 seconds. Drain and kneed the curds again. Knead the curds until it begins to look smooth, shiny and is firming up.

Step 4-Cooking and Kneading the Curds.jpg

STRETCHING THE CHEESE:

  1. Take the temperature of the cheese. It must be 135° F to stretch properly. If it isn’t hot enough, microwave for another 30 seconds until the cheese reaches temperature. Add the salt and any other herbs you want to use and begin to work into the cheese by stretching and folding, and repeat this movement.
  2. Holding the cheese up, let it fall on itself. If you prefer a softer texture, don’t stretch the cheese as much. As soon as it is smooth and shiny {looks like taffy} shape it into a ball.
  3. Form ball by pulling and tucking the edges underneath the cheese and smoothing the top and sides. If you want to eat it warm, just wrap it tightly in plastic wrap. Or, if you want to keep the shape, place each ball in a large bowl of ice water for 15 minutes.
  4. Remove from water, wrap in plastic wrap and refrigerate.
Step 5-Stretching the Mozz

Step 5-Stretching the Mozz

Fresh Mozz!

Fresh Mozz!

Get Back to Your Roots | More Scratch Projects:

CHEESE | Homemade Ricotta
BREAD | 101: How to Make Bakery Quality Bread @Home
PICKLES | Homemade Spicy Pickled Carrots
KIMCHI | Homemade Spicy Carrot Kimchi! & Apple Chutney!

4 Comments

Filed under @home {recipes to love}

recipe goodness :: early bird foods’ olive oil and maple syrup granola

Early Bird Olive Oil and Maple Syrup Granola

Early Bird Olive Oil and Maple Syrup Granola

I discovered the recipe through food52’s genius series, a weekly column of recipes that are nothing short of genius. I was in the mood to bake something quick and easy and was drawn to this nutty savory-sweet mix. One batch makes 7-8 cups, so this treat feed you for a few weeks {unless you’re like me and can’t stop grabbing a handful}.

Adapted very slightly from Early Bird Foods’ Farmhand’s Choice Granola

Makes about 7 cups

3 cups old-fashioned rolled oats
1 cup raw pumpkin seeds, hulled
1 cup raw sunflower seeds, hulled
1 cup unsweetened coconut chips
1 1/4 cup raw pecan halves, left whole or coarsely chopped
1/2-3/4 cup pure maple syrup {I prefer a little less sweet}
1/2 cup extra-virgin olive oil
1/2 cup packed light-brown sugar
Coarse salt

  1. Heat oven to 300 degrees.
  2. Place oats, pumpkin seeds, sunflower seeds, coconut, pecans, syrup, olive oil, sugar, and 1 teaspoon salt in a large bowl and mix until well combined. Spread granola mixture in an even layer on a rimmed baking sheet. Transfer to oven and bake, stirring every 10-15 minutes, until granola is toasted, about 45 minutes.
  3. Remove granola from oven and season with more salt to taste. Let cool completely before serving or storing in an airtight container for up to 1 month.

More For the Early Bird:
Blueberry, Lemon & Coconut Pancakes
Secret DiLaura Family Frittata with Sweet Italian Sausage
Herbed Buttermilk Biscuits
Royal British Cranberry-Almond Breakfast Scones

How To Cook The Perfect Sunny Side-Up Egg
How to Cook the Perfect 8.5 Minute Egg
Southern Breakfast Egg Casserole

Leave a comment

Filed under @home {recipes to love}

recipe goodness: aw nuts! darn good roasted rosemary nuts for the holidays

Roasted Nuts

It’s the holidays and that means we’re all running from party to party or even planning our own. We never want to show up empty handed and we’re often looking for a way to put out a great spread, without a lot of work. This recipe is your solution to both dilemmas. The recipe comes from the long-standing popular Union Square Cafe in New York City and it takes beer nuts to a new level. Hitting on every taste-bud, I guarantee the bowl will be empty faster than the mini-hot dog platter. This salty treat will also make any gifted bottle of wine extra special when you walk through any guest’s door on your party route. Gifting Tip: buy cellophane bags from a party or paper store and tie the bag with a red ribbon that you can hang around the neck of a wine bottle — easy, inexpensive and extra impressive.

Coating Goodness

Roasted Rosemary Union Square Bar Nuts

Cook time: 10 minutes

2 1/4 cups unsalted mixed nuts
2 Tablespoons chopped fresh rosemary leaves
1/2 teaspoon cayenne pepper
2 teaspoon dark brown sugar
2 teaspoon sea salt
1 Tablespoon melted butter

  1. Preheat oven to 350°F.
  2. Spread nuts out on cookie sheet and toast for 10 minutes or until just turning golden brown.
  3. In a bowl combine all other ingredients and combine with nuts while warm.
  4. Toss thoroughly until well mixed and let cool before adding to an air tight container or gift bags.

Aw Nuts, I Need More Party Ideas!
Cinnamon Sugar & Dark Cocoa Almonds
Inside-Out Scotch Eggs w/ Ground Lamb, Harissa Yolk & Panko Gremolata
Mini Wild Mushroom Shepherd’s Pie w/ Scotch! {bottom of post} 
Autumn Manhattan {Herby Garnished Classic a la Tippling Bros.}
Fireside Sparks {Champagne Cocktail a la Tippling Bros.}
Smokey Margarita {a la Tippling Bros.}

5 Comments

Filed under @home {recipes to love}

recipe goodness :: peppers padron at home

Peppers Padron

Anytime I see these little suckers on a restaurant menu, I am almost always certain to order them. They are simple, salty little snacks that are most often found in Spanish tapas bars. They are mostly very mild, but every now and then you get a surprise spicy one which is part of the fun. After a recent trip to Barcelona I brought back a packet of seeds to see if I could grow and replicate this plate at home. The result: success. If you can’t find your own seeds or seedlings to grow in your garden, these peppers are growing in popularity and can often be found in grocery stores or local farmers’ markets.

Roasted Peppers Padron

1/2-1 lb of Padron peppers
1-2 tablespoons olive oil
Maldon salt for sprinkling

  1. Add olive oil to a hot pan, when the oil is hot and shimmering add the peppers.
  2. Cook and stir the peppers until the skin is brown and blistered about 2-3 minutes.
  3. Remove the peppers from the pan, place on a plate and sprinkle with Maldon salt to taste.

Leave a comment

Filed under @home {recipes to love}

recipe goodness :: inside-out scotch eggs w/ ground lamb, harissa yolk & panko gremolata

Inside-out Scotch Egg

What is an inside-out scotch egg you ask? If you want to be a traditionalist, the scotch egg usually involves enrobing a hard boiled egg with ground meat, breading it and deep frying that sucker. As I prepared for 8.ate@eight’s Robert Burn’s night with the Tippling Bros., I knew I didn’t want to be deep frying, nor serving something that ends up being the size of your fist, so I took inspiration from these flavors, flipped them inside out and created an appetizer that is creamy, spicy and somewhat devilish — the perfect drinking companion. Serve this at your Superbowl party and you will be legendary!

Inside Out Scotch Egg With Ground Lamb, Harissa Yolk & Panko Gremolata
Makes 12 | Total Time: 1 hour, 30 minutes

6 Eggs, two-weeks old

Lamb:
¼ lb ground lamb
1 teaspoon harissa paste
salt

Harissa Yolk:
¼ cup mayonnaise
1 teaspoon Dijon mustard
1 teaspoon chives, chopped very fine
1 teaspoon harissa paste {add more for spicier kick}
1/8 teaspoon salt
¼ teaspoon ground black pepper

Panko Gremolata:
¼ cup panko breadcrumbs
1 tablespoon olive oil
1 garlic clove, minced
zest of 1 lemon
2 tablespoons of fresh parsley, chopped

For the eggs and lamb:

  1. Use two-week old eggs to allow hard boiled egg to separate from the shell more easily. The night before you plan to make, rest each egg horizontally in the carton with the lid open. This will help center the yolk for better presentation.
  2. Bring eggs to room temperature for 30 minutes {still resting on their sides}.
  3. Add eggs to a large pot and fill with water, covering the eggs by at least an inch. Salt the water and bring to a boil.
  4. When water is boiling, remove from heat and cover with a lid for 30 minutes.
  5. While eggs rest, sauté ground lamb, harissa paste and salt until no longer pink. Remove from heat and drain any excess oil.
  6. After 30 minutes, cool eggs in ice bath immediately and rest for 20 minutes.
  7. While eggs cool, make gremolata.
  8. Once cooled, roll each egg along the counter to crack shells and place back in cold water for 5 minutes to allow for easy separation between egg and shell.
  9. Remove the shell, cutting each egg in half and remove the yolk into a separate bowl.
  10. Mash the egg yolk till powdery and then add remaining ingredients. Taste mixture and add additional harissa if you prefer spicier flavor.
  11. When ready to assemble, use a small spoon to scoop lamb into the cavity of each egg half.
  12. Using a pastry bag and tip with a large opening, pipe the egg mixture on top of the lamb in each cavity.
  13. Right before serving, sprinkle the gremolata on top of the yolk and enjoy!

For the Gremolata:

  1. In a small sauté pan heat olive oil on medium heat and add panko breadcrumbs. Continue stirring until panko breadcrumbs are light brown in color.
  2. Add minced garlic and lemon zest and stir to release the flavors, about 2 minutes.
  3. Remove from heat and add to chopped parsley.
  4. Set aside until ready to serve {may get soggy if added to eggs to early}

You Might Also Like These:
How To Cook The Perfect Sunny Side-Up Egg
How to Cook the Perfect 8.5 Minute Egg
Mini Wild Mushroom Shepherd’s Pie w/ Scotch! {bottom of post}

3 Comments

Filed under 8.ate@eight, @home {recipes to love}

Soft & Salty Snack @Sigmund Pretzelshop

Sigmund Pretzelshop Selection

In New York it’s not very hard to find a soft pretzel to satisfy your snack craving — they’re sold street-side at practically every corner cart. But it’s also not very hard to be disappointed by those salty twists that are often stale and taste of the strange burnt smell that wafts disturbingly from the pushcart. But if you head down to the East Village you will discover a whole new world of soft pretzels, far beyond the standard twist you may be used to. At Sigmunds Pretzelshop you can choose from an array of fat, crusty soft pretzels topped with the standard white salt crystals or more creative toppings such as jalapeno cheddar or caramel pecan to satisfy your sweet tooth. If you’re not already excited by souped up softy, you can also choose from their FREE selection of dips to accompany your snack. I had the pumpkin seed pretzel with whole-grain mustard {of course} and loved the nutty twist. And if you’re hungry for more than just a bite, Sigmunds has gone beyond the simple twist, offering soft pretzel sandwiches stuffed with such goodies as mozzarella, tomato & pesto or ham & fontina. Delicious!

Sigmund Sweet Cinnamon Sugar Pretzel

PRETZELS
$3.00 – 3.50
salted
caraway
poppy
sesame
jalapeno cheddar
gruyere paprika
seven chile
garlic parsley
cinnamon raisin
caramel pecan

Sigmund Pumpkin Seed Soft Pretzel

*****
DIPS
{free!}
whipped butter
wholegrain mustard
honey mustard
beet-horseradish mayo
herb goat cheese
cream cheese
nutella

*****

Sigmund Soft Pretzel Sandwiches

*****
SANDWICHES
$7.00

roast turkey with gouda and apple
roast beef with horseradish and red onion
smoked salmon with dill cream cheese
mozzarella, tomato and pesto
*****

The Skim: Soft pretzels — salty, sweet or as a sammy, but a satisfying snack from Sigmund Pretzelshop no matter how you select.
Map: {29 Avenue B, btw 2nd & 3rd}
Reservations: Not needed!
Phone: 646.410.0333

1 Comment

Filed under Eat Here!