Tag Archives: Side

recipe goodness :: community grains lazy sunday red flint polenta integrale

A Lazy Polenta

A Lazy Polenta

Well, by the sound of that title it sure does sound like I made something super fancy doesn’t it? Truth is Polenta integrale is the traditional Italian term for ‘whole milled’, meaning the whole corn kernel is coarse-milled together with nothing sifted out, offering a beautiful, rustic texture and hearty, full-flavor that lends itself as the perfect accompaniment to traditional ragús & savory braises, or just butter and cheese.

It just so happens that we’re selling this polenta {quite honestly the best I’ve ever had} in the Food52 Shop. Near extinct, this rare variety of corn was re-discovered in 2000 near the town of Trento in northern Italy. Lucky for us, it is currently in very limited production in the United States.  Here’s the kind of thing you can always have in your pantry and make a lazy, but outstanding Sunday supper out of just about anything you can throw in or on top of it. Polenta is your leftovers friend. And with this whole milled rustic version you’ll transport yourself to nonna’s table with a few stirs of a pot.

Rustic Polenta Integrale

Rustic Polenta Integrale

Lazy Sunday Polenta Integrale
Serves 2-3

1 cup polenta integrale
4 cups water
1 tablespoon butter {optional}
Salt to taste

Toppings or flavor inspiration: 

Rosemary, thyme or any fresh herb, chopped
Chopped red chili for a small kick
Sauteed mushrooms or grated truffles
Sauteed scallion
Leftover pasta sauce or ragu
Leftover grilled vegetables
Dollop of ricotta or goat cheese {let’s be honest, this is a must!}
Grilled or pan seared sausage
A poached egg!
Anything your heart desires

  1. Bring water and polenta to a gentle simmer in a heavy bottomed pot.
  2. Simmer on low for an hour, stirring regularly to prevent sticking on bottom of pot. Add herbs or red chili at this time, if desired. Go read a book.
  3. After an hour cover with a lid and turn heat off to allow polenta to absorb water. Go reorganize your closet.
  4. Add a pat of butter and kosher salt to taste. Stir and bring to a slow simmer to reheat. The consistency should be perfect, but if it’s too thick, add a bit of water to make it easy to stir, but still thick and hearty.
  5. Scoop into a bowl, top with cheese and anything you feel like eating.

Nonna-Worthy:
Homemade Gnocchi and Sauce: Channeling My Italian Grandmother
Homemade Ricotta
How to Cook the Perfect Poached Egg 
Braised Grass-Fed Beef Brisket and Polenta

Leave a comment

Filed under @home {recipes to love}

recipe goodness :: heidi swanson’s harissa spinach chop salad

A few good ingredients

A few good ingredients

I know a few people who would rather leave the lettuce eating to the rabbits. But they like cooked greens — spinach, collards, amaranth greens will all be happily stabbed with a fork and consumed. I also know a few vegetarians who roll their eyes when people suggest all they eat are salads. So when I came across Heidi Swanson’s {a well-known vegetarian cookbook author} recipe for a warm spinach chop, with hard-boiled eggs, garlic, almonds and harissa, not only did my mouth begin to water, but I felt like I discovered a solution to a salad that’s not just another salad.

Everything on this ingredient list I usually have on hand, except the spinach — so it’s an easy last minute menu saver if you can get your hands on some fresh cooking greens. And with the spice of the harissa, the crunch of the almonds, the tartness of the lemon and the substance of the egg, you’ll find this chop combines complex flavors and doesn’t leave you feeling like a peckish rabbit.

Heidi Swanson's Spinach Chop

Heidi Swanson’s Spinach Chop

Heidi Swanson’s Spinach Chop

1 lb. spinach {or other good cooking green — kale, collards}
1 tbs. extra-virgin olive oil
3 cloves garlic, minced
1 tbs. harissa
4 large hard-cooked eggs, peeled and chopped
1/2 cup slivered or whole almonds, toasted
Scant 1/2 tsp. fine-grain sea salt
Grated zest of 1/2 lemon

  1. Remove any tough spinach stems. Add ½-inch water to a pot and bring to a boil.
  2. Add spinach and stir constantly until the spinach collapses entirely, about a minute. Drain spinach and run cold water over it until cool. Spin-dry very well in a salad spinner, or press-dry in a clean kitchen towel.
  3. Finely chop the spinach. Heat oil in a large skillet over medium-high heat. Stir in the garlic and cook for about a minute, without letting it brown. Remove pan from heat and stir in harissa and spinach. Add eggs, almonds, salt, and lemon zest and stir again gently to combine well.
  4. Serve warm or at room temperature.

Stab-Worthy Salads:
Julia Child’s Salade Nicoise
Lime-Kissed Peach and Corn Summer Salad
Orzo, Spinach & Feta Summer Salad
Spinach, Strawberry & Halloumi Salad
Tomato, Basil & Feta Salad
The Ultimate Summer Slaw

1 Comment

Filed under @home {recipes to love}

recipe goodness :: grilled green garlic

Grilled Spring Garlic

Grilled Green Garlic

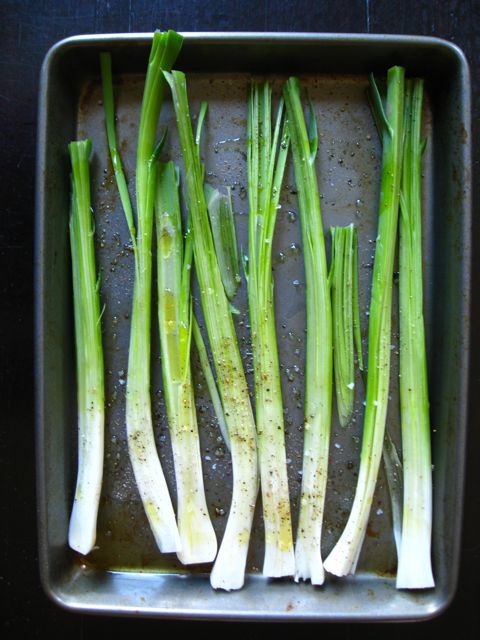
Springtime brings lots of treasures that are here for a blink of an eye and then gone from our flourishing greenmarkets. Ramps, strawberries, asparagus — just some of the items that get loaded into our resuable shopping bags as we lust over these edible signs of the outdoor dining season. One of my favorite flash finds is green garlic {also known as spring garlic or new garlic}. These long green shoots look a lot like scallions, but are the beginnings of the larger garlic bulb we have come to be more familiar with. When the farmers trim these stalks it makes way for those bulbs to continue growing throughout the season and brings us a mild sweet garlic treat as a bonus. My favorite thing to do is toss them with olive oil, salt and pepper and throw them on the high rack of the grill to slow roast for 10-15 minutes until perfectly tender. They are mild enough to be eaten on their own, but make a killer topping for crostini slathered in ricotta, grilled pizzas, a nice juicy steak or even eggs.

Grilled Green Garlic

1-2 bunches spring garlic
olive oil
salt & pepper

  1. Trim roots and dark green fiberous leaves from garlic stems and slice in half lengthwise.
  2. Toss with olive oil, salt and pepper to coat.
  3. Place on the top rack of the grill with the heat on low and roast until tender and starts to brown.
  4. Serve whole or dice into smaller pieces as a topping.

Green Goddess 
Orzo, Spinach & Feta Summer Salad
Spinach, Strawberry & Halloumi Salad
Tomato, Basil & Feta Salad
The Ultimate Summer Slaw
Grilled Thyme-Cumin Vegetable Kabobs
How to Love a Radish
Violet-Radish Spring Salad with Secret Lemon-Garlic Dressing

4 Comments

Filed under @home {recipes to love}

recipe goodness :: how to love a radish {with sesame ginger lime-poached cod}

How to Love a Radish

The Radish is one of the most under-appreciated vegetables in my opinion. It’s often the last man standing on a veggie platter, the filler in the sad tasteless airplane salads or an ornament carved to serve no other purpose than to decorate a dinner plate.

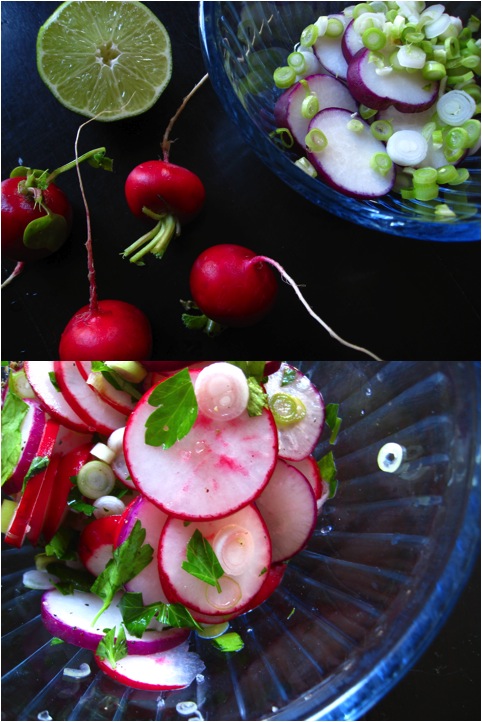
But what’s not to love about a radish — it’s pink! it’s purple! it’s Chanel red! A radish has a great crunch that can add texture to any dish and has a peppery bite that makes this veg one of the more flavorful fresh ingredients that can completely change a recipe without a lot of fuss. And because it’s hearty, radishes can keep for at least a week if stored properly in an airtight container, so you use them up as time allows.

We are often at a loss of what to do with a radish, other than slice it up into a bowl of greens. Keep this recipe in your back pocket for a vibrant and quick Spring radish slaw that is not only good on its own, but can be the perfect accompaniment to a grilled steak, fish, pork chop or just about anything asking for a punch of flavor {also xoxo on tacos!}

Grilled Ginger Sesame Cod with Radish Slaw

Grilled Ginger Sesame Cod with Radish Slaw

Spring Radish Slaw {on Sesame Ginger Lime-Poached Cod}
Serves 2

6 radishes, thinly sliced
3 scallions, diced
small handful of flat-leaf parsley, chopped
1/2 lime, zested and juiced
sel gris or other coarse salt
pepper to taste

1 x 12-16oz cod filet
1 teaspoon ground ginger
1 teaspoon black sesame seeds
1 teaspoon regular sesame seeds
1/2 lime
olive oil for drizzling
sel gris or other coarse salt
pepper to taste

For the Slaw:

  1. Wash and thinly slice radishes, removing roots and stems. Thinly dice scallions halfway up the dark green stem, discarding the rest and the root. Roughly chop parsley and add everything to a small bowl.
  2. Add the zest and juice of half a lime, a general sprinkle of coarse salt and pepper and toss everything together with your hands, giving it a good squeeze. Set the bowl to the side or place in the fridge if you don’t plan to use it within ~30 minutes. Enjoy as a salad as is, or continue to cook your favorite grilled item and use as a fresh slaw topping.

For the Fish:

  1. Cut a large enough piece of foil to place your fish filet in the center and be able to bring the edges together to create a sealed pouch after prep.
  2. Place your filet in the center and lightly drizzle with olive oil and the juice of half a lime. Bring up the edges of foil slightly if needed to prevent juice for getting all over your counter. Season with salt and pepper.
  3. In a small bowl mix the ginger and sesame seeds and sprinkle over the fish to generously cover. Save any extra for another time.
  4. Bring the edges of the foil together and fold over creating a tight seal, which leaving enough room for air to circulate to poach the fish.
  5. Heat your grill to low and place the foil pouch either directly on the grill or on the rack above, allowing it to cook 10-15 minutes. Check when the timer is down that the fish is completely white — add additional time if needed.
  6. Top your filet with the radish slaw, sprinkle some flaky maldon salt across the top and enjoy!

Summer Grillin’ is Good:
Gourmet Grilled White Truffle Corn
Grilled Thyme-Cumin Vegetable Kabobs

Creative Crowd-Pleasing BBQ’d Pizzas
Bison, a Better Burger Worth Biting Into
Whole-Grain Mustard & Rosemary Pork Chops 

3 Comments

Filed under @home {recipes to love}

Do This!: Learn Lacto-Fermentation {Kimchi! Chutney!} with Leda Meredith

Leda Meredith's Lacto Fermentation Sidetour Experience

Leda Meredith's Lacto Fermentation Sidetour Experience

2012 is the year of #scratchcooking. Getting back to the ingredients and making things that you can hold in your own two hands and be proud of. Last weekend I took my new-found pickling love to the next level with a lacto-fermentation class {not to be confused with a lactation class}. Woah. Spicy Carrot Kimchi and Apple Chutney that I would eat straight out of the jar was the end prize. The Sidetour event took place in Brooklyn and was hosted by Leda Meredith, author of The Locavore’s Handbook and food preservationist-extrodinaire.

We spent two hours learning the difference between several food preservation techniques and rules to live by to safely avoid the dreaded botulism {good news, botulism can’t happen when you ferment so keep reading}. Leda showed us a quick hot water bath pickle to distinguish between that jarring method and the lacto-fermentation approach which was going to be our main focus. I’ll skip over the details of the pickle since I covered it in my Happy Girl Pickle Post {read more here}. Jumping to fermentation, just know one thing: this is a quick and easy project that can be done in under 30 minutes, so don’t be scared off by big long words or the idea that jarring is a day-long commitment. Get involved!

Learn to Make Kimchi with Leda {here}

Leda Meredith Makes Hot Water Bath Pickled Carrots

Leda Meredith Makes Hot Water Bath Pickled Carrots

Lacto-Fermentation defined: the biological process by which bacteria converts starches to lactic acid.

Why Lacto-Fermentation is GOOD, not scary: loaded with probiotics that help with digestion and have anti-inflammatory properties. May even fight cancer — hooray!

Stage one of lacto-fermentation: vegetables are submerged in a brine that is salty enough to kill off harmful bacteria. The Lactobacillus good guys survive this stage and begin stage two.

Stage two of lacto-fermentation: the Lactobacillus organisms begin converting lactose and other sugars present in the food into lactic acid. This creates an acidic environment that safely preserves the vegetables – and gives lacto-fermented foods their classic tangy flavor.

Key Fermentation Tips to Live By:

  • Botulism CAN’T happen with fermentation. phew!
  • Fermented foods don’t need to be canned via hot water bath or pressure canning, so can easily be made with an empty mayo jar, salt, vegetables and water. No fancy sealing jars. No sterilization. No equipment needed. But they do need to be stored in the fridge.
  • More specifically, fermented foods should not be canned in a hot water bath, as the heat will kill off all bacteria needed for the lacto-fermentation process.
  • The salt brine is the safety factor in fermentation. As long as you maintain the proper ratio of 1 pint H2O to 2 teaspoons salt, you can play around with any seasonings and veg to let your creativity safely run wild.
  • Adding a splash of whey {from strained yogurt or cheese} will help jumpstart the fermentation process {finally, something to do with all the whey from my homemade ricotta!}
  • Must use filtered water. Chlorine and flouride found in our tap water could kill the bacteria {brita is fine, bottled water may not be since many brands are just bottled tap water}.
  • Must fill the jar all the way to the top with veg and brine so everything is 100% submerged {unlike hot water bath pickling where air space is needed}.
  • Product keeps forever, but flavors will continue to develop to the point of being too pungent and mushy. Peak flavor: 3 months.
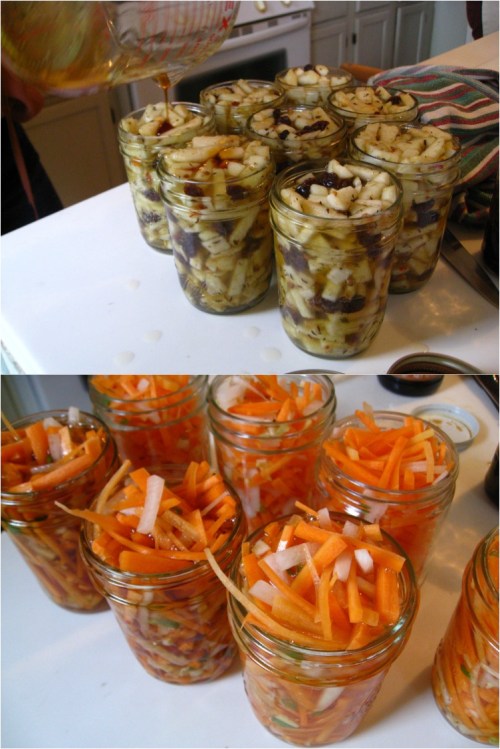
Fermented Apple Chutney and Spicy Carrot Kimchi

Fermented Apple Chutney and Spicy Carrot Kimchi

Spicy Carrot Kimchi

Prep Time: 15 minutes | Unrefrigerated Fermentation Time: 48 hours
Minimum Wait Until Eat: 1 week | Peak: 2-3 months

Yield: 1 quart or 1 liter

3 cups filtered water {brita or spring bottled}

1 1/2 tablespoons kosher or other non-iodized salt
1/2 teaspoon nam pla (fish sauce) OR soy sauce
3/4 pound carrots, peeled
1/4 pound daikon radish, peeled
1 scallion, white parts and some of the green, chopped
1 – 2 cloves garlic, peeled and thinly sliced
1 teaspoon grated fresh ginger root
1/2 teaspoon red pepper flakes, or more to taste

  1. Dissolve the salt in the filtered water. It’s important to use filtered water because the chlorine and other chemicals in most municipal tap water can interfere with the fermentation process.
  2. Stir in the fish or soy sauce.
  3. Finely julienne the carrots and daikon radish into matchstick sized pieces. A mandoline or thin slicing blade of a food processor will make this step easier.
  4. In a large bowl, toss the carrots, daikon radish, grated ginger, chopped scallion, garlic and red pepper flakes. Pack them into a clean quart or liter glass jar.
  5. Pour the brine over the other ingredients. Press gently on the vegetables and spices to release any air bubbles. The brine should completely cover the other ingredients. If the food floats out of the brine, weight it with a smaller glass jar filled with water. If the vegetables are staying immersed in the brine, just cover the jar they are in loosely with a lid.
  6. Place the jar of kimchi on a small plate to catch the overflow that may happen as it starts to ferment. Leave it at room temperature for 24 – 48 hours until you start to see bubbles and it smells slightly sour when you remove the lid.
  7. Once you see and smell signs that the kimchi is actively fermenting, transfer the jar to the door of your refrigerator. This is the warmest part of your refrigerator but still cooler than room temperature – perfect for your kimchi to keep slowly fermenting.
  8. If you plan to store it for longer than a month, move it to a cooler part of your refrigerator (one of the central shelves rather than the inside of the refrigerator door).

Spicy Apple Chutney

Prep Time: 10 minutes | Unrefrigerated Fermentation Time : 48 hours
Minimum Wait Until Eat: 2 weeks | Peak: 2 months 

Yield: 1 quart

1/2 cup filtered water {brita or spring bottled}

2 tablespoons honey
2 tablespoons whey* (see note below)
1 tablespoon apple cider vinegar
3 cups cored and finely chopped apples
1/2 cup raisins
2 tsp. kosher or other non-iodized salt
1 tsp. ground cumin
1 tsp. slightly crushed coriander seeds
1/2 tsp. red pepper flakes (or more, if you like your chutney spicy)
1/2 tsp. dried thyme
1/2 tsp. caraway seeds

  1. Combine the water, vinegar, honey and whey. Mix the combined liquids with the other ingredients and pack firmly into a quart-size glass jar, leaving at least an inch of head space. The liquid should come up to the top of the fruit. If it doesn’t, add a little filtered water.
  2. Cover and leave at room temperature for 2 days. You should see some bubbles on top by then, which is a sign of active fermentation.
  3. Refrigerate and leave for another week before eating. Will keep in the refrigerator for 2 months. Delicious as a side, on top of meat {pork chop!}, with cheese or on its own!
  4. *The whey in this recipe is already alive with healthy, probiotic bacteria and jumpstarts the fermentation process. To make whey drain plain whole yogurt or homemade ricotta through cloth or paper filters over a bowl. The liquid that separates out is whey.

Scratch Projects {Get Back to your Roots}:
CHEESE | Homemade Ricotta
BREAD | 101: How to Make Bakery Quality Bread @Home
PICKLES | Homemade Spicy Pickled Carrots 

Leave a comment

Filed under @home {recipes to love}, Do This!

recipe goodness :: spicy tomato-meyer lemon stewed chick peas

spicy tomato-meyer lemon stewed chick peas

spicy tomato-meyer lemon stewed chick peas

More from the book of “sometimes the best dishes come together when it’s 7pm, your stomach is talking to you, and you don’t have much to choose from in the fridge.” What I love about cooking with protein-rich chick peas is that you can always have them on hand in your cupboard, so when you’re in a pinch you can easily throw together a quick and filling dish. And because they have a great neutral flavor, chick peas can be canvases for any sort of creative seasoning you want to stew them in. After adding a little bit of this and a little bit of that, I think we have a winner worthy of sharing. It’s a little spicy {but you can adjust that to taste}, a little creamy {from the marriage of olive oil, butter and chick pea starch} and it’s brightened by a kiss of citrus. Simple flavors, uber delicious — and it only takes 5 minutes. Keep this one in mind for a crowd-pleasing side or a self-pleasing bowl of mid-week goodness.

Spicy Tomato-Meyer Lemon Stewed Chick Peas

Serves 1 as a main, 2 as a side

1 can chick peas, drained
1 teaspoon tomato paste
3 tablespoons olive oil
1 tablespoon butter
1 meyer lemon, juiced
1/4 teaspoon red pepper flakes
salt and pepper to taste
1 tablespoon fresh parsley, chopped

  1. Drain chick peas and add to a small saucepan with all the ingredients, except the parsley.
  2. Heat pot to low-medium and simmer lightly for 5 minutes, until liquid cooks down slightly and chick peas are warmed through.
  3. Pour into a bowl, top with maldon sea salt and chopped parsley.

Serve with: za’atar-pecorino toasted crostini

More Chicks to Fall in Love With…
B
arcelona Balsamic Chick Pea Salad
Lemon Herb Roasted Chicken
Some Like it HOT Pollo alla Diavola
Roasted Dijon Chicken Salad w/ Dried Cranberries & Sunflower Seeds

3 Comments

Filed under @home {recipes to love}

recipe goodness :: za’atar-pecorino toasted crostini

za'atar-pecorino crostini

za'atar-pecorino crostini

Sometimes the best things in food are created by opening your cupboards and blindly grabbing one ingredient with your right hand and another with your left. I love crostini — I think it’s the answer to any last minute appetizer need or the way to add a crunchy bite to a smooth bowl of soup or stew.

When I was experimenting with my balsamic and fish stew, I thought anyone without dentures might appreciate something with a different texture to round out their bowl. So with a few swipes of butter, a grating or two of pecorino and a sprinkle of za’atar {a spice mixture I think everyone should have in their cupboards}, this tasty little crostini came to life and proved worthy of sharing with you all. Who needs Stella D’Oro when you can make these from scratch in under 5 minutes.

Za’atar-Pecorino Crostini

1 fresh baguette
butter or olive oil for spreading
pecorino for grating
za’atar spice for sprinkling

  1. Heat oven to 450° F.
  2. Slice the baguette at a 45 degree angle, cutting as many pieces as you think will suit  your crowd {I underestimated their popularity, so ended up making a second batch — plan wisely!}
  3. Spread butter or brush olive oil on each piece to lightly coat. Using a microplane, zest pecorino on top of each crostini. Take a pinch of za’atar and sprinkle on top of the pecorino.
  4. Place all the crostini on a baking sheet and bake in the oven 5-8 minutes or until the cheese is slightly melted and the breaded is lightly toasted.
  5. Serve with soup, stew, roast chicken, fish, brisket, braised rabbit, whatever your heart desires!

Crostini Partners in Crime:
Grandma’s Italian Wedding Chicken Soup
Wild Child Broccoflower and Celery Root Soup

Homemade Gnocchi and Sauce: Channeling My Italian Grandmother
Lemon Herb Roasted Chicken
Spicy Balsamic and Fennel Fish Stew

3 Comments

Filed under @home {recipes to love}

recipe goodness :: bursting brussels sprouts with pancetta-clementine reduction

Pan-Roasted Brussels Sprouts with Pancetta-Orange Reduction

Pan-Roasted Brussels Sprouts with Pancetta-Orange Reduction

I can’t take credit for creating this recipe {my brother is the mastermind behind this one}, but I can attest to its deliciousness. There has been a brussels sprouts revolution over that past few years — this once polarizing veg, although cute, was often the recipient of turned up noses. Perhaps because they have the reputation of being boiled to death until taking on a soggy, grey characteristic that would have anyone using their napkin as a disposal system.

But these beautifully bright green mini-cabbages can carry some outstanding flavors when prepared properly — and by properly, I don’t mean to imply this is difficult. A little pancetta or bacon goodness, some brightening citrus and a few minutes in a pan to marry all the flavors in a caramelization collision and you have yourself a healthy, colorful side that is worthy of any dinner party.

Pancetta Rendering

Pancetta Rendering

Brussels Sprouts with Pancetta-Clementine Reduction

Serves 4 | 15-20 minutes

1/3 lb pancetta, diced
2 small shallots, sliced
1.5 lbs brussels sprouts
1/2 cup fresh clementine juice + zest {can use oranges too}
Salt and pepper to taste
Pine nuts to garnish

  1.  Cut pancetta into 1/4-inch cubes and cook on low heat in a large pan to slowly render the fat, ~5-10 minutes.
  2. Meanwhile, wash and halve brussels sprouts, removing any hard stem from the bottom. Remove skin from shallots and slice into rings.
  3. Once pancetta starts to firm and fat becomes slightly translucent, add the shallots and cook until tender. Then add the sprouts to the pan, raise the heat to medium and season with salt and pepper {start light on the salt as the pancetta is salty and you can always add more to taste}. Cook an additional 5-7 minutes until the sprouts start to brown on the edges and become slightly tender, stirring occasionally.
  4. Squeeze and zest clementines and add to the pan, stirring to coat. Allow to cook 3-5 minutes to reduce juice and warm through.
  5. Taste and add additional salt, pepper or juice as desired. Add to a bowl and top with pine nuts.

Complete My Dinner:
Flaky Cheese Straws, As Easy As Being Barefoot
Giada’s Sweet & Sour Pork Chops
Farro Salad with Steamed Kale and Roasted Pinenuts 

2 Comments

Filed under @home {recipes to love}

recipe goodness :: lime-kissed peach and corn summer salad

Summer Jersey Peaches

Two of my favorite things come out in the heat of the summer: corn and peaches. So the obvious thing to me is to put them together, add some citrus, heat and herby goodness and create a spectacular summer salad that can be made in 5 minutes. We served this up to our Freshocracy customers and also just shared a few bites at our Freshocracy Greenmarket cooking demo…to rave reviews. So for those of you who would like to try this simple sweet and savory salad at home, here’s to sharing…

Lime-Kissed Peach and Corn Summer Salad
Serves 4
Recipe modified from Jessica Albertson 

4 ears of corn, shucked
2 peaches
1/2-1 serrano pepper
1/2 red onion, diced finely
0.5 oz cilantro or mint, chopped
1 lime, zested and juiced
Salt and pepper to taste

  1. Shuck the corn and use a large sharp knife to cut off the root part of the cob that is sticking out, creating a flat end. Tip: Using a baking sheet with edges, hold the corn standing up on its flat end in the middle of the sheet and carefully run your knife down the sides to cut off the kernels. Cutting directly on the baking sheet with edges will catch the kernels as they fall off. Add the corn to a medium sized bowl.
  2. Wash and dice the peach into pieces approximately the size of the corn or a little larger.
  3. Depending on your tolerance for spice, dice 1/2 to all of the serrano and add to the mixture. Note: Be careful not to touch your eyes after handling a hot pepper!
  4. Finely dice red onion and add to the bowl.
  5. Wash and chop cilantro or mint and add to the bowl.
  6. Zest and juice lime into the bowl.
  7. Season with salt and pepper and mix gently.
  8. Serve as a side salad with fish, chicken or beef or just as a salsa!

Leave a comment

Filed under @home {recipes to love}

recipe goodness :: barcelona favorite recreated | balsamic chick pea salad

balsamic chick pea salad

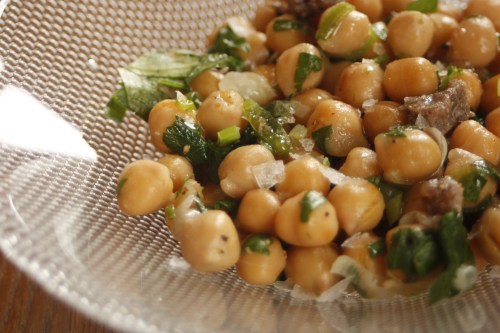
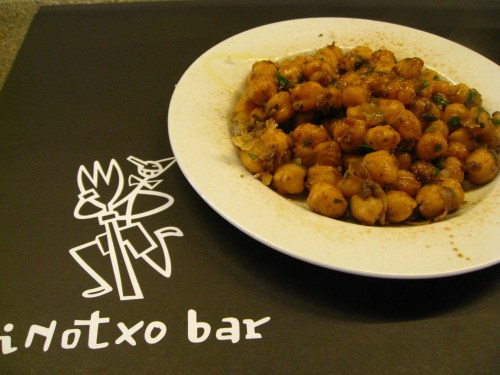
I had this dish at an amazing little tapas bar called Pinotxo in Barcelona’s Mercat de La Boqueria. I went for breakfast, so I didn’t expect to be served such a savory, delightful combination of flavors at 9am, but delightful it was! After conversing with my minimal spanish and a lot of hand gestures, the sweet and lively owner, dished up a warm combination of flavors — chick peas, brightened by the parsley with a great balsamic tanginess that just put this simple, but amazing dish over the top. You certainly can eat this breakfast, but it will also make for a great side salad or protein rich entree.

Barcelona Balsamic Chick Pea Salad

Serves 4-6

2 oz ground beef
2 cans unsalted chick peas, drained
2 scallions diced
1/4 cup parsley, finely chopped
Black pepper to taste
Olive oil for drizzling
Balsamic for drizzling
Fleur de sel to taste

In a large pan break up ground beef to very tiny pieces and brown just until not pink. Add scallions to pan for 1 minute to release fragrance and soften slightly. Add drained chick peas to pan and add black pepper to taste. Stir to combine and remove from heat, transferring to a serving bowl. Drizzle with good olive oil and lightly drizzle some good balsamic. Sprinkle generously with fleur de sel and enjoy! Serve warm or at room temperature.

The Original Inspirational Dish:

Amazing Chick Pea Breakfast from Pinotxo

More from Barcelona:
Barcelona Digested: Mercat de La Boqueria
Barcelona Digested: Chocolate Central
Barcelona Digested: Hang with the Locals – Cava and Cafe Catalonian Style

1 Comment

Filed under @home {recipes to love}

recipe goodness :: farro salad with steamed kale and roasted pinenuts

Farro Salad w/ Steamed Kale and Roasted Pine Nuts

I was at the farmer’s market recently and with the winter veg dwindling, I grabbed a bunch of kale and thought I would experiment with a green that I don’t normally cook with. Kale is one of the veggies that I want to add to my “I need more of this in my life” list. It has cancer-fighting properties is great for detoxing the body — just what I need after a late Saturday night. Everything else I just grabbed out my cupboard and fridge and threw together a lovely nutty and bright dish that is great on a cold winter’s night or as a cold salad on a warm day.

Farro Salad with Steamed Kale and Roasted Pine Nuts

Serves 4 | Time: 20 minutes

1 cup farro
1 bunch kale, stems removed
1/4 cup pine nuts
1/2 lemon
olive oil {equal parts to lemon juice}
salt and pepper to taste
parmesan for grating

  1. Pour farro into medium saucepan and cover with cold water until an inch above the grains. Let soak for 20 minutes.
  2. Drain farro and recover with cold water. Add a generous amount of kosher salt and bring to boil.
  3. Lower heat to a simmer and cover for 10 minutes.
  4. While farro is cooking, wash and dry kale. Cut into bite-sized pieces.
  5. Juice half a lemon into a glass measuring cup and add the same amount of olive oil. Add salt and coarsely ground pepper to taste. Set aside.
  6. In a small dry pan, toast pine nuts until light brown and remove from heat.
  7. After farro has cooked for 10 minutes, add kale to the pot on top of the farro and recover for an additional 5 minutes.
  8. After 5 minutes, turn off heat and check to be sure kale is bright green and tender and farro is cooked, but still has an al dente bite. If more time is needed, cover the pot off the heat for an additional 3-5 minutes.
  9. Drain farro and kale and transfer to a large bowl.
  10. Pour lemon and olive oil over salad and toss to mix. Serve in a bowl with grated parmesan and toasted pine nuts sprinkled on top. Enjoy!

I Need More of This in My Life:
Roasted Cauliflower with Gremolata Breadcrumbs
Savory Cauliflower Fried Rice
Greenmarket: Put Smarter, Cheaper & More Scrumptious Food on Your Table

1 Comment

Filed under @home {recipes to love}

recipe goodness :: inside-out scotch eggs w/ ground lamb, harissa yolk & panko gremolata

Inside-out Scotch Egg

What is an inside-out scotch egg you ask? If you want to be a traditionalist, the scotch egg usually involves enrobing a hard boiled egg with ground meat, breading it and deep frying that sucker. As I prepared for 8.ate@eight’s Robert Burn’s night with the Tippling Bros., I knew I didn’t want to be deep frying, nor serving something that ends up being the size of your fist, so I took inspiration from these flavors, flipped them inside out and created an appetizer that is creamy, spicy and somewhat devilish — the perfect drinking companion. Serve this at your Superbowl party and you will be legendary!

Inside Out Scotch Egg With Ground Lamb, Harissa Yolk & Panko Gremolata
Makes 12 | Total Time: 1 hour, 30 minutes

6 Eggs, two-weeks old

Lamb:
¼ lb ground lamb
1 teaspoon harissa paste
salt

Harissa Yolk:
¼ cup mayonnaise
1 teaspoon Dijon mustard
1 teaspoon chives, chopped very fine
1 teaspoon harissa paste {add more for spicier kick}
1/8 teaspoon salt
¼ teaspoon ground black pepper

Panko Gremolata:
¼ cup panko breadcrumbs
1 tablespoon olive oil
1 garlic clove, minced
zest of 1 lemon
2 tablespoons of fresh parsley, chopped

For the eggs and lamb:

  1. Use two-week old eggs to allow hard boiled egg to separate from the shell more easily. The night before you plan to make, rest each egg horizontally in the carton with the lid open. This will help center the yolk for better presentation.
  2. Bring eggs to room temperature for 30 minutes {still resting on their sides}.
  3. Add eggs to a large pot and fill with water, covering the eggs by at least an inch. Salt the water and bring to a boil.
  4. When water is boiling, remove from heat and cover with a lid for 30 minutes.
  5. While eggs rest, sauté ground lamb, harissa paste and salt until no longer pink. Remove from heat and drain any excess oil.
  6. After 30 minutes, cool eggs in ice bath immediately and rest for 20 minutes.
  7. While eggs cool, make gremolata.
  8. Once cooled, roll each egg along the counter to crack shells and place back in cold water for 5 minutes to allow for easy separation between egg and shell.
  9. Remove the shell, cutting each egg in half and remove the yolk into a separate bowl.
  10. Mash the egg yolk till powdery and then add remaining ingredients. Taste mixture and add additional harissa if you prefer spicier flavor.
  11. When ready to assemble, use a small spoon to scoop lamb into the cavity of each egg half.
  12. Using a pastry bag and tip with a large opening, pipe the egg mixture on top of the lamb in each cavity.
  13. Right before serving, sprinkle the gremolata on top of the yolk and enjoy!

For the Gremolata:

  1. In a small sauté pan heat olive oil on medium heat and add panko breadcrumbs. Continue stirring until panko breadcrumbs are light brown in color.
  2. Add minced garlic and lemon zest and stir to release the flavors, about 2 minutes.
  3. Remove from heat and add to chopped parsley.
  4. Set aside until ready to serve {may get soggy if added to eggs to early}

You Might Also Like These:
How To Cook The Perfect Sunny Side-Up Egg
How to Cook the Perfect 8.5 Minute Egg
Mini Wild Mushroom Shepherd’s Pie w/ Scotch! {bottom of post}

3 Comments

Filed under 8.ate@eight, @home {recipes to love}

Crispy Cayenne Roasted Potatoes

Crispy Cayenne Roasted Potatoes

Still on the wintry kick here — winter hibernation, means good satisfying meals that don’t leave you hungry or bored with flavor. After a visit to the farmer’s market, I came home with an array of colorful potatoes just begging to be roasted and crispy. These are not your mother’s potatoes. I suggested a few varieties below, but you can use any combination, although I like the smaller spuds that are easy to cut into bite-sized pieces and get a nice charred edge on them. I also like these because they vary in both color and flavor, so you take a simple roasted potato dish to something with much more depth and with no additional effort. This recipe is easy to throw together as a last minute side dish and requires minimal prep.

Crispy Cayenne Roasted Potatoes
Serves 4 | Cook Time: 45 minutes | 400º

¼ lb Fingerling Potatoes
¼ lb Purple Peruvian Potatoes
¼ lb Red-Skinned Potatoes
Olive Oil
1/4-1/2 teaspoon cayenne pepper
Salt and pepper to taste

  1. Preheat oven to 400 degrees.
  2. Rinse and dry potatoes. Cut each potato in half through its narrowest equator and add to medium sized bowl {quarter them if yours are larger than a ping pong ball in size}.
  3. Add olive oil to coat, salt, pepper and cayenne pepper {1/2 teaspoon if spicier potatoes are preferred}.
  4. Toss to coat and spread evenly on baking sheet.
  5. Slide baking sheet into middle or lower rack the in oven for 20 minutes.
  6. After 20 minutes, use a spatula to turn potatoes allowing opposite side to face up. Rotate baking sheet 180 degrees and place back in the oven for remaining 25-35 minutes, until outer edge is brown and crispy.

The Side Came First, Now For the Entree:
Lemon Herb Roasted Chicken
Pistachio-Encrusted Spring Lamb w/ Pickled Red Onions & Cumin Yogurt Sauce
Whole-Grain Mustard & Rosemary Pork Chops

Leave a comment

Filed under @home {recipes to love}

recipe goodness :: italian sausage & chard stuffin’ muffins

Italian Sausage & Chard Stuffin' Muffins

If you’re looking for another crowd-pleasing side to add to your holiday table, look no further. We made this recipe last year for Thanksgiving with my sister-in-law’s family. The addition of italian sausage, swiss chard and herbs brings a ton of great flavor to an otherwise very bready dish. What I love most about this recipe though, was how her family bakes this dish —  instead of just cooking in the cavity of a turkey or in a large casserole dish, her family puts stuffing in muffin tins — hence stuffin’ muffins!. Everyone always loves the crispy pieces from the corners of traditionally prepared stuffing, so to make sure everyone gets some crispy bites the stuffing is divided into muffin pans, also providing for the perfect individual serving sizes — how brilliant is that!

Italian Sausage & Chard Stuffin’ Muffins

Serves 16 | Prep Time: 30-45 mins. | Cook Time: 30 mins.

3/4 loaf french bread
1 1/2 cups nonfat milk
2 lbs Italian sausages
1 cup chopped fat-leaf parsley
1 garlic clover, minced or pressed
1 medium onion, chopped
1/2 cup finely chopped celery
1 1/2 lbs green swiss chard, stem ends trimmed, coarsely chopped
1 1/2 cups freshly shredded parmesan cheese
1 1/2 tsp dried basil
1/4 tsp dried rubbed sage
1/4 tsp dried rosemary
salt

Cut bread into 1/2-in slices. Place slices in a large bowl and add milk. Mix gently with a wooden spoon to saturate with milk and let stand about 30 mins. Stir occasionally.

Meanwhile, place a 6-8 QT. pot over high heat. Squeeze the sausages from casings into pot. Discard casings. Cook meat, stirring often to crumble, until lightly browned 10-15 mins; discard fat. Add parsley, garlic, onion and celery. Cook, stirring often, until vegetables are lightly browned 5-8 mins. Add chard and 1/2 cup water and cook, stirring often, until chard is wilted, about 5 mins.

With your hands, squeeze bread slices to break them into tiny pieces. Add cooked meat mixture, parmesan, basil, sage and rosemary. Season mixture with salt to taste.

Preheat oven to 350°. Spoon stuffing into a non-stick or well-greased muffin tins. Bake until hot or lightly browned, at least 30 mins.

Make ahead: Up to 1 day ahead, make stuffing, put in casserole or muffin tins, cover and chill. Allow about 1 hour to bake.

Set Your Holiday Table:
Autumn Manhattan {Herby Garnished Classic a la Tippling Bros.}
Fireside Sparks {Champagne Cocktail a la Tippling Bros.}
Cinnamon Sugar & Dark Cocoa Almonds
Rosemary, Truffle and Parmesan Chips or Fries
Best Butternut Squash and Green Apple Soup
Flaky Cheese Straws, As Easy As Being Barefoot

Roasted Cauliflower with Gremolata Breadcrumbs
Perfect Pear Cranberry Pie


2 Comments

Filed under @home {recipes to love}