Tag Archives: Spring

The Way to a Girl’s Heart: Beer-Bartered Trout

Prized Trout

Prized Trout

So this is how the story goes: girl buys new shiny grill, shiny grill needs its maiden voyage, girl craves something that can’t be bought — a friendly barter is made, as is a meal worthy of brag.

I look forward to each Sunday when I roll out of bed, hair disheveled, tote bags hung on the crook of my elbow, and meander a few blocks to the farmers’ market. The only thing on my agenda is to say hi to my friends, the farmers — everyone should  be friends with local farmers, they wake up at 4am to feed you. That’s a good friend.

But this particular day was different. I was hanging out with Keith at Grazin’ Angus Acres — eyeing their grass-fed beef and stocking up on  $10 / dozen golden eggs. Conversation turns to the things that fill empty hours — I was telling him about my new  brewing project {remember: brew beer, make friends} and he was telling me about his day of fishing for stream trout that was planned for Monday. Mmmm, beer. Mmmm, fresh trout. Boom: light bulb. “What would you say to a friendly barter?” he proposes. The genius plan: meet back at the market the following Sunday with two tradable treasures that would be mutually appreciated.

A Fine Finned Friend

A Fine Finned Friend

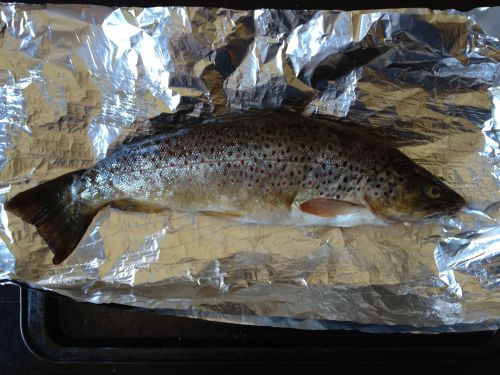
And so came home a fine finned friend — a beaut, as they say.

Grilled Stream Trout

1 whole trout, gutted and cleaned
2 green garlic stems, chopped
1 lemon sliced
4-5 pats of butter
salt and pepper to taste

With nothing more than a little butter, green garlic and lemon stuffed inside and blanketing the fiddy, I wrapped this guy in a foil pouch, threw him on the grill at a steady 350° {yes, the new grill has a gauge!} and cooked him until his clear-as-day eyes turned white — about 20 minutes.

Poach Pouch

Poach Pouch

Voila — maiden voyage success and a meal to remeber!

Grilled Trout

Grilled Trout

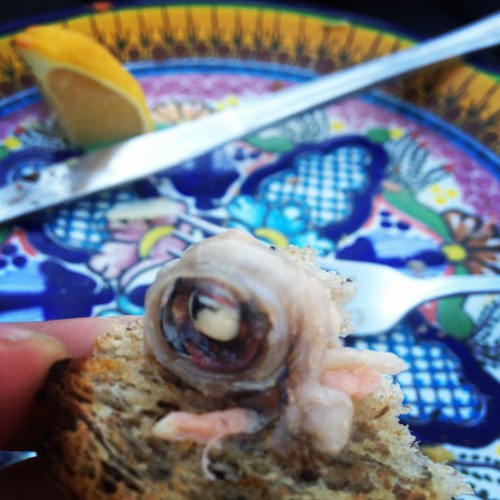
Oh, and the best part? A dare to eat the eye. I rarely turn away from a good challenge. Thank goodness for bread and a cold beer.

Eye see you

Eye see you

3 Comments

Filed under @home {recipes to love}, Do This!

recipe goodness :: more minted peas please!

peas

spring peas

There is something remarkably relaxing about shelling peas. It feels like I should be sitting under a big 200-year old oak tree, sipping lemonade while the biscuits bake in the oven. Sure, they are a bit of work, but as you snap each pod releasing the perfect pea pearls into your lapped bowl with a tink tink tink, there is a feeling reaped treasure. The beauty of these bright green gems is the hard work ends there. A little steam, olive oil and salt & pepper and you have a complete dish.

Pea Shelling Sunday

Pea Shelling Sunday

Steamed Spring Peas

2 lbs of peas in their pod {look for big fat pods}
1/4 cup water
salt & pepper to taste
1 tablespoon fresh mint, chopped
olive oil for drizzling

  1. Pour a glass of lemonade or wine and pop a squat with a large bowl in your lap.
  2. Patiently shell each pod letting the peas collect in the bowl {and saving the pods for stock?}
  3. In a 7-10″ pan add peas, water, salt and pepper and cover tightly with a lid.
  4. Heat to a simmer and then remove from heat and let rest with the lid on 10-15 minutes until tender.
  5. Drain any excess water, scoop into a bowl, drizzle with olive oil and season with chopped mint, more flake salt & pepper as needed.

It’s the Simple Things:
Homemade Ricotta
How To Cook The Perfect Sunny Side-Up Egg
Spritzy Sunday Morning Citrus Cocktail 
Barcelona Balsamic Chick Pea Salad
How to Love a Radish

2 Comments

Filed under @home {recipes to love}

recipe goodness :: introducing grilled blowfish

Marinated Blowfish

Marinated Blowfish

Flounder, Cod, Scallops — all usual suspects you would expect to see on an early summer grill. Sometimes it takes a little convincing to get out of the mainstream grill mentality, which is why I love shopping at the local greenmarket. The benefit of strolling stand to stand is that you have the opportunity to chat it up with the experts whose daily job it is to harvest and catch the very food you put on your plate. Last weekend my friendly fishmonger Warren from American Seafood convinced me that the thing to make that night was his freshly caught blowfish. Woah, aren’t those the second most poisonous vertebrates in the world? I thought Warren was my friend. In fact, the northern puffer that we catch locally is not toxic, unlike its blowfish counterparts swimming through asian waters. So fear not, this delectable catch is a catch!

With newly found finned friend in hand, I came home, tossed them in a bowl with a generous drizzle of olive oil, a squeeze of a lime and a few chopped scallions, leaving it all to marinate until dinner time. After a few minutes on the grill, we had ourselves a beautiful Spring supper that looked almost like a butterflied shrimp {they have a hard tail that stays on}, but was light and flaky like any good filet.

Grilled Blowfish

Grilled Blowfish

Grilled Blowfish

2 small blowfish per person.
Drizzle of olive oil
1 lime zested and juiced
salt and pepper to taste
Extra lime, olive oil and flaky salt for serving

  1. Toss everything in a casserole dish or bowl, coating the fish evenly and place in the fridge until ready to prepare (1-4 hours).
  2. Heat the grill to low and cook 4-5 minutes on either side, until flesh is no longer translucent and flakes easily from the bone.
  3. Drizzle with a bit of olive oil, a squeeze of lime and flaky salt.

Springtime Treats
Summer Strawberry Chilled Chamomile Tea {non-alcoholic}
Spinach, Strawberry & Halloumi Salad
Violet-Radish Spring Salad with Secret Lemon-Garlic Dressing

2 Comments

Filed under @home {recipes to love}

recipe goodness :: violet-radish spring salad with secret lemon-garlic dressing

violet-radish spring salad with secret dressing

violet-radish spring salad with secret dressing

Think this is just a pretty salad? Think again — this will change your attitude about boring leafy greens. Radishes are in season. Why do we love them? They’re colorful, crunchy and add a nice peppery bite. Violets are in season. Why do we love them? They’re pretty and you can find them all over public parks, so they’re free! {steer clear of the dog zone and make sure your park doesn’t spray pesticides}. Buy your favorite greens {mine are red mustard greens pictured above, for their slight peppery flavor and pretty purple and green leaves}, toss in a few slices of radishes and edible flowers and you have a kodak-worthy plate. But I’m also going to share a secret dressing with you that will not only make this dish eye-catching, but will put Paul Newman to shame.

I recently finished the book An Everlasting Meal, by Tamar Adler. I’m pretty experimental in the kitchen, but this book changed my outlook on so many things. Adler’s witty and approachable read encourages you to think about ways to extend everything you make in the kitchen. Use leftover roasted vegetables in a tart or omelet. Use stale bread to make toasted crostini or homemade breadcrumbs. Freeze all the ends of your carrots, celery, onions, fennel to make your own stock when you have some chicken bones on hand. Pretty simple, but thinking this way makes leftovers so much more interesting when you recreate a second dish instead of just reaheating what you had yesterday.

My favorite lesson and the recipe for a secret life-changing dressing: use all the pan drippings from a roast chicken to make your next salad dressing. Last week we roasted chicken with garlic, lemon, white wine, olive oil and thyme. After cooking away for 30-40 minutes we had a pan full of the most amazing concentrated flavors — things I would want in a dressing anyway, but normally dumped down the drain. This time, I poured everything straight into a container, tossed it in the fridge and pulled it out a few days later when I was looking for something to pour over my pretty Spring salad. The result: inquiries from the entire table as to where I bought this amazing dressing. Try it next time you roast anything and have some good liquid leftovers. It will change your salad world.

Violet-Radish Spring Salad with Secret Lemon-Garlic Dressing

1-2 radishes per person, sliced
handful of violet flowers and leaves, washed and stems removed
2-3 oz of lettuce leaves of choice per person
Drizzle of your leftover roasted whatever pan-drippings
Flaky Maldon salt and pepper to taste

  1. Rinse and dry all your greens and flowers
  2. Toss the greens in leftover dressing. Sprinkle flowers on top.
  3. Add salt and pepper to taste. ‘nough said.

Spring is in the Air:
Lemon Herb Roasted Chicken {for your dressing!}
Cumin & Dill Dijon Egg Salad with Radish Sprouts

Grilled Thyme-Cumin Vegetable Kabobs
Pistachio-Encrusted Spring Lamb w/ Pickled Red Onions & Cumin Yogurt Sauce 

2 Comments

Filed under @home {recipes to love}

Do This!: Get Back to Your Roots

Get Back to Your Roots

Get Back to Your Roots

There is something very gratifying about growing your own greens. Herbs, flowers, veggies, whatever. I must have acquired this love to ‘putz’ in the garden from my Italian father, who can almost always be found in this worn-out threads strolling the beds, pulling weeds, watering the seedlings and making our backyard look lush.

But there is more than just beauty to growing your own garden — it is quite a practical thing to do. During the summer, I often want to make a simple tomato and basil salad or fresh salsa for a BBQ.  But as I stroll through Whole Foods, I realize how quickly these things add up — a pint of tomatoes for $3.99, large bunches of parsley, cilantro basil and mint for $1.99 each {and 1/8 of which I actually need and end up wasting the rest}. The benefit of growing a few simple herbs that you like to use all the time is your own free herb aisle that costs you nothing more than a few seeds {or seedlings} and will last you from spring to late fall.  And let’s be honest, it’s more effort to go to the store to buy these things than it is to sprinkle a little water on your plants each day so that all you have to do is snip off what you need whenever your cooking heart desires.

Even if you don’t have much space {concrete jungle dwellers}, all you need is a few window boxes or small pots and you’re set. For most things you do need sunlight, but a few herbs will do just fine on a windowsill if that’s all you have access to.

Here’s what you need to get started:

  1. Small plastic cups and plastic wrap {if starting from seeds}
  2. Window boxes or pots {if starting from seedlings and to transfer your seeds to once they become seedlings. You can usually fit 2-3 kinds of herbs side by side in a window box depending on how long it is. And 1 herb per round pot.}
  3. Potting soil {the kind with time-releasing nutrients is great so you get the benefit of rich soil over a few months}
  4. Water {of course}
  5. Your own two hands 🙂
If you plant nothing else, plant these:
  1. Basil {really hearty and goes great on lots of summer veg}
  2. Thyme {perfect on sauteed/grilled mushrooms, zucchini, chicken. will continue to grow inside through the winter. }
  3. Rosemary {my favorite herb! will continue to grow inside through the winter}
  4. Sage {BBQ chicken’s favorite friend!}
  5. Mint {will keep coming back in your pot EVERY year. even after it dies in the winter. That’s an easy one!}
  6. Strawberries {surprisingly easy to grow in a pot. and what a treat!}
  7. Arugula {small leaf lettuce is really easy to grow in a window box — and SO much more flavorful}
  8. Parsley and Cilantro {don’t you just hate buying an entire bunch when you only need a little}
  9. Grape tomatoes {if you have sunny outdoor space for a really large pot, you will get hundreds of little juicy tomatoes off 1-2 vines. I eat them like candy!}
Tips:
If you have the patience to start seeds in a small plastic cup with a little soil, it’s awfully gratifying to see them sprout up. Most seeds only take 1-2 weeks to germinate, so even though it’s already June, you can still start some herbs that don’t need to grow as tall as tomato plants — like basil or parsley.
  1. Get a baking sheet and line it with a plastic cup or small pyrex dish for each plant. Fill it about 3/4 of the way with light, fine soil and place your seeds on top evenly spaced.
  2. Follow the directions from your seed packet, but it will probably tell you to cover the seeds with 1/8-1/4 inch of soil. Add water to soak the soil and then cover the cup with plastic wrap and use a rubber band to secure the wrap to the sides. This will create your own little greenhouse to trap moisture and heat and help the seeds grow {especially if starting in April or May before it’s warm outside}. Add more water each morning if needed to keep the soil moist.
  3. If you start in April/May before it’s warm, keep these inside, but whenever you get a warm day you can easily transfer all the cups on the sheet to a sunny spot outdoors to benefit from the natural heat/sunlight. If you’re starting now, you can place the cups outdoors. Just make sure they are covered so the birds don’t get them!
  4. Once your seeds become ~2-inch seedlings, transfer them to a larger pot with soil and let them spread their roots!
First Strawberry of the Season!

First Strawberry of the Season! (June 7th)

City Herbs

City Herbs

Sweet, Sweet Tomatoes

Sweet, Sweet Tomatoes

Recipes to Showcase Your Home Garden:
Creole Roasted Fresh Corn-Tomato Salsa
Spinach, Strawberry & Halloumi Salad
Tomato, Basil & Feta Salad
Lemon Herb Roasted Chicken
Whole-Grain Mustard & Rosemary Pork Chops

3 Comments

Filed under Do This!