Tag Archives: Summer

The Way to a Girl’s Heart: Beer-Bartered Trout

Prized Trout

Prized Trout

So this is how the story goes: girl buys new shiny grill, shiny grill needs its maiden voyage, girl craves something that can’t be bought — a friendly barter is made, as is a meal worthy of brag.

I look forward to each Sunday when I roll out of bed, hair disheveled, tote bags hung on the crook of my elbow, and meander a few blocks to the farmers’ market. The only thing on my agenda is to say hi to my friends, the farmers — everyone should  be friends with local farmers, they wake up at 4am to feed you. That’s a good friend.

But this particular day was different. I was hanging out with Keith at Grazin’ Angus Acres — eyeing their grass-fed beef and stocking up on  $10 / dozen golden eggs. Conversation turns to the things that fill empty hours — I was telling him about my new  brewing project {remember: brew beer, make friends} and he was telling me about his day of fishing for stream trout that was planned for Monday. Mmmm, beer. Mmmm, fresh trout. Boom: light bulb. “What would you say to a friendly barter?” he proposes. The genius plan: meet back at the market the following Sunday with two tradable treasures that would be mutually appreciated.

A Fine Finned Friend

A Fine Finned Friend

And so came home a fine finned friend — a beaut, as they say.

Grilled Stream Trout

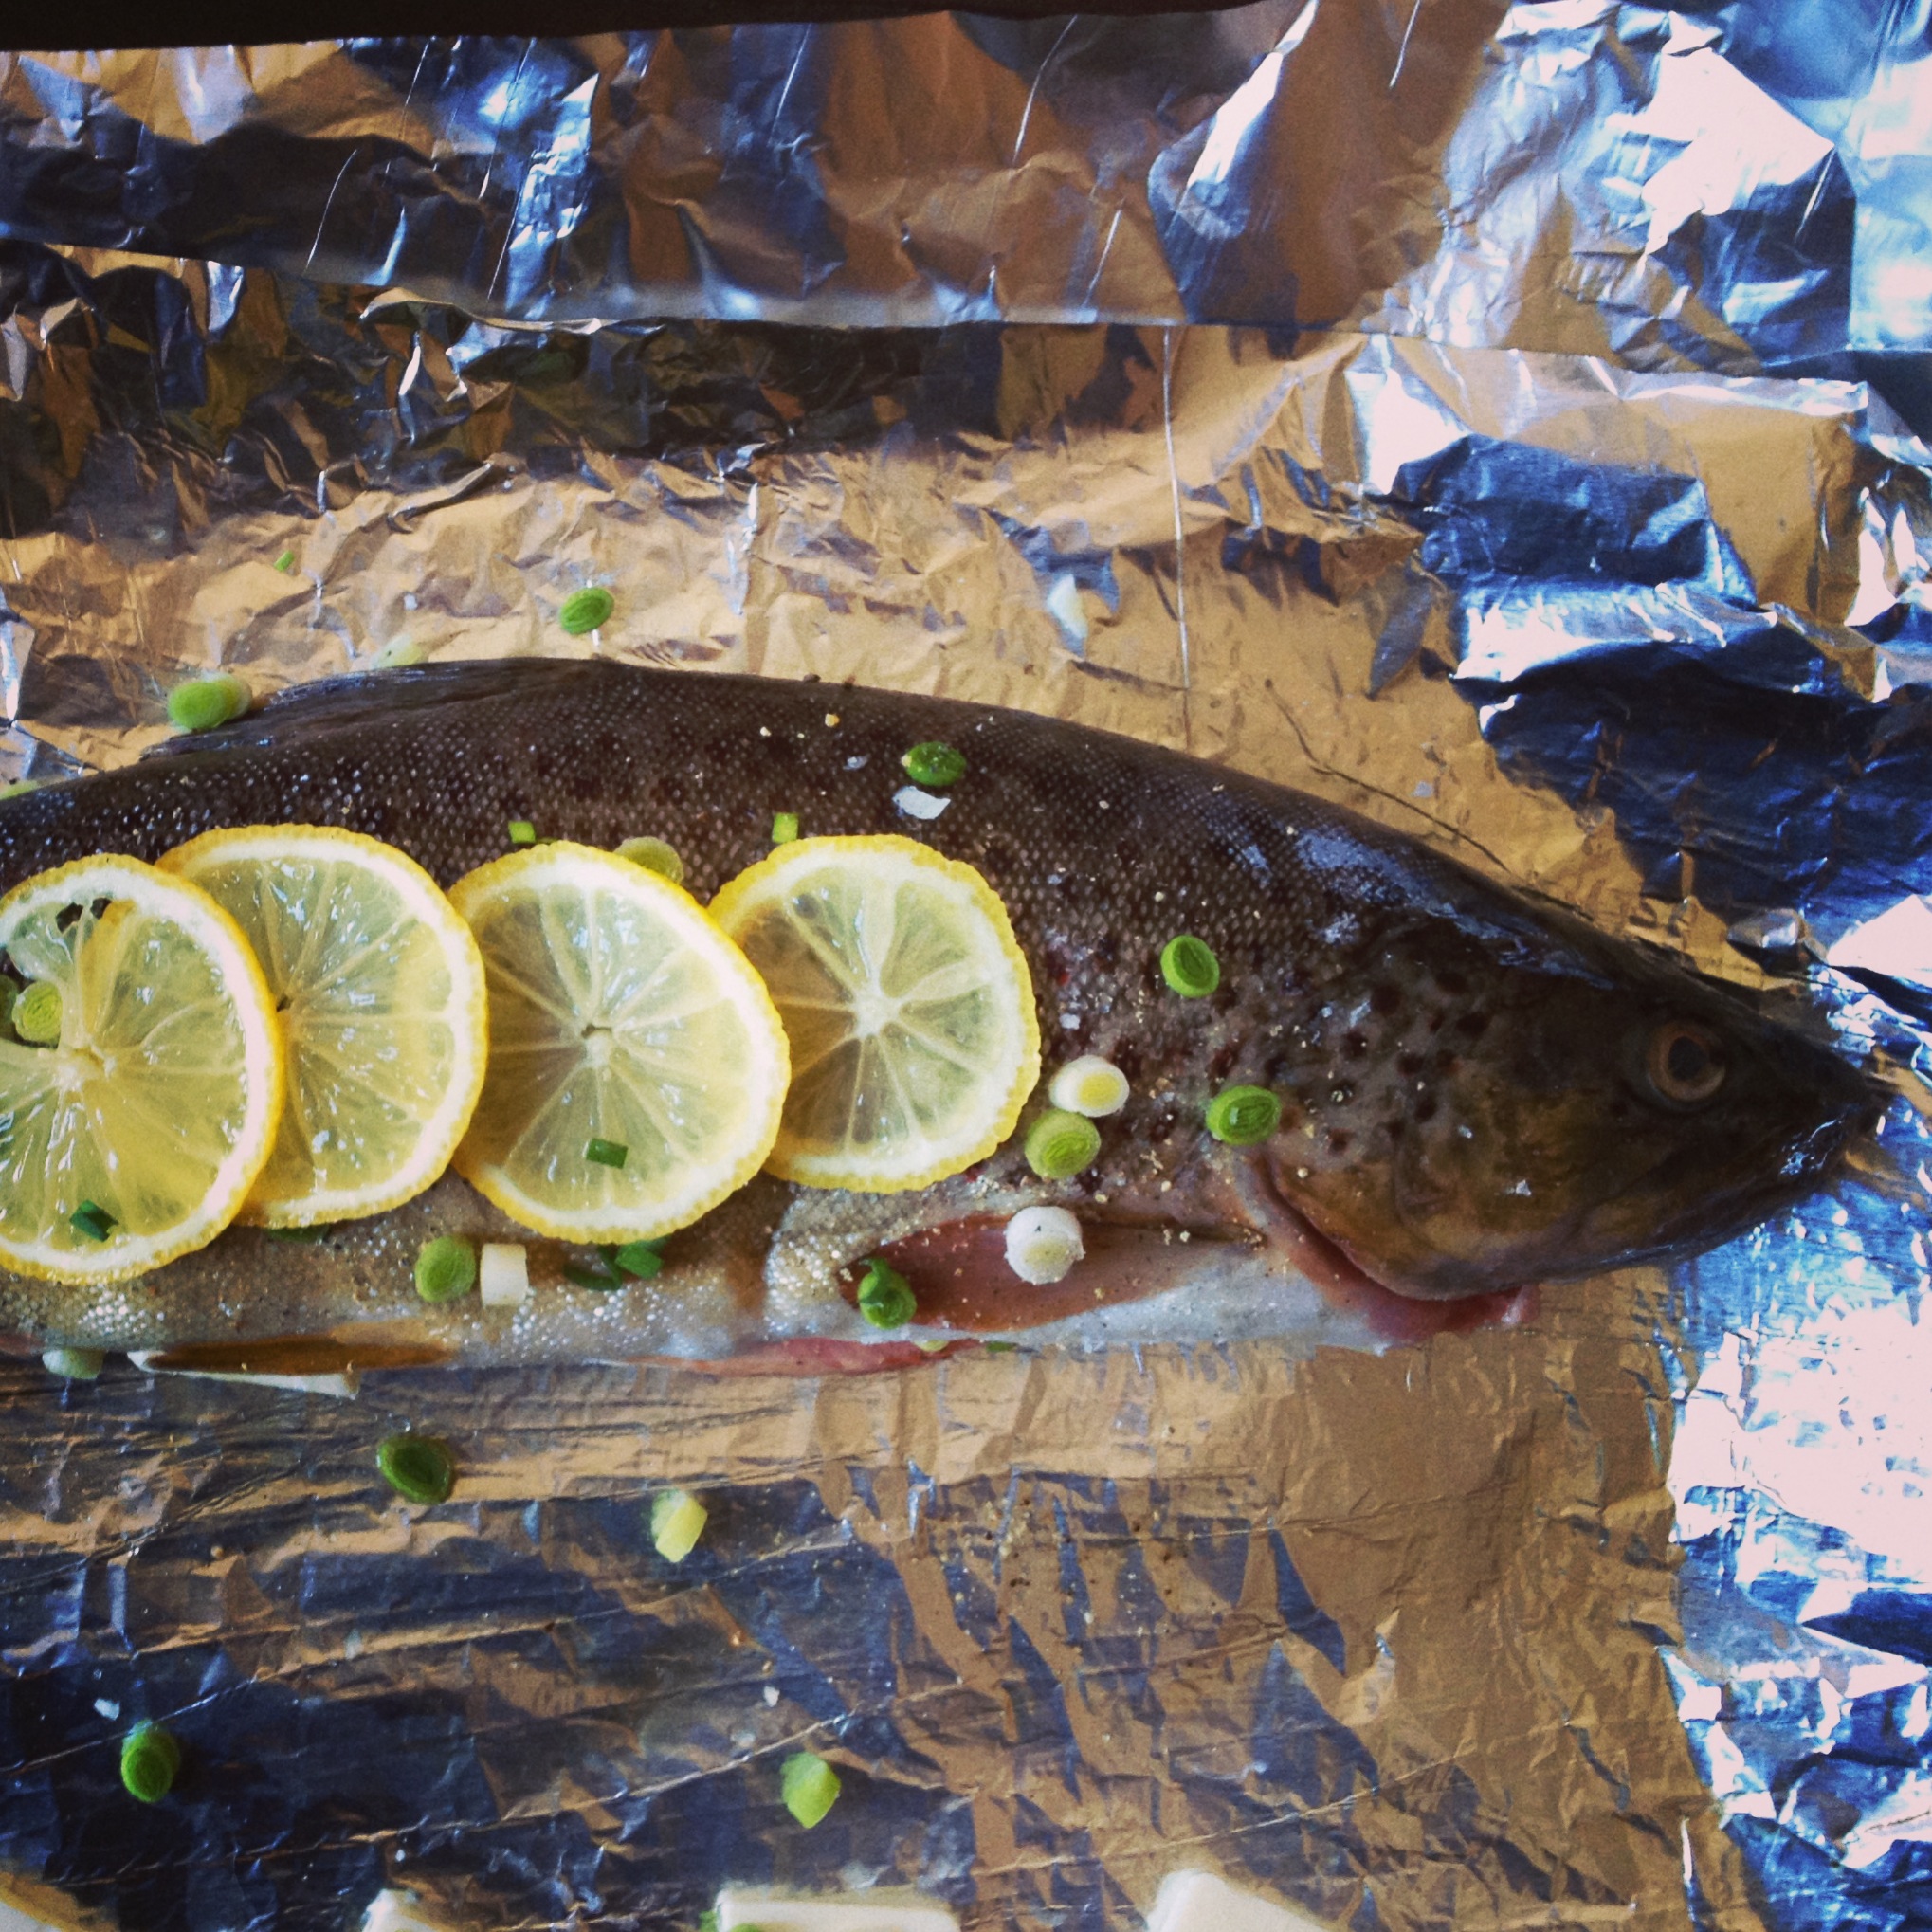
1 whole trout, gutted and cleaned
2 green garlic stems, chopped
1 lemon sliced
4-5 pats of butter
salt and pepper to taste

With nothing more than a little butter, green garlic and lemon stuffed inside and blanketing the fiddy, I wrapped this guy in a foil pouch, threw him on the grill at a steady 350° {yes, the new grill has a gauge!} and cooked him until his clear-as-day eyes turned white — about 20 minutes.
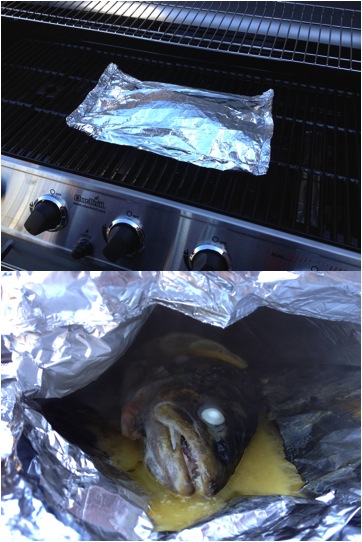
Poach Pouch

Poach Pouch

Voila — maiden voyage success and a meal to remeber!
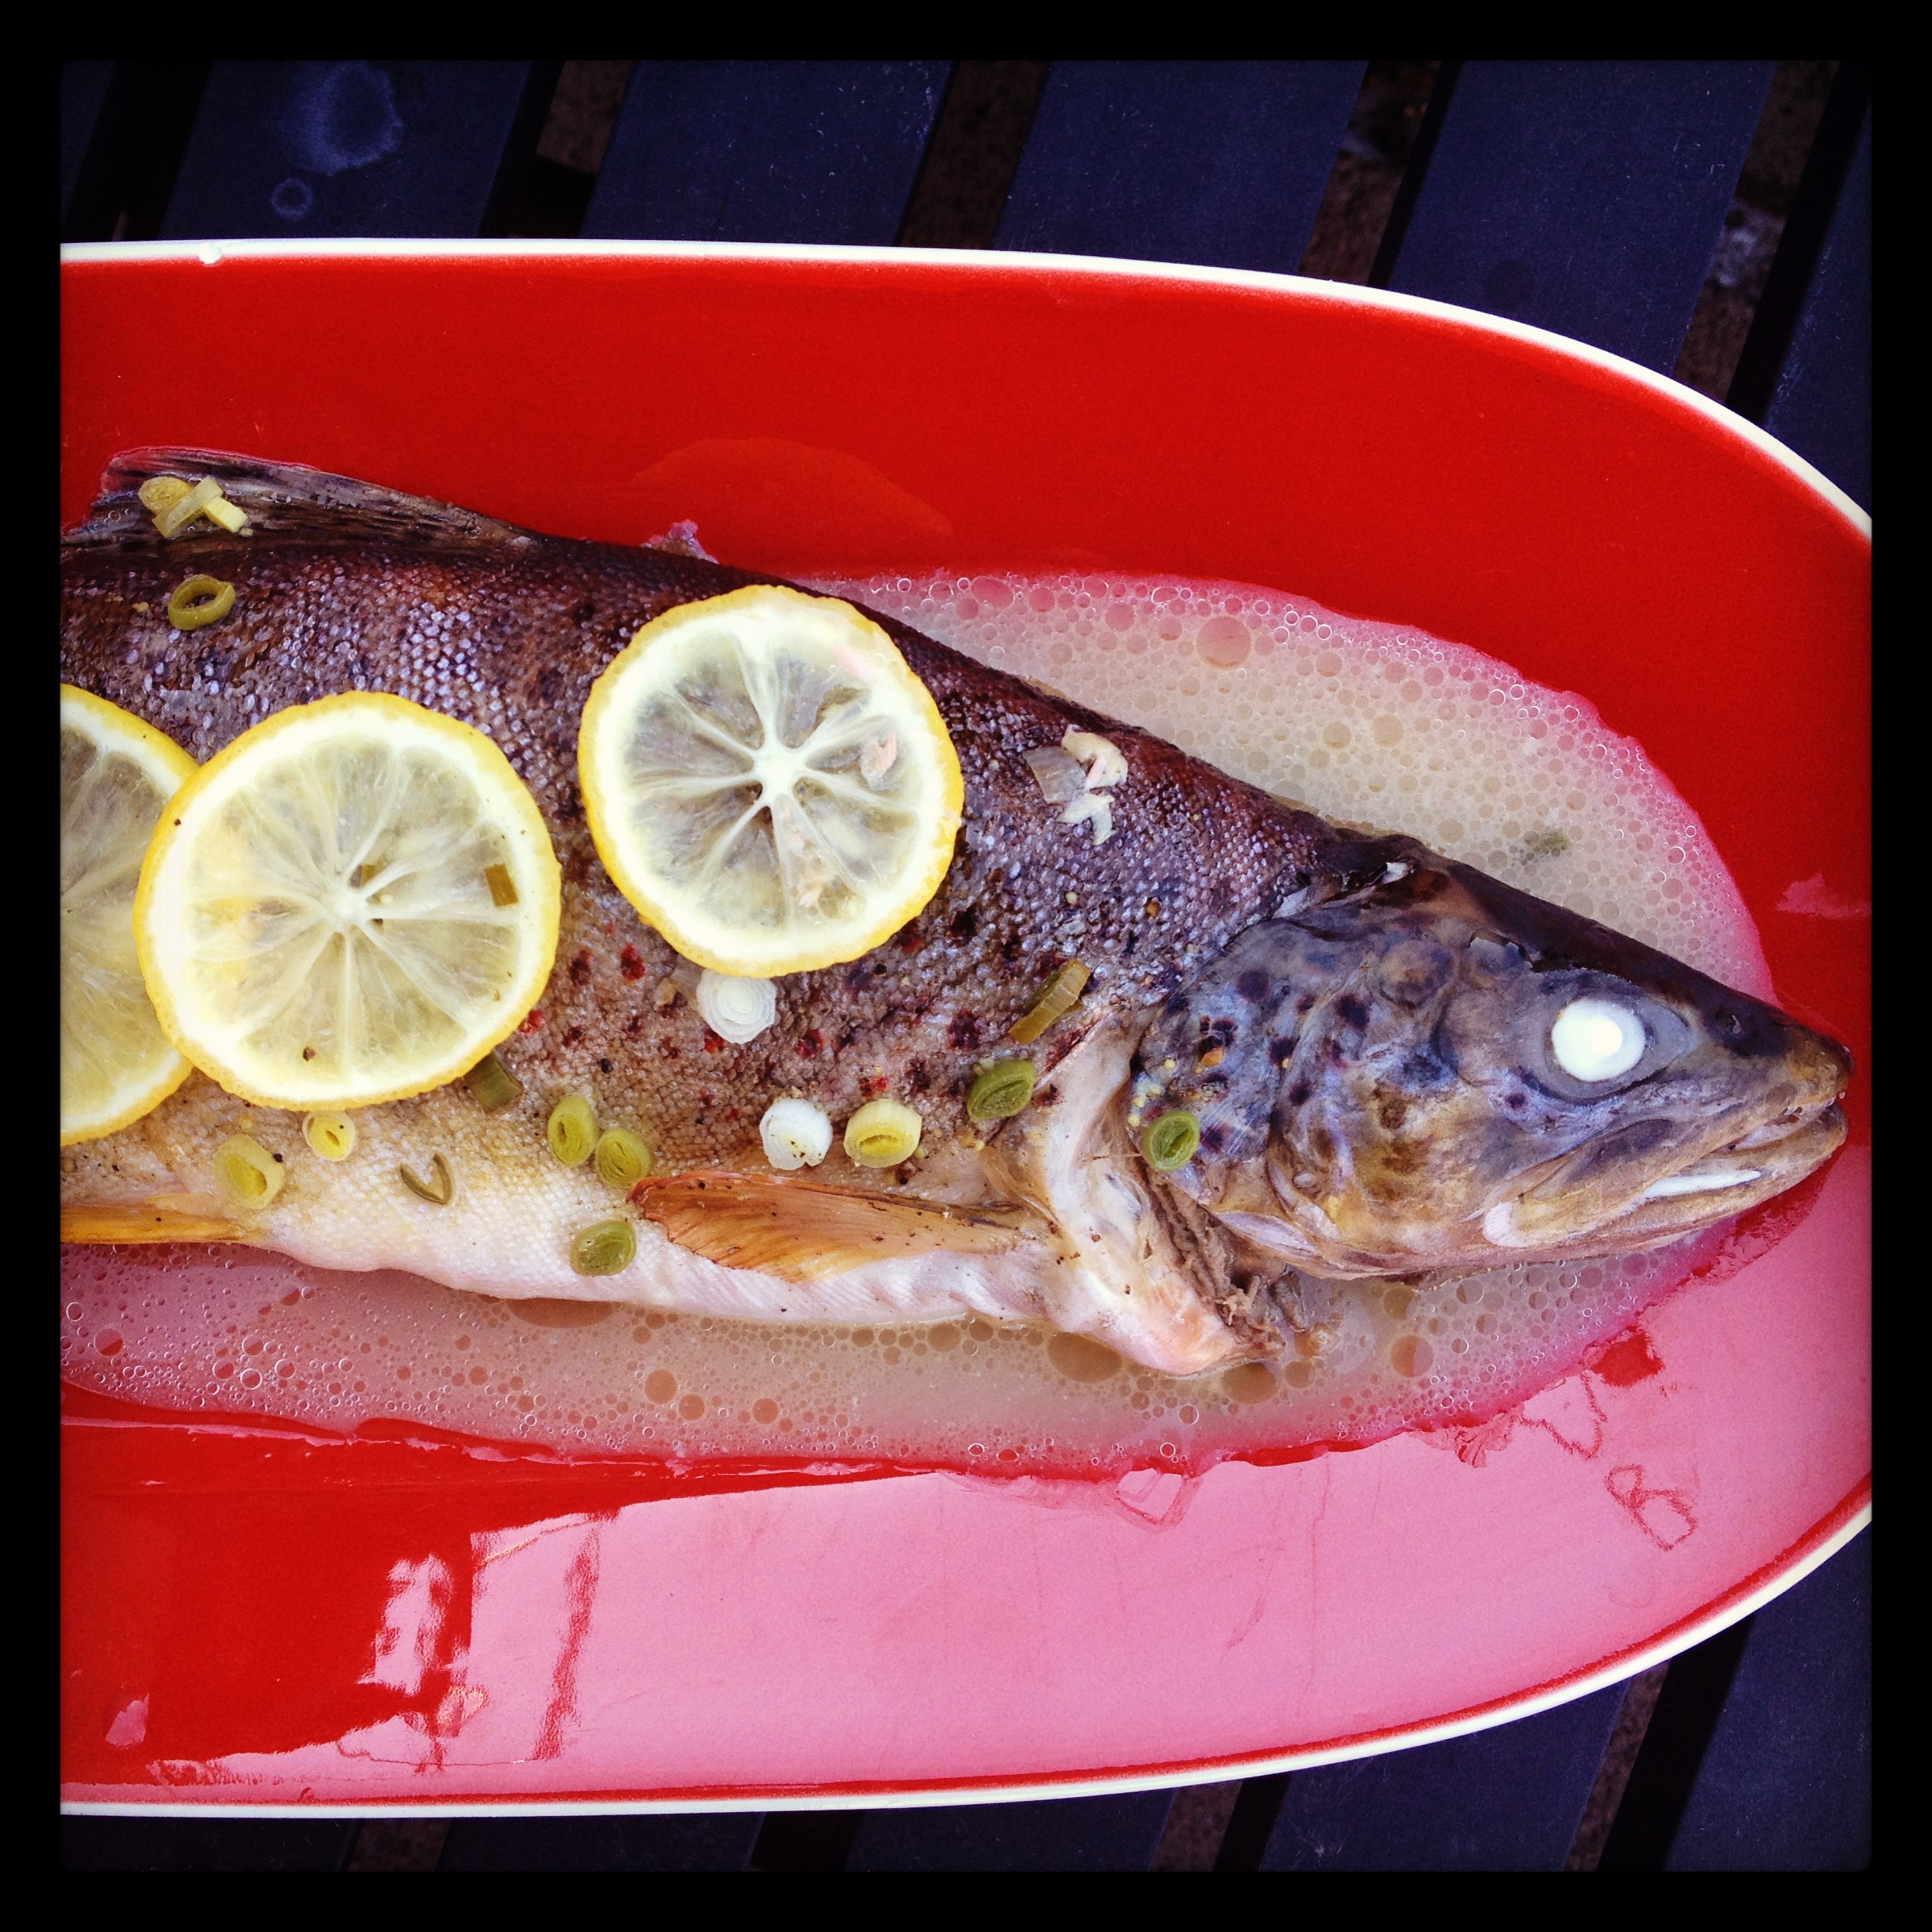
Grilled Trout

Grilled Trout

Oh, and the best part? A dare to eat the eye. I rarely turn away from a good challenge. Thank goodness for bread and a cold beer.

Eye see you

Eye see you

3 Comments

Filed under @home {recipes to love}, Do This!

recipe goodness :: lime-red chili grilled swordfish

Lime-Red Chili Swordfish

Lime-Red Chili Swordfish

The beautiful thing about swordfish is the heartiness of the meat. It’s the perfect grilling fish for someone whose worried about their filet falling through the cracks. And it’s just begging to be topped with a heaping spoonful of some lovely fresh salsa you whipped up — like the smooth spicy tomatillo blend or the bright avocado & peach salsa. I like to marinate it with a little olive oil and the juice of a lime with some red chili and fresh cilantro {or parsley for cilantro haters} just to add a little love to the fish itself. And if you don’t have time for a salsa topper, the marinated fish alone will please a crowd.


Grilled Swordfish with Tomatillo Salsa

Grilled Swordfish with Tomatillo Salsa

Lime-Red Chili Grilled Swordfish

6-8oz fillet per person
1 lime, zested and juiced
Drizzle of olive oil
1/2 red chili chopped
2 sprigs cilantro or parsley chopped
Salt and pepper to taste

  1. Lay the swordfish in a small casserole dish with sides.
  2. Juice, zest, drizzle all the marinade ingredients over the top and turn each fillet to coat.
  3. Cover and let it all hang out in the fridge for as little as 15 minutes or 2-3 hours if you have the time.
  4. Heat a grill to medium heat and cook for 3-4 minutes. Flip and cook for an additional 3-4 or until the fish is cooked through.
  5. Serve as is or with a fresh tomatillo or avocado & peach salsa topper.

Swim with the Fiddies:
Introducing grilled blowfish
Julia Child’s Fillet of Sole Meuniere
Sesame Ginger Lime-Poached Cod
Spicy Balsamic and Fennel Fish Stew

Leave a comment

Filed under @home {recipes to love}

recipe goodness :: grilled zucchini & summer squash pesto “pasta”

Grilled Zucchini & Summer Squash Pesto Pasta

Grilled Zucchini & Summer Squash Pesto Pasta

Summer is a time of agricultural abundance. A stroll through the weekend farmers’ markets is like a rainbow connection — ruby tomatoes, sunshine orange nectarines, golden summer squash, enviously green zucchini, deep purple eggplant. It doesn’t take a lot of effort to take your booty home and make a stellar meal. I’m a proponent of grilling just about anything {I’ve even been known to grill berries} — a little olive oil, salt and pepper is all you need and you can focus on the complexities of your wine paring, not your meal planning.

However, after making a large batch of basil-walnut pesto, I fell compelled to use that precious pairing before it went bad. A likely partner: pasta. But with the mercury rising to high 90s for much of July, a heavy meal was the last thing that appealed to my cravings. Enter zucchini & squash “pasta.” A few swipes of across my mandolin created thin, long strips that mimicked a tagliatelle noodle. Grilling only required enough time to make the squash tender and add some flame flavor. Once done, everything was tossed with the bright herby pesto, a handful of pine nuts for texture and we had ourselves a bowlful of fork twisting goodness.

Grilled Zucchini and Summer Squash

Grilled Zucchini and Summer Squash

Grilled Zucchini & Summer Squash Pesto Pasta

1 zucchini per person
1 summer squash per person
olive oil
salt and pepper to taste
~1 tablespoon pesto per person
~1 tablespoon pine nuts per person

Pesto {makes ~1 cup}:
1 large bunch of basil, leaves only, washed and dried
1-2 cloves of garlic
1/4 cup walnuts or pine nuts {pine nuts are expensive, so walnuts are a nice sub}
1 cup freshly grated Parmesan
A few tablespoons of extra-virgin olive oil

  1. In a food processor add all the ingredients for the pesto and whiz until blended. Taste and add more garlic, nuts or olive oil to your liking and desired consistency.
  2. Pour pesto into an air tight container and cover with a thin layer of olive oil to protect from the air. Cover and store in the fridge or freezer if not immediately using.
  3. Remove the stem from the squash and zucchini and slice thinly lengthwise using a mandolin or sharp knife. Lay on a large baking sheet, drizzle with olive oil and season with salt and pepper.
  4. Grill 1-2 minutes on each side until slightly tender and shows grill marks.
  5. Toss in a bowl with pesto and top with pine nuts.

Grilled Goodness:
Gourmet Grilled White Truffle Corn
Grilled Thyme-Cumin Vegetable Kabobs

Lemon Herb Roasted Chicken
Some Like it HOT Pollo alla Diavola
Bison, a Better Burger Worth Biting Into

1 Comment

Filed under @home {recipes to love}

recipe goodness :: traditional tomatillo tops salsa notions

Traditional Tomatillo Tops Salsa Notions

Traditional Tomatillo Tops Salsa Notions

Each week’s trip the greenmarket feels like a treasure hunt. But despite the many visits I’ve made over the years, I’m still discovering new items that I’ve never cooked with before. This week’s experiment: tomatillos. Luckily my produce stand is manned with friends of Mexican descent, who are more than willing to share their traditional preparation secrets to create a tomatillo salsa that will top any prior notions of what makes salsa good.

First: peel thin outer skin and cook 3 minutes in boiling water until color changes to a darker green.

Side by Side Tomatillos

Side by Side Fresh and Cooked Tomatillos

Second: Toss in the tomatoes and cook for 2 more minutes. Drain. Whiz. Salsa!

Salsafied

Salsafied

Traditional Tomatillo Salsa

4 tomatillos
~2 cups mixed yellow, red and black grape tomatoes
2 stems of cilantro, washed and finely chopped
1/2-1 red chilli {depending on heat pref}
1 scallion or 1/4 medium red onion
salt to taste

  1. Bring a pot of water to a boil with 4-5 inches of water
  2. Peel tomatillo and add for 2 minutes. Add tomatoes and cook for 2-3 more minutes until tender.
  3. Drain and blend thoroughly with onion, red chili and salt to taste.
  4. Mix in chopped cilantro by hand.
  5. Chill or serve immediately as a salsa or topping to fresh grilled fish.

Salsafied:
Creole Roasted Fresh Corn-Tomato Salsa
Avocado & Tropical Fruit Salsa 
Introducing grilled blowfish

2 Comments

Filed under @home {recipes to love}

recipe goodness :: balsamic-drizzled watermelon steak topped with feta, mint and pistachios

Watermelon-Feta Steak

Watermelon-Feta Steak

Every now and then something brilliant hits you over the head and you wish you discovered that genius trick first, patented it and retired to easy living on the shores of a remote caribbean island. I often struggle with slicing the unwieldy watermelon — do I cut it in half first, then slice it into easy-gripping triangles? Do I chop it into neat little cubes for easy bites that don’t require a fork and knife? Is there a *right* way to slice that big bertha? I don’t know the answer to that, but I do know that thanks to my brother’s brilliant find, I recently discovered the simplest plan of attack that, in my opinion, is the most beautiful as well. Simple circles. The result is like cutting into a juicy steak, only sweeter. Doesn’t that plate just make you swoon for summer?!

Simple Slicing

Simple Slicing

Balsamic-Drizzled Watermelon Steak Topped
with Feta, Mint and Pistachios

Serves a watermelon sized party {all ingredients optional}

1 Seedless Watermelon
1/2-1 lb fresh goat’s milk feta  {NYC: Ardith Mae at the greenmarket is the best!}
1 bunch fresh mint, chopped
1/2-1 cup shelled pistachios, chopped
Good aged balsamic for drizzling
Maldon salt to taste

  1. Place the watermelon on its side — if it is more round in shape, slice a thin edge off the rind to create a flat surface that you can lay on the cutting board to avoid rolling.
  2. With a large chef’s knife slice into 1-inch thick circles and set aside.
  3. Lay each circle flat and take a small paring knife to slice around the circle where the melon meets the rind.
  4. Place each melon circle in the center of a plate, top with crumbled feta, chopped mint, chopped pistachios and a drizzle of balsamic. Add flaky salt to taste, if desired {will bring out the sweetness of the melon}.

More Summer Stars:
Fresh Lime-Margarita Marinated Watermelon
Pink Fizzy Lemonade Cocktails Beat the Heat
Avocado & Tropical Fruit Salsa 
Creole Roasted Fresh Corn-Tomato Salsa
Lime-Kissed Peach and Corn Summer Salad
The Ultimate Summer Slaw

6 Comments

Filed under @home {recipes to love}

recipe goodness :: mastering the art of julia child’s salade nicoise #jc100

Julia Child's Salad Nicoise

Julia Child’s Salad Nicoise

This is exactly the type of recipe that you are not meant to follow to a T. A big bowl of fresh ingredient goodness is all that matters. No green beans at the market yet? Asparagus makes for a lovely substitution. Not feelin’ the canned tuna? A beautiful bright tuna filet from my friendly fishmonger Warren at American Seafood was a first class upgrade. And with green garlic in season, I opted for those sweet stalks instead of scallions. I was not really feelin’ the five-page recipe laying out the original steps for Julia’s masterpiece. Really? For a salad? So I skimmed through her instructions and general flavor combinations, made a trip to the greenmarket, did a bit of chopping and doused everything in lemon, olive oil, salt and pepper. The result was a bountiful bowl full of beauty that was both healthy and hearty and will definitely be repeated again. soon. This is the perfect summer evening meal {which a chilled glass of wine of course}.

Julia Child's Salad Nicoise

Julia Child’s Salad Nicoise

“A bountiful arrangement in a bowl or platter is so handsome to behold that I think it a cruel shame to toss everything together in a big mess.”
— Julia Child

Julia Child’s Salade Niçoise {slightly modified}

Serves 2-4 | Link to the original recipe HERE

1 head boston bibb lettuce, washed and dried
1/4 bunch fresh asparagus {or 1 pound green beans} trimmed, cut into 3-inch pieces
1/4 pint grape tomatoes, halved {or 1-2 whole tomatoes cut into wedges}
3/4-1 lb tuna filet grilled and sliced {or 8-10oz  oil packed tuna, drained and flaked)
2-4 hard boiled eggs, halved
1 can flat anchovies packed in oil, drained {optional}
1/4 cup black nicoise-type olives {optional}

Dressing:
1-2 tablespoons capers
1/4 cup minced parsley
1 lemon, juiced
1/2 as much olive oil as lemon
salt and pepper to taste

Potatoes:
4 small new potatoes sliced into circles
1 stem green garlic or scallion, finely diced
1/4 cup potato-cooking water
1 1/2 tablespoons white wine vinegar
2-3 tablespoons fresh parsley
2-3 tablespoons olive oil

  1. Rinse and dry all the vegetables. Add the lettuce to a large bowl while you prepare the rest.
  2. Add eggs to a medium pot and cover with water by 1-inch. Bring to a boil, then turn heat down to a low simmer, cover with a lid and cook for 15 minutes. Remove from heat, remove eggs and cool.
  3. Bring water back up to a boil and add sliced potatoes until just slightly tender when you pierce with a fork. Reserve 1/4 cup of the starchy water, then drain and immediately toss in a bowl with vinegar, scallion/garlic, parsley, olive oil and cooking water. Season with salt and pepper and let potatoes absorb the liquid as they cool.
  4. Bring a medium pot of water back to a boil and add the 3-inch pieces of asparagus {or green beans} to the boiling water, cover and cook 1-2 minutes until bright green, but still firm. Drain and immediately run cold water over or add to an ice bath to stop the cooking process.
  5. Mix the dressing. Pour a little over the cut tomatoes in a small bowl and set aside. Pour a little over the asparagus in a small bowl and set aside. Pour the rest over the lettuce and toss to coat.
  6. Heat your grill to high.
  7. Coat your tuna with olive oil, salt and a generous amount of coarse black pepper on both sides. Cook 3-5 minutes on each side, just until the outer edges turn white and the center is still a light pink for medium rare. Remove from heat and let rest.
  8. Assemble the salad by channeling your inner Julia, creating sections of the seasoned potatoes, tomatoes, asparagus {or green beans}, the egg halves and olives. Sprinkled the anchovies over the salad. Slice the tuna and arrange in the center of the bowl.
  9. Bon Appetit!

More Juuuuuuuulia:
recipe goodness :: mastering julia child’s rolled french omelet
recipe goodness :: mastering the art of julia child’s chocolate mousse
Do This!: Celebrate Julia Child’s 100th Birthday 

Excerpted from The Way to Cook by Julia Child. Copyright © 1989 by Julia Child. Reprinted with permission from the publisher Alfred A. Knopf, a division of Random House, Inc.

2 Comments

Filed under @home {recipes to love}

Recipe Inspiration: Take the Labor Out of Labor Day Grilling

Woo-wee, this summer has flown by. In the same way I love to start BBQ season off with a bang on Memorial Day, I think a proper summer send-off is essential come Labor Day. Here are a few last minute favorites if you’re looking to make the most of the long weekend, your Weber and cocktail shaker.

DRINKS {start the party out right}

Alton Brown’s Bourbon Mint Julep
Bottle of Baron {Refreshing “Island Cocktail” a la Tippling Bros.}

Fresh Lime-Margarita Marinated Watermelon
Kickin’ Ancho Chili Fresh Citrus Margarita
Pink Fizzy Lemonade Cocktails Beat the Heat

Stand-Out Spanish Sangria
Summer Strawberry Chilled Chamomile Tea {non-alc or a mixer!}

SNACK’EMS {your guests eat, while the grill heats}

Avocado & Tropical Fruit Salsa {also good as an entree side}
Creole Roasted Fresh Corn-Tomato Salsa
Fresh Lime-Margarita Marinated Watermelon{double duty bites}

SALADS {beautiful and delicious}

Lime-Kissed Peach and Corn Summer Salad
Orzo, Spinach & Feta Summer Salad
Spinach, Strawberry & Halloumi Salad
Tomato, Basil & Feta Salad
The Ultimate Summer Slaw

PIZZA & BREADS {d’oh! why didn’t i try this yet}

Creative Crowd-Pleasing BBQ’d Pizzas {this is what I’ll be serving! So FUN}
Flaky Cheese Straws, As Easy As Being Barefoot
Red Chili-Lime Cornbread Muffins

FOR THE GRILL {that’s what it’s all about}

Bison, a Better Burger Worth Biting Into
Lemon Herb Roasted Chicken
Pistachio-Encrusted Spring Lamb w/ Pickled Red Onions & Cumin Yogurt Sauce
Whole-Grain Mustard & Rosemary Pork Chops
Grilled Thyme-Cumin Vegetable Kabobs

DESSERT {life is short, eat it first}

Alton Brown’s Bourbon Banana’s Foster w/ Bourbon Ice Cream
Banana Puddin’ Chocolate Cups
 {bottom of post}
Violet’s Lemon Cheesecake with BBQ’d Summer Berries{bottom of post}

Leave a comment

Filed under @home {recipes to love}, Do This!

Recipe Inspiration: Happy 4th of July!

Well we all know how I feel about BBQs — any excuse to play with food and fire is a good time to me. It’s easy to throw a few burgers on the grill and crack a few cold ones, but there is no reason you can’t jazz up a 4th of July BBQ and still keep it easy and relaxed. Here are a few of my favorite recipes — I hope this inspires some BBQ fireworks.

DRINKS {start the party out right}

Alton Brown’s Bourbon Mint Julep
Bottle of Baron {Refreshing “Island Cocktail” a la Tippling Bros.}

Fresh Lime-Margarita Marinated Watermelon
Kickin’ Ancho Chili Fresh Citrus Margarita
Pink Fizzy Lemonade Cocktails Beat the Heat

Stand-Out Spanish Sangria
Summer Strawberry Chilled Chamomile Tea {non-alc or a mixer!}

SNACK’EMS {your guests eat, while the grill heats}

Avocado & Tropical Fruit Salsa {also good as an entree side}
Creole Roasted Fresh Corn-Tomato Salsa
Fresh Lime-Margarita Marinated Watermelon{double duty bites}

SALADS {beautiful and delicious}

Orzo, Spinach & Feta Summer Salad
Spinach, Strawberry & Halloumi Salad
Tomato, Basil & Feta Salad
The Ultimate Summer Slaw

PIZZA & BREADS {d’oh! why didn’t i try this yet}

Creative Crowd-Pleasing BBQ’d Pizzas {this is what I’ll be serving! So FUN}
Flaky Cheese Straws, As Easy As Being Barefoot
Red Chili-Lime Cornbread Muffins

FOR THE GRILL {that’s what it’s all about}

Bison, a Better Burger Worth Biting Into
Lemon Herb Roasted Chicken
Pistachio-Encrusted Spring Lamb w/ Pickled Red Onions & Cumin Yogurt Sauce
Whole-Grain Mustard & Rosemary Pork Chops
Grilled Thyme-Cumin Vegetable Kabobs

DESSERT {life is short, eat it first}

Alton Brown’s Bourbon Banana’s Foster w/ Bourbon Ice Cream
Banana Puddin’ Chocolate Cups
 {bottom of post}
Violet’s Lemon Cheesecake with BBQ’d Summer Berries{bottom of post}

Leave a comment

Filed under @home {recipes to love}

recipe goodness :: the ultimate summer slaw

The ultimate slaw

The ultimate slaw

Creamy cole slaw {you know, the kind you see at delis} is a dish that sneaks its way into one too many BBQs. It’s soggy. It’s flat. It’s so easy to improve on. The thing about cabbage is you can feed A LOT of people with one shredded head and very cheaply too. So if you get a little creative, you can actually create a spectacular side on a budget. I love using red cabbage — it’s purple for pete’s sake and you can’t get much cooler than that! I also love using thinly sliced radishes for a peppery bite and running a few carrots through the food processor sideways so you get thin rectangles and not just shredded carrots. So much color, so many textures and a mix of crunchy, vibrant, flavorful goodness. Two important notes: 1) I highly recommend making this with a food processor — it comes together in a matter of minutes with all the chopping that needs to be done; and 2) make this 24 hours in advance if you can — it softens the cabbage a bit and really lets the flavors come together. Plus it’s one less thing you have to worry about on party day.

The Ultimate Summer Slaw

1 cup mayo
3 tablespoons white vinegar
2 tablespoons plus 2 teaspoons granulated sugar
2 tablespoons milk
2-3 jalapenos or red chilies
1 head of red cabbage, chopped thinly
1 bunch of radishes, sliced
2 carrots, quartered then sliced lengthwise
Salt and pepper to taste

  1. Combine all ingredients except cabbage, radishes and carrots in a food processor or blender and blend until smooth. Set aside.
  2. Shred cabbage in food processor by cutting the head into quarters and feeding through the tube using the shredding attachment. Add to a very large bowl.
  3. Wash radishes and remove tops and roots. Feed through food processor tube using the slicing attachment to get 1/8-inch thick slices. Add to the cabbage in the bowl.
  4. Peel and remove tops of carrots. Depending on length of carrots, cut the length into thirds or quarters so you get 2 inch long pieces. Feed through the food processor tube horizontally with the slicing attachment so you get 2-inch long rectangular slices. Add to the cabbage and radishes.
  5. Pour mixture from step 1 over the top and mix thoroughly. Salt and pepper to taste.
  6. Add to large zip lock bags or cover the bowl and let chill out in the fridge for 24 hours if you can to really get a great mix of flavors.

3 Comments

Filed under 8.ate@eight, @home {recipes to love}

Do This!: Get Back to Your Roots

Get Back to Your Roots

Get Back to Your Roots

There is something very gratifying about growing your own greens. Herbs, flowers, veggies, whatever. I must have acquired this love to ‘putz’ in the garden from my Italian father, who can almost always be found in this worn-out threads strolling the beds, pulling weeds, watering the seedlings and making our backyard look lush.

But there is more than just beauty to growing your own garden — it is quite a practical thing to do. During the summer, I often want to make a simple tomato and basil salad or fresh salsa for a BBQ.  But as I stroll through Whole Foods, I realize how quickly these things add up — a pint of tomatoes for $3.99, large bunches of parsley, cilantro basil and mint for $1.99 each {and 1/8 of which I actually need and end up wasting the rest}. The benefit of growing a few simple herbs that you like to use all the time is your own free herb aisle that costs you nothing more than a few seeds {or seedlings} and will last you from spring to late fall.  And let’s be honest, it’s more effort to go to the store to buy these things than it is to sprinkle a little water on your plants each day so that all you have to do is snip off what you need whenever your cooking heart desires.

Even if you don’t have much space {concrete jungle dwellers}, all you need is a few window boxes or small pots and you’re set. For most things you do need sunlight, but a few herbs will do just fine on a windowsill if that’s all you have access to.

Here’s what you need to get started:

  1. Small plastic cups and plastic wrap {if starting from seeds}
  2. Window boxes or pots {if starting from seedlings and to transfer your seeds to once they become seedlings. You can usually fit 2-3 kinds of herbs side by side in a window box depending on how long it is. And 1 herb per round pot.}
  3. Potting soil {the kind with time-releasing nutrients is great so you get the benefit of rich soil over a few months}
  4. Water {of course}
  5. Your own two hands 🙂
If you plant nothing else, plant these:
  1. Basil {really hearty and goes great on lots of summer veg}
  2. Thyme {perfect on sauteed/grilled mushrooms, zucchini, chicken. will continue to grow inside through the winter. }
  3. Rosemary {my favorite herb! will continue to grow inside through the winter}
  4. Sage {BBQ chicken’s favorite friend!}
  5. Mint {will keep coming back in your pot EVERY year. even after it dies in the winter. That’s an easy one!}
  6. Strawberries {surprisingly easy to grow in a pot. and what a treat!}
  7. Arugula {small leaf lettuce is really easy to grow in a window box — and SO much more flavorful}
  8. Parsley and Cilantro {don’t you just hate buying an entire bunch when you only need a little}
  9. Grape tomatoes {if you have sunny outdoor space for a really large pot, you will get hundreds of little juicy tomatoes off 1-2 vines. I eat them like candy!}
Tips:
If you have the patience to start seeds in a small plastic cup with a little soil, it’s awfully gratifying to see them sprout up. Most seeds only take 1-2 weeks to germinate, so even though it’s already June, you can still start some herbs that don’t need to grow as tall as tomato plants — like basil or parsley.
  1. Get a baking sheet and line it with a plastic cup or small pyrex dish for each plant. Fill it about 3/4 of the way with light, fine soil and place your seeds on top evenly spaced.
  2. Follow the directions from your seed packet, but it will probably tell you to cover the seeds with 1/8-1/4 inch of soil. Add water to soak the soil and then cover the cup with plastic wrap and use a rubber band to secure the wrap to the sides. This will create your own little greenhouse to trap moisture and heat and help the seeds grow {especially if starting in April or May before it’s warm outside}. Add more water each morning if needed to keep the soil moist.
  3. If you start in April/May before it’s warm, keep these inside, but whenever you get a warm day you can easily transfer all the cups on the sheet to a sunny spot outdoors to benefit from the natural heat/sunlight. If you’re starting now, you can place the cups outdoors. Just make sure they are covered so the birds don’t get them!
  4. Once your seeds become ~2-inch seedlings, transfer them to a larger pot with soil and let them spread their roots!
First Strawberry of the Season!

First Strawberry of the Season! (June 7th)

City Herbs

City Herbs

Sweet, Sweet Tomatoes

Sweet, Sweet Tomatoes

Recipes to Showcase Your Home Garden:
Creole Roasted Fresh Corn-Tomato Salsa
Spinach, Strawberry & Halloumi Salad
Tomato, Basil & Feta Salad
Lemon Herb Roasted Chicken
Whole-Grain Mustard & Rosemary Pork Chops

3 Comments

Filed under Do This!

recipe goodness :: strawberry chamomile tea

Strawberry Chamomile Tea

Strawberry Chamomile Tea

It’s strawberry season! And when life gives you strawberries, make strawberry chamomile tea, of course! We gave this tea to all our freshocracy customers for mother’s day and I fell in love. The main ingredient is Berried Treasures Farm’s tristar strawberries that were frozen to preserve through the winter. After boiling them in cheesecloth with some chamomile you get this spectacularly red and sweet all natural drink that tastes just like summer. It’s the perfect thing to give your kids or enjoy yourself on a scorching day. And while it makes for a perfectly delightful refresher on its own, top it off with some seltzer, champagne or even tequila to jazz up your glass. Go to Ikea, buy some inexpensive bottles with rubber stoppers and show off your new concoction. This also makes a fantastic party or *just because* gift to share with friends.

Makes 6 quarts {if you don’t want to stock up, cut in half}

Courtesy of Chef Rick Jakobson 

2 lbs. frozen tristar strawberries
8 chamomile tea bags
6 quarts cold water
6.5-8 oz honey
2-3 lemons
generous pinch of kosher salt

  1. Wrap frozen strawberries and chamomile tea bags in cheesecloth and tie tightly to ensure no strawberries can get loose.
  2. Place cheesecloth in a large stockpot and cover with water. Add 6.5 oz honey.
  3. Bring to a boil and let simmer until strawberries release their flavor. Once water begins to boil, use a wooden spoon to squeeze the cheesecloth against the side of the pot to release the juice of the strawberries.
  4. Turn off stove and let steep for ~10 minutes. Squeeze cheesecloth one last time to release all the juice and remove from the pot.
  5. Add juice of 2 lemons and a generous pinch of kosher salt. Stir and taste. Add more honey or lemon as desired.
  6. Let cool and pour into bottles or pitchers.
  • Variation 1: Serve with a sprig of mint, topped off with a little seltzer
  • Variation 2: Serve with champagne {one part strawberry chamomile, 2 parts champagne}
  • Variation 3: Mix with white tequila and fresh of lime {2:1:1 tequila:strawberry tea:lime}

1 Comment

Filed under 8.ate@eight, @home {recipes to love}, {Drink Me}