Tag Archives: Easy

recipe goodness :: really crisp roasted sweet potatoes with gochujang

Roasted Sweet Potatoes with Gochujang


It’s been a long time since I’ve put pen to paper, but it’s about time the blog hiatus comes to an end. The other night, with no particularly inspired meal plan in my mind, I made something blog-worthy. The kind of dish that syncs beautifully with one central ingredient and several well-chosen partners.

I had a sweet potato from the farmers’ market that had been sitting on the shelf for several weeks and was starting to stare back at me with a few eyes. I remembered a ridiculously good crispy roasted potato recipe {courtesy of Nigella Lawson} I had made for New Year’s Eve and wondered if I could apply the same technique to a more tender sweet potato with similar results. Granted those were roasted in duck fat, but the secret sauce was really in the technique. It’s good to be back sharing — enjoy!

Sliced and ready to parboil

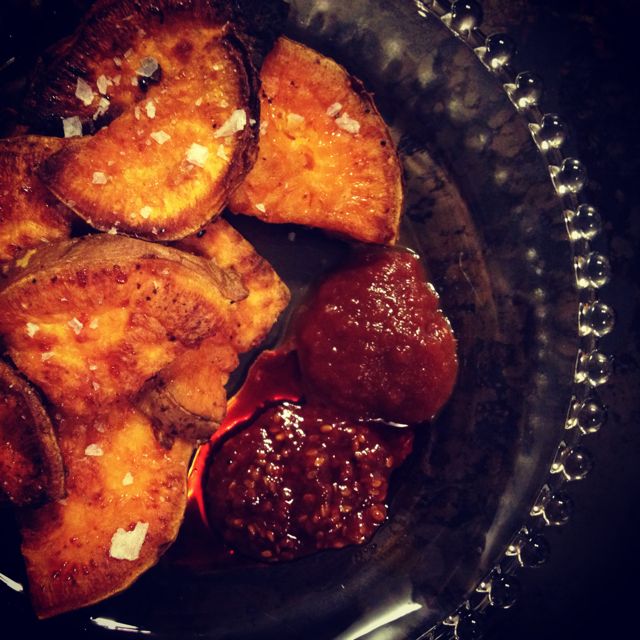
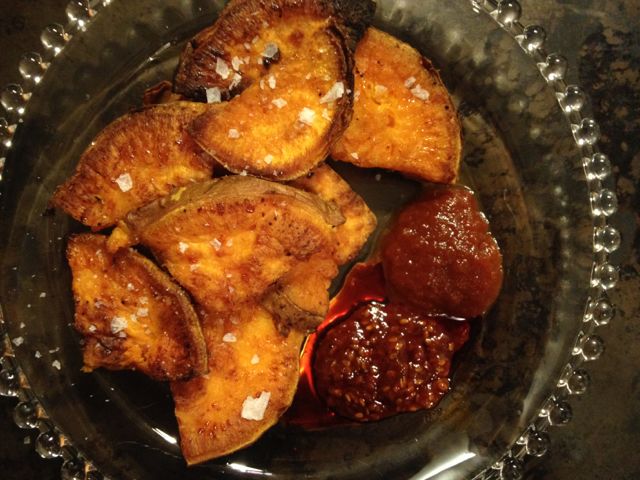
Crisp Roasted Sweet Potatoes with Gochujang
1 large sweet potato, scrubbed
olive oil for drizzling
1 teaspoon coarse gray salt
1 teaspoon Izak N. 37 (or a blend of sweet chili pepper, cumin, garlic powder)
Gochujang for serving

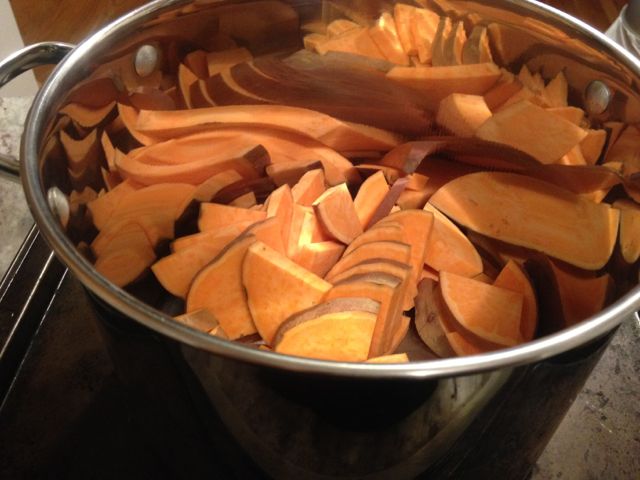
  1. Scrub the potato and slice it into 1/4-inch thick circles. Because this guy was a fatty, I quartered each round.
  2. Preheat dry baking sheet in 450 degree oven
  3. Parboil the potatoes for about 5 minutes to warm them up and start breaking down the starch — this will help them start crisping as soon as they hit the hot oven.
  4. Once tender enough that a paring knife would easily pierce the potato {about 5 minutes}, drain the goods and throw them back into the empty pot. Add a generous drizzle of olive oil, coarse gray salt and one of my favorite sweet chili spices, Izak N.37 from La Boîte {or mix equal amounts 1/3 tsp each of sweet chili pepper, cumin, garlic powder}.
  5. And now the fun part. Put the lid of the pot on and hold tightly, shaking vigorously to take out all work week frustrations. The process of doing this roughs up the surface, which will allow for more surface area to release the moisture trapped in a potato and also creates more edges that will get good and crisp during roasting. Win, win.
  6. Once everything is nice and beat up, pull the preheated sheet pan out of the oven and drizzle with 1-2 tablespoons of oil and swirl around to coat the pan.
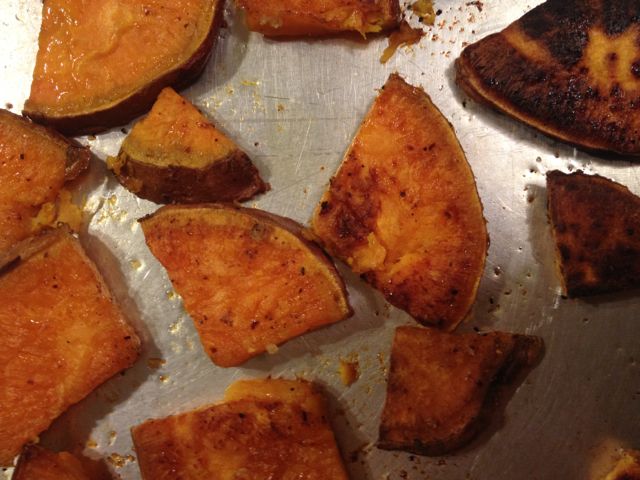
  7. Toss the coated potatoes on the pan {be careful as the oil may splatter} and throw in the oven for 10 minutes.
  8. Rotate the pan 180 degrees after 10 minutes and roast for another 10 minutes.
  9. Remove pan from the oven and use tongs or a spatula to flip each potato over to roast the other side. Toss the pan back in the oven for another 10 minutes {less if getting too dark too or more if desired darkness is taking longer}.
  10. Remove from the oven and sprinkle with a nice flake salt — I love Jacobsen Salt — and serve with a side of Korean Gochujang {a tangy flavor combination of vinegar and fermented chile paste} or your favorite dipping condiment.

Roasted sweet potatoes

Roasted Sweet Potatoes with Gochujang

Some Like it Hot:
Homemade Spicy Pickled Carrots
Homemade Spicy Carrot Kimchi! & Apple Chutney!
Spicy Tomato-Meyer Lemon Stewed Chick Peas
Some Like it HOT Pollo alla Diavola
Lime-Red Chili Grilled Swordfish


1 Comment

Filed under @home {recipes to love}

Fall in Love with Sardines, Save Dinner

Bela Sardines. Photo by James Ransom for Food52

Bela Sardines. Photo by James Ransom for Food52

When I was a wee little one, I remember my dad coming in from an afternoon tending to his garden and popping open a can of sardines for lunch. Curious about these little guys, I was not. Usually his offer to share a bite was met with a prompt and firm “ewwwww, no.”

It’s taken me 30 years to question why these cans of conveniently packed, flavorful little fiddies get such a bum rap. I don’t think twice when cranking a can of tuna open to save the day when I have nothing in the fridge for lunch. I recently read an article by Nicholas Day on Food52 speaking the praises of sardines — in his case because it conveniently saves dinner in a pinch for his own children. He feeds his kids sardines? This made me take pause. Well why not.

And then I was contacted by BELA Sardines to see if their cans of fresh-packed {within 8 hours of being caught and never frozen} Portuguese sardines would be something we would be interested in selling in the Food52 shop. We popped a few cans open at the office, broke out the crackers and started snacking. They were good — really, really good. Each is slightly smoked and packed in either Portuguese extra virgin olive oil or tomato sauce {4 flavors to choose from}. Beyond just the flavor, there are other reasons to love these little guys — they’re low-mercury, sustainably caught, and full of healthy fats. They are a pantry staple everyone should pile high.

I’m a convert. To be perfectly honest, I would be happy opening a can of these, pouring a nice glass of wine and calling that alone a mid-week meal. But it doesn’t take much to use them in a slightly more creative way, with still minimal effort, and have a dish to be proud of. Go ahead, give sardines a chance — you may be surprised by a new love.

Need a Little Inspiration?
Linguine with Sardines, Fennel & Tomato
Sardines, Avocado and Radish Salad with Upland Cress
Sardine Butter

Leave a comment

Filed under @home {recipes to love}, Do This!

recipe goodness :: grilled zucchini & summer squash pesto “pasta”

Grilled Zucchini & Summer Squash Pesto Pasta

Grilled Zucchini & Summer Squash Pesto Pasta

Summer is a time of agricultural abundance. A stroll through the weekend farmers’ markets is like a rainbow connection — ruby tomatoes, sunshine orange nectarines, golden summer squash, enviously green zucchini, deep purple eggplant. It doesn’t take a lot of effort to take your booty home and make a stellar meal. I’m a proponent of grilling just about anything {I’ve even been known to grill berries} — a little olive oil, salt and pepper is all you need and you can focus on the complexities of your wine paring, not your meal planning.

However, after making a large batch of basil-walnut pesto, I fell compelled to use that precious pairing before it went bad. A likely partner: pasta. But with the mercury rising to high 90s for much of July, a heavy meal was the last thing that appealed to my cravings. Enter zucchini & squash “pasta.” A few swipes of across my mandolin created thin, long strips that mimicked a tagliatelle noodle. Grilling only required enough time to make the squash tender and add some flame flavor. Once done, everything was tossed with the bright herby pesto, a handful of pine nuts for texture and we had ourselves a bowlful of fork twisting goodness.

Grilled Zucchini and Summer Squash

Grilled Zucchini and Summer Squash

Grilled Zucchini & Summer Squash Pesto Pasta

1 zucchini per person
1 summer squash per person
olive oil
salt and pepper to taste
~1 tablespoon pesto per person
~1 tablespoon pine nuts per person

Pesto {makes ~1 cup}:
1 large bunch of basil, leaves only, washed and dried
1-2 cloves of garlic
1/4 cup walnuts or pine nuts {pine nuts are expensive, so walnuts are a nice sub}
1 cup freshly grated Parmesan
A few tablespoons of extra-virgin olive oil

  1. In a food processor add all the ingredients for the pesto and whiz until blended. Taste and add more garlic, nuts or olive oil to your liking and desired consistency.
  2. Pour pesto into an air tight container and cover with a thin layer of olive oil to protect from the air. Cover and store in the fridge or freezer if not immediately using.
  3. Remove the stem from the squash and zucchini and slice thinly lengthwise using a mandolin or sharp knife. Lay on a large baking sheet, drizzle with olive oil and season with salt and pepper.
  4. Grill 1-2 minutes on each side until slightly tender and shows grill marks.
  5. Toss in a bowl with pesto and top with pine nuts.

Grilled Goodness:
Gourmet Grilled White Truffle Corn
Grilled Thyme-Cumin Vegetable Kabobs

Lemon Herb Roasted Chicken
Some Like it HOT Pollo alla Diavola
Bison, a Better Burger Worth Biting Into

1 Comment

Filed under @home {recipes to love}

recipe goodness :: balsamic-drizzled watermelon steak topped with feta, mint and pistachios

Watermelon-Feta Steak

Watermelon-Feta Steak

Every now and then something brilliant hits you over the head and you wish you discovered that genius trick first, patented it and retired to easy living on the shores of a remote caribbean island. I often struggle with slicing the unwieldy watermelon — do I cut it in half first, then slice it into easy-gripping triangles? Do I chop it into neat little cubes for easy bites that don’t require a fork and knife? Is there a *right* way to slice that big bertha? I don’t know the answer to that, but I do know that thanks to my brother’s brilliant find, I recently discovered the simplest plan of attack that, in my opinion, is the most beautiful as well. Simple circles. The result is like cutting into a juicy steak, only sweeter. Doesn’t that plate just make you swoon for summer?!

Simple Slicing

Simple Slicing

Balsamic-Drizzled Watermelon Steak Topped
with Feta, Mint and Pistachios

Serves a watermelon sized party {all ingredients optional}

1 Seedless Watermelon
1/2-1 lb fresh goat’s milk feta  {NYC: Ardith Mae at the greenmarket is the best!}
1 bunch fresh mint, chopped
1/2-1 cup shelled pistachios, chopped
Good aged balsamic for drizzling
Maldon salt to taste

  1. Place the watermelon on its side — if it is more round in shape, slice a thin edge off the rind to create a flat surface that you can lay on the cutting board to avoid rolling.
  2. With a large chef’s knife slice into 1-inch thick circles and set aside.
  3. Lay each circle flat and take a small paring knife to slice around the circle where the melon meets the rind.
  4. Place each melon circle in the center of a plate, top with crumbled feta, chopped mint, chopped pistachios and a drizzle of balsamic. Add flaky salt to taste, if desired {will bring out the sweetness of the melon}.

More Summer Stars:
Fresh Lime-Margarita Marinated Watermelon
Pink Fizzy Lemonade Cocktails Beat the Heat
Avocado & Tropical Fruit Salsa 
Creole Roasted Fresh Corn-Tomato Salsa
Lime-Kissed Peach and Corn Summer Salad
The Ultimate Summer Slaw

6 Comments

Filed under @home {recipes to love}

recipe goodness :: spicy tomato-meyer lemon stewed chick peas

spicy tomato-meyer lemon stewed chick peas

spicy tomato-meyer lemon stewed chick peas

More from the book of “sometimes the best dishes come together when it’s 7pm, your stomach is talking to you, and you don’t have much to choose from in the fridge.” What I love about cooking with protein-rich chick peas is that you can always have them on hand in your cupboard, so when you’re in a pinch you can easily throw together a quick and filling dish. And because they have a great neutral flavor, chick peas can be canvases for any sort of creative seasoning you want to stew them in. After adding a little bit of this and a little bit of that, I think we have a winner worthy of sharing. It’s a little spicy {but you can adjust that to taste}, a little creamy {from the marriage of olive oil, butter and chick pea starch} and it’s brightened by a kiss of citrus. Simple flavors, uber delicious — and it only takes 5 minutes. Keep this one in mind for a crowd-pleasing side or a self-pleasing bowl of mid-week goodness.

Spicy Tomato-Meyer Lemon Stewed Chick Peas

Serves 1 as a main, 2 as a side

1 can chick peas, drained
1 teaspoon tomato paste
3 tablespoons olive oil
1 tablespoon butter
1 meyer lemon, juiced
1/4 teaspoon red pepper flakes
salt and pepper to taste
1 tablespoon fresh parsley, chopped

  1. Drain chick peas and add to a small saucepan with all the ingredients, except the parsley.
  2. Heat pot to low-medium and simmer lightly for 5 minutes, until liquid cooks down slightly and chick peas are warmed through.
  3. Pour into a bowl, top with maldon sea salt and chopped parsley.

Serve with: za’atar-pecorino toasted crostini

More Chicks to Fall in Love With…
B
arcelona Balsamic Chick Pea Salad
Lemon Herb Roasted Chicken
Some Like it HOT Pollo alla Diavola
Roasted Dijon Chicken Salad w/ Dried Cranberries & Sunflower Seeds

3 Comments

Filed under @home {recipes to love}

recipe goodness :: za’atar-pecorino toasted crostini

za'atar-pecorino crostini

za'atar-pecorino crostini

Sometimes the best things in food are created by opening your cupboards and blindly grabbing one ingredient with your right hand and another with your left. I love crostini — I think it’s the answer to any last minute appetizer need or the way to add a crunchy bite to a smooth bowl of soup or stew.

When I was experimenting with my balsamic and fish stew, I thought anyone without dentures might appreciate something with a different texture to round out their bowl. So with a few swipes of butter, a grating or two of pecorino and a sprinkle of za’atar {a spice mixture I think everyone should have in their cupboards}, this tasty little crostini came to life and proved worthy of sharing with you all. Who needs Stella D’Oro when you can make these from scratch in under 5 minutes.

Za’atar-Pecorino Crostini

1 fresh baguette
butter or olive oil for spreading
pecorino for grating
za’atar spice for sprinkling

  1. Heat oven to 450° F.
  2. Slice the baguette at a 45 degree angle, cutting as many pieces as you think will suit  your crowd {I underestimated their popularity, so ended up making a second batch — plan wisely!}
  3. Spread butter or brush olive oil on each piece to lightly coat. Using a microplane, zest pecorino on top of each crostini. Take a pinch of za’atar and sprinkle on top of the pecorino.
  4. Place all the crostini on a baking sheet and bake in the oven 5-8 minutes or until the cheese is slightly melted and the breaded is lightly toasted.
  5. Serve with soup, stew, roast chicken, fish, brisket, braised rabbit, whatever your heart desires!

Crostini Partners in Crime:
Grandma’s Italian Wedding Chicken Soup
Wild Child Broccoflower and Celery Root Soup

Homemade Gnocchi and Sauce: Channeling My Italian Grandmother
Lemon Herb Roasted Chicken
Spicy Balsamic and Fennel Fish Stew

3 Comments

Filed under @home {recipes to love}

recipe goodness :: spicy balsamic and fennel fish stew

Spicy Balsamic and Fennel Fish Stew

Spicy Balsamic and Fennel Fish Stew

When most people think of stews, they think of hours of braising meat and heavy, fill-your-belly bowls of wintry goodness. Can a stew be made quickly and with a lightness that still satisfies the desire for deep flavor complexity? The answer is yes. Enter the fish stew.

This recent creation received a table full of ooohs and aaahs and pleas for seconds, so next time you’re looking for an inspired mid-week meal, visit your local fishmonger and produce-stand and stew it up. Why is this such a praise-worthy recipe? The combination of subtle spice {which you can add to if you prefer more} with the sweet balsamic and fennel really hits on all those taste buds and takes the mild fish to a new level. Bonus: the fish only takes 3-4 minutes to cook and is added at the end, so you can easily make the base of the sauce ahead of time, leave in a covered pot, and reheat just prior to dinner, bringing a great meal together in a matter of minutes. Dare I say it’s healthy too? Nah, who really cares about that.

Spicy Balsamic and Fennel Fish Stew

Serves 8 | 40-50 minutes total time

1 carrot, diced
1 celery stalk, diced
1/2 fennel bulb, diced, frawns reserved
1 red onion, diced
2 cloves garlic, minced
3 tablespoons olive oil
1/2 cup white wine
1 28 oz can diced tomatoes
3/4 can of water
1 teaspoon anchovy paste
1/2 teaspoon cayenne pepper
salt and pepper to taste
2 lbs flounder, skin and bones removed {or other white fish}
2 cups rice {I used brown for more flavor}
Aged balsamic for drizzling
Fennel frawns for garnish

  1. Dice all your veg, setting aside the garlic to add later. Heat oil in a large stock pot or dutch oven over medium heat and add carrots, celery, fennel, red onion, cooking 10-15 minutes until tender and not brown {lower heat or add more oil if starts to brown}.
  2. Prepare your rice according to package instructions in a separate pot.
  3. After the veg cooks for 10-15 minutes, add garlic and a little more oil if pot is dry. Cook 2-3 minutes to release the garlic fragrance.
  4. Add white wine and let simmer 3-5 minutes. Turn heat to high and add the diced tomatoes and fill the can 3/4 full with water to add as well.
  5. Season with anchovy paste, cayenne, salt and pepper to taste. Bring to a boil, then lower to a simmer for 20-30 minutes uncovered, reducing the amount of liquid by about 1/4. Once the sauce is thicker, taste and add additional seasoning as desired. Note: you can make the sauce ahead of time up until this point and reheat prior to adding the fish, making this a quick meal that can be prepared in minutes.
  6. Slice each fish filet into 2-inch wide strips. Season with salt and pepper and add to the simmering sauce. Fish will cook fairly quickly, so check a piece after 3-4 minutes to make sure it is firm and no longer translucent in the middle.
  7. Add a generous scoop of rice to the bottom of a bowl, top with fish stew, drizzle lightly with aged balsamic and top with chopped fennel frawns. Enjoy!
Home-Tested, 8.ate@eight Approved

Chock Full of Flavorful Veg

Fish Stew

Wintry Wonders:
Best Butternut Squash and Green Apple Soup
Grandma’s Italian Wedding Chicken Soup
Wild Child Broccoflower and Celery Root Soup

Braised Grass-Fed Beef Brisket and Polenta
Irish Steak & Guinness Puff Pastry Pie

Leave a comment

Filed under @home {recipes to love}

recipe goodness :: wild child broccoflower and celery root soup

Broccoflower Celery Root Soup

Broccoflower Celery Root Soup

I recently tried a soup from food52’s Genius Recipe series that promised preparation simplicity with unsuspected flavor complexity. The soup only has three main ingredients, one of which is water, with the other two being cauliflower and onion. Immediate reaction: plain peasant soup? But if you trust in Paul Bertolli {of Chez Panisse and Oliveto}, you will quickly realize the genius in this preparation creates a smooth, slightly sweet, creamy blend you would swear had a fair dose of artery-damaging cream. It does not.

So after making and happily consuming several batches of Paul’s cauliflower soup, I decided to apply his technique to other favorite wintry veg and see if the results were equally outstanding. Enter the wild child broccoflower — an offspring of the marriage between broccoli and cauliflower, it has the subtle broccoli flavor with the hearty cauliflower architecture. I decided to also throw in some celery root for it’s unique flavor that I thought would add an additional brightness to the bowl. Result? Success round two.

Bright Green Broccoflower

Bright Green Broccoflower

Wild Child Broccoflower and Celery Root Winter Soup

Adapted from Paul Bertolli’s Cauliflower Soup | Serves 8

3 Tablespoons Olive Oil
1 medium yellow onion, sliced thinly
1 head broccoflower, broken into florets
1 celery root bulb, peeled and sliced thinly
Salt to taste
6 cups water, divided
Extra virgin olive oil
Freshly ground black pepper

  1. Warm the olive oil in a heavy-bottomed pan. Sweat the onion in the olive oil over low heat without letting it brown for 15 minutes.
  2. Add the broccoflower, celery root, salt to taste, and 1/2 cup water. Raise the heat slightly, cover the pot tightly and stew for 15 to 18 minutes, or until tender. Then add another 4 1/2 cups hot water, bring to a low simmer and cook an additional 20 minutes uncovered.
  3. Working in batches, purée the soup in a blender to a very smooth, creamy consistency {or use an immersion blender in the pot, being careful not to let hot soup splash onto you}. Let the soup stand for 20 minutes. In this time it will thicken slightly.
  4. Thin the soup with 1/2-1 cup hot water. Reheat the soup. Serve hot, drizzled with a thin stream of extra-virgin olive oil and freshly ground black pepper.
Steam the Broccoflower Florets and Celery Root

Steam the Broccoflower Florets and Celery Root

Brrrrrrrring on Other Warming Wintry Dishes:
Best Butternut Squash and Green Apple Soup
Grandma’s Italian Wedding Chicken Soup

Braised Grass-Fed Beef Brisket and Polenta
Irish Steak & Guinness Puff Pastry Pie 

Leave a comment

Filed under @home {recipes to love}

recipe goodness :: bursting brussels sprouts with pancetta-clementine reduction

Pan-Roasted Brussels Sprouts with Pancetta-Orange Reduction

Pan-Roasted Brussels Sprouts with Pancetta-Orange Reduction

I can’t take credit for creating this recipe {my brother is the mastermind behind this one}, but I can attest to its deliciousness. There has been a brussels sprouts revolution over that past few years — this once polarizing veg, although cute, was often the recipient of turned up noses. Perhaps because they have the reputation of being boiled to death until taking on a soggy, grey characteristic that would have anyone using their napkin as a disposal system.

But these beautifully bright green mini-cabbages can carry some outstanding flavors when prepared properly — and by properly, I don’t mean to imply this is difficult. A little pancetta or bacon goodness, some brightening citrus and a few minutes in a pan to marry all the flavors in a caramelization collision and you have yourself a healthy, colorful side that is worthy of any dinner party.

Pancetta Rendering

Pancetta Rendering

Brussels Sprouts with Pancetta-Clementine Reduction

Serves 4 | 15-20 minutes

1/3 lb pancetta, diced
2 small shallots, sliced
1.5 lbs brussels sprouts
1/2 cup fresh clementine juice + zest {can use oranges too}
Salt and pepper to taste
Pine nuts to garnish

  1.  Cut pancetta into 1/4-inch cubes and cook on low heat in a large pan to slowly render the fat, ~5-10 minutes.
  2. Meanwhile, wash and halve brussels sprouts, removing any hard stem from the bottom. Remove skin from shallots and slice into rings.
  3. Once pancetta starts to firm and fat becomes slightly translucent, add the shallots and cook until tender. Then add the sprouts to the pan, raise the heat to medium and season with salt and pepper {start light on the salt as the pancetta is salty and you can always add more to taste}. Cook an additional 5-7 minutes until the sprouts start to brown on the edges and become slightly tender, stirring occasionally.
  4. Squeeze and zest clementines and add to the pan, stirring to coat. Allow to cook 3-5 minutes to reduce juice and warm through.
  5. Taste and add additional salt, pepper or juice as desired. Add to a bowl and top with pine nuts.

Complete My Dinner:
Flaky Cheese Straws, As Easy As Being Barefoot
Giada’s Sweet & Sour Pork Chops
Farro Salad with Steamed Kale and Roasted Pinenuts 

2 Comments

Filed under @home {recipes to love}

recipe goodness :: homemade ricotta and melted leeks — the easiest winning appetizer you MUST make

Homemade Ricotta

Homemade Ricotta

I don’t typically like to tell people what to do. But I’m going to tell you — and you’re going to listen to me — you must make this NOW. Sure, I get a little more experimental in the kitchen than most, but when I tell you this will have you channeling your inner Italian Grandmother with ease and will also have you wanting to make fresh ricotta everyday, I hope you believe me. The beauty of this recipe is 1) how easy it is, 2) how proud you will be that you made YOUR OWN ricotta, and 3) it will have your guests ooh-ing and aah-ing over this deceivingly perfect flavor combo — let’s face it, this is really just onions and milk we’re talking about. It happens to also be an extremely inexpensive way to create an impressive appetizer, so with the holidays around the corner let’s get curdling!

I’ve included a few other variations in case you want to serve this different ways at all your holiday line-ups {everything can be made ahead of time, so you can enjoy a cocktail instead of sweating over a hot oven}. Plus 1.5 lbs of ricotta will probably get you through 2-3 evenings, depending on the size of your crowd.

Homemade Ricotta 

Makes ~1 lb post-drained ricotta 

1 pint whole milk {I use Grazin’ Angus Acres}
1 cup heavy cream
3/4 cup cultured buttermilk
Maldon sea salt

Equipment:
Large 1 gallon+ pot {le creuset if you have one}
Cooking thermometer that reads to 200 degrees
Very fine cheesecloth or clean tea towel
String
Colander and large bowl

  1. Using a large 1 gallon+ stock pot {I use my le creuset} heat whole milk, cream, buttermilk and a few pinches of salt on medium heat until it comes to a light boil. Stir milk frequently to ensure bottom does not scorch.
  2. Boil milk for 2 minutes, stirring, then remove from the heat and let rest in the pot for 1 hour to let the curds form some more.
  3. Place a large colander over a large bowl in the sink. Line the colander with very fine cheese cloth or a clean white tea towel so edges hang over the edge of the colander.
  4. Slowly pour the curdled milk into the colander/cheesecloth, letting the whey pour through to the bowl below and keeping the curds in the cheesecloth. You can use the whey to soften the cheese later or simply discard.
  5. Lift the colander out of the bowl and grab the edges of the cheesecloth/towel together. Hold up and let drain for about 1 minute+ until the the ricotta reaches the consistency you desire.
  6. Note: I like to keep it a little creamy so it is easy to spread, but if it gets thicker than you desire, you can always pour a few tablespoons of milk {or the strained whey} back into the cheese to soften.
  7. When you’re ready to serve, season with maldon sea salt to taste and prepare any of the variations below or your own inspired pairing.
Appetizer Variations:

  • Serve with water crackers or garlic crostini {recipe below}
  • Top with warm melted leeks {recipe below}
  • Top with drizzled honey or your favorite chutney
  • Sprinkle with Maldon sea salt, a drizzle of good olive oil and fresh thyme, destemmed
p.s. you can also make this ricotta for Homemade Gnocchi and Sauce: Channeling My Italian Grandmother

Melted Leeks

1 bunch leeks
1 stick butter
Kosher salt

  1. Cut off and discard root end and half way up the firm green stems. Slice each leek in half lengthwise to expose inner layers. Add leek halves to a bowl of cold water to release dirt. Use your fingers to check and clean outer layers.
  2. Pat dry and place each leek half flat-side down on cutting board and cut into 1/4-inch thick half-circle slices.
  3. Melt butter in a large pan on low-medium heat {or the cleaned le creuset you just used for the ricotta} and add leeks.
  4. Slowly cook leeks in butter until tender, ~10-15 minutes. Turn heat down if they start to brown before they are soft. Add salt to taste.
  5. Serve immediately while warm with the ricotta on the side or place in an airtight container and reheat in the microwave for 20 seconds just before serving to soften butter.

Garlic-Rubbed Crostini

1 baguette
Olive Oil for brushing
1-2 garlic cloves

  1. Preheat oven to 400 degrees F.
  2. Slice baguette at a 45-degree angle, creating 1/4-inch thick slices.
  3. Place slices side by side on a baking sheet. Brush each piece with olive oil and place in oven for 10-15 minutes until toasted.
  4. Remove baking sheet and while the crostini are still hot, rub a whole garlic clove with 1-2 swipes on each piece of bread.
  5. Note: can be made ahead of time on the day you plan to serve and stored in an air-tight container or bag once cooled, until ready to serve.

1. Pour whole milk, cream and buttermilk into a large pot

2. Heat to 200 degrees F, or until it starts to boil, stirring frequently

2. Turn heat off and let rest for 1 hour

3/4. Pour ricotta into cheesecloth-lined colander over a large bowl in the sink. {Bowl shown next to the colander to show whey that runs through}

5. Gather edges of cloth and tie tightly with string, hanging to let drain ~1-2 minutes

6. Voila! Homemade Ricotta

Melted Leeks

3 Comments

Filed under @home {recipes to love}